<?xml version="1.0" encoding="utf-8"?>
<feed xmlns="http://www.w3.org/2005/Atom">
  <title>Starsky&#39;s Blog - 11zHexo</title>
  
  
  <link href="/atom.xml" rel="self"/>
  
  <link href="https://www.sun11.me/"/>
  <updated>2019-11-26T13:03:26.867Z</updated>
  <id>https://www.sun11.me/</id>
  
  <author>
    <name>Starsky Wong</name>
    
  </author>
  
  <generator uri="http://hexo.io/">Hexo</generator>
  
  <entry>
    <title>FCOS核心代码阅读笔记</title>
    <link href="https://www.sun11.me/blog/2019/fcos-core-code-note/"/>
    <id>https://www.sun11.me/blog/2019/fcos-core-code-note/</id>
    <published>2019-11-26T12:29:31.000Z</published>
    <updated>2019-11-26T13:03:26.867Z</updated>
    
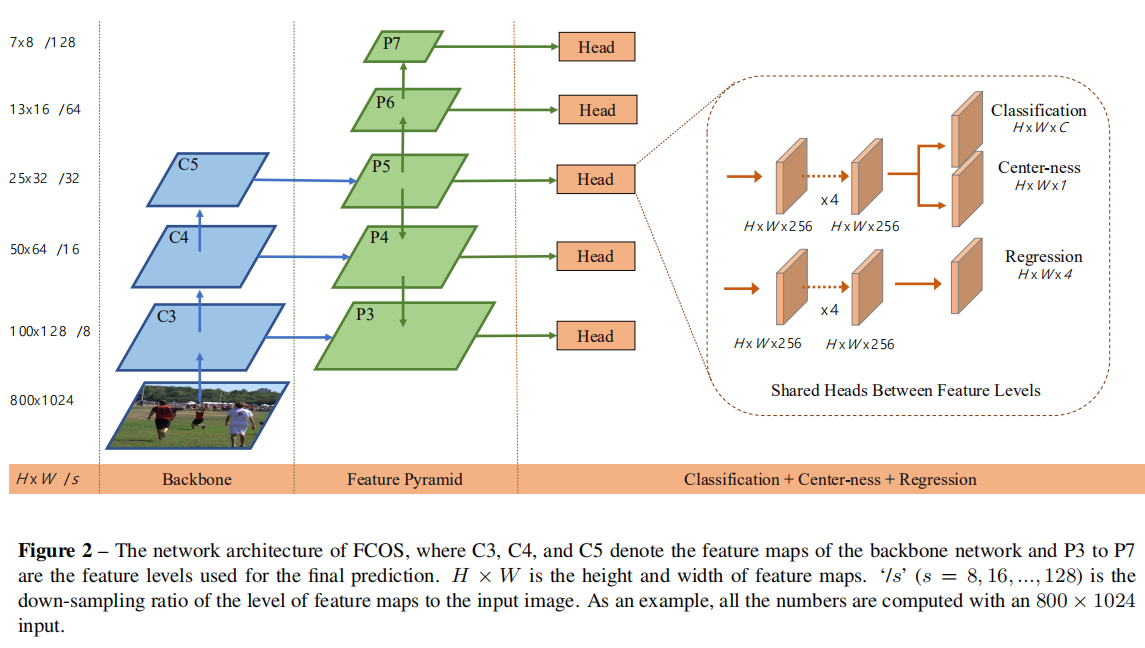
    <content type="html"><![CDATA[<h4 id="fcos-core-modeling-rpn-fcos-fcos-py"><a href="#fcos-core-modeling-rpn-fcos-fcos-py" class="headerlink" title="fcos_core/modeling/rpn/fcos/fcos.py"></a>fcos_core/modeling/rpn/fcos/fcos.py</h4><p>这个文件主要包括fcos的网络结构，包含三个loss: loss_cls, loss_reg, loss_centerness。</p><p><img src="/images/fcos-core-code-note/fcos_arch.png" alt="FCOS Architecture"></p><p>其中一个关键函数是<code>compute_locations</code>：</p><figure class="highlight python"><table><tr><td class="gutter"><pre><span class="line">1</span><br><span class="line">2</span><br><span class="line">3</span><br><span class="line">4</span><br><span class="line">5</span><br><span class="line">6</span><br><span class="line">7</span><br><span class="line">8</span><br><span class="line">9</span><br><span class="line">10</span><br><span class="line">11</span><br><span class="line">12</span><br><span class="line">13</span><br><span class="line">14</span><br><span class="line">15</span><br><span class="line">16</span><br><span class="line">17</span><br><span class="line">18</span><br><span class="line">19</span><br><span class="line">20</span><br><span class="line">21</span><br><span class="line">22</span><br><span class="line">23</span><br><span class="line">24</span><br><span class="line">25</span><br></pre></td><td class="code"><pre><span class="line"><span class="function"><span class="keyword">def</span> <span class="title">compute_locations</span><span class="params">(self, features)</span>:</span></span><br><span class="line">    locations = []</span><br><span class="line">    <span class="keyword">for</span> level, feature <span class="keyword">in</span> enumerate(features):</span><br><span class="line">        h, w = feature.size()[<span class="number">-2</span>:]</span><br><span class="line">        locations_per_level = self.compute_locations_per_level(</span><br><span class="line">            h, w, self.fpn_strides[level],</span><br><span class="line">            feature.device</span><br><span class="line">        )</span><br><span class="line">        locations.append(locations_per_level)</span><br><span class="line">    <span class="keyword">return</span> locations</span><br><span class="line"></span><br><span class="line"><span class="function"><span class="keyword">def</span> <span class="title">compute_locations_per_level</span><span class="params">(self, h, w, stride, device)</span>:</span></span><br><span class="line">    shifts_x = torch.arange(</span><br><span class="line">        <span class="number">0</span>, w * stride, step=stride,</span><br><span class="line">        dtype=torch.float32, device=device</span><br><span class="line">    )</span><br><span class="line">    shifts_y = torch.arange(</span><br><span class="line">        <span class="number">0</span>, h * stride, step=stride,</span><br><span class="line">        dtype=torch.float32, device=device</span><br><span class="line">    )</span><br><span class="line">    shift_y, shift_x = torch.meshgrid(shifts_y, shifts_x)</span><br><span class="line">    shift_x = shift_x.reshape(<span class="number">-1</span>)</span><br><span class="line">    shift_y = shift_y.reshape(<span class="number">-1</span>)</span><br><span class="line">    locations = torch.stack((shift_x, shift_y), dim=<span class="number">1</span>) + stride // <span class="number">2</span></span><br><span class="line">    <span class="keyword">return</span> locations</span><br></pre></td></tr></table></figure><p>对于fpn的5个特征图：P3，P4，P5，P6，P7，计算特征图上的点映射到原图的位置，即生成一个二维网格（meshgrid）。</p><p>上面代码的24行加上<code>stride // 2</code>是为了解决一个向下取整造成的问题，使原图上的对应点尽可能接近location(x,y)的感受野中心。</p><p>最后得到的locations是一个list，包含5个level特征图的所有点映射到原图的坐标。</p><a id="more"></a><h4 id="fcos-core-modeling-rpn-fcos-loss-py"><a href="#fcos-core-modeling-rpn-fcos-loss-py" class="headerlink" title="fcos_core/modeling/rpn/fcos/loss.py"></a>fcos_core/modeling/rpn/fcos/loss.py</h4><p>上述locations作为了prepare_targets函数的第一个参数。</p><figure class="highlight python"><table><tr><td class="gutter"><pre><span class="line">1</span><br><span class="line">2</span><br><span class="line">3</span><br><span class="line">4</span><br><span class="line">5</span><br><span class="line">6</span><br><span class="line">7</span><br><span class="line">8</span><br><span class="line">9</span><br><span class="line">10</span><br><span class="line">11</span><br><span class="line">12</span><br><span class="line">13</span><br><span class="line">14</span><br><span class="line">15</span><br><span class="line">16</span><br><span class="line">17</span><br><span class="line">18</span><br><span class="line">19</span><br><span class="line">20</span><br><span class="line">21</span><br><span class="line">22</span><br><span class="line">23</span><br><span class="line">24</span><br><span class="line">25</span><br><span class="line">26</span><br><span class="line">27</span><br><span class="line">28</span><br><span class="line">29</span><br><span class="line">30</span><br><span class="line">31</span><br><span class="line">32</span><br><span class="line">33</span><br><span class="line">34</span><br><span class="line">35</span><br><span class="line">36</span><br><span class="line">37</span><br><span class="line">38</span><br><span class="line">39</span><br><span class="line">40</span><br><span class="line">41</span><br><span class="line">42</span><br><span class="line">43</span><br><span class="line">44</span><br><span class="line">45</span><br><span class="line">46</span><br><span class="line">47</span><br><span class="line">48</span><br><span class="line">49</span><br><span class="line">50</span><br></pre></td><td class="code"><pre><span class="line"><span class="function"><span class="keyword">def</span> <span class="title">prepare_targets</span><span class="params">(self, points, targets)</span>:</span></span><br><span class="line">    object_sizes_of_interest = [</span><br><span class="line">        [<span class="number">-1</span>, <span class="number">64</span>],</span><br><span class="line">        [<span class="number">64</span>, <span class="number">128</span>],</span><br><span class="line">        [<span class="number">128</span>, <span class="number">256</span>],</span><br><span class="line">        [<span class="number">256</span>, <span class="number">512</span>],</span><br><span class="line">        [<span class="number">512</span>, INF],</span><br><span class="line">    ]</span><br><span class="line">    expanded_object_sizes_of_interest = []</span><br><span class="line">    <span class="keyword">for</span> l, points_per_level <span class="keyword">in</span> enumerate(points):</span><br><span class="line">        <span class="comment"># a.new_tensor has the same type with a</span></span><br><span class="line">        object_sizes_of_interest_per_level = \</span><br><span class="line">            points_per_level.new_tensor(object_sizes_of_interest[l])</span><br><span class="line">        expanded_object_sizes_of_interest.append(</span><br><span class="line">            object_sizes_of_interest_per_level[<span class="literal">None</span>].expand(len(points_per_level), <span class="number">-1</span>)</span><br><span class="line">        )</span><br><span class="line"></span><br><span class="line">    expanded_object_sizes_of_interest = torch.cat(expanded_object_sizes_of_interest, dim=<span class="number">0</span>)</span><br><span class="line">    num_points_per_level = [len(points_per_level) <span class="keyword">for</span> points_per_level <span class="keyword">in</span> points]</span><br><span class="line">    self.num_points_per_level = num_points_per_level</span><br><span class="line">    points_all_level = torch.cat(points, dim=<span class="number">0</span>)</span><br><span class="line">    <span class="comment"># shape: (P, N), (P, N, 4), P is the image nums</span></span><br><span class="line">    labels, reg_targets = self.compute_targets_for_locations(</span><br><span class="line">        points_all_level, targets, expanded_object_sizes_of_interest</span><br><span class="line">    )</span><br><span class="line"></span><br><span class="line">    <span class="comment"># labels[i] is a tuple</span></span><br><span class="line">    <span class="keyword">for</span> i <span class="keyword">in</span> range(len(labels)):</span><br><span class="line">        labels[i] = torch.split(labels[i], num_points_per_level, dim=<span class="number">0</span>)</span><br><span class="line">        reg_targets[i] = torch.split(reg_targets[i], num_points_per_level, dim=<span class="number">0</span>)</span><br><span class="line"></span><br><span class="line">    labels_level_first = []</span><br><span class="line">    reg_targets_level_first = []</span><br><span class="line">    <span class="comment"># labels_level_first[level] has P*N_level elements</span></span><br><span class="line">    <span class="comment"># reg_targets_level_first[level] has shape (P*N_level, 4)</span></span><br><span class="line">    <span class="keyword">for</span> level <span class="keyword">in</span> range(len(points)):</span><br><span class="line">        labels_level_first.append(</span><br><span class="line">            torch.cat([labels_per_im[level] <span class="keyword">for</span> labels_per_im <span class="keyword">in</span> labels], dim=<span class="number">0</span>)</span><br><span class="line">        )</span><br><span class="line"></span><br><span class="line">        reg_targets_per_level = torch.cat([</span><br><span class="line">            reg_targets_per_im[level]</span><br><span class="line">            <span class="keyword">for</span> reg_targets_per_im <span class="keyword">in</span> reg_targets</span><br><span class="line">        ], dim=<span class="number">0</span>)</span><br><span class="line"></span><br><span class="line">        <span class="keyword">if</span> self.norm_reg_targets:</span><br><span class="line">            reg_targets_per_level = reg_targets_per_level / self.fpn_strides[level]</span><br><span class="line">        reg_targets_level_first.append(reg_targets_per_level)</span><br><span class="line"></span><br><span class="line">    <span class="keyword">return</span> labels_level_first, reg_targets_level_first</span><br></pre></td></tr></table></figure><p>首先构造了一个expanded_object_sizes_of_interest变量，对于每一个采样点，都需要有一个对应的sizes_of_interest。expanded_object_sizes_of_interest按照每个level创建了该level所有采样点的sizes_of_interest，然后用torch.cat合并起来，形成了(N, 2)形状的数据，N为所有采样点的个数。</p><p>num_points_per_level是每个level的点个数，这个用于后续的操作。</p><p>points_all_level包含了所有采样点，跟expanded_object_sizes_of_interest类似，也用torch.cat合并，形成了(N, 2)的形状。</p><p>compute_targets_for_locations函数使用points_all_level, targets, expanded_object_sizes_of_interest计算分类和回归的标注即labels和reg_targets，形状为(P, N)和(P, N, 4)，P为图像数量。</p><p>compute_targets_for_locations函数得到的labels和reg_targets是把所有level的数据拼接在一起的。现在要根据每个level的点个数即num_points_per_level把他们拆开，按照level优先做成一个list。最后的结果是labels_level_first[level]，拥有<code>P*N_level</code>个元素。reg_targets_level_first[level]形状为<code>(P*N_level, 4)</code>，N_level为该level采样点的个数。</p><figure class="highlight python"><table><tr><td class="gutter"><pre><span class="line">1</span><br><span class="line">2</span><br><span class="line">3</span><br><span class="line">4</span><br><span class="line">5</span><br><span class="line">6</span><br><span class="line">7</span><br><span class="line">8</span><br><span class="line">9</span><br><span class="line">10</span><br><span class="line">11</span><br><span class="line">12</span><br><span class="line">13</span><br><span class="line">14</span><br><span class="line">15</span><br><span class="line">16</span><br><span class="line">17</span><br><span class="line">18</span><br><span class="line">19</span><br><span class="line">20</span><br><span class="line">21</span><br><span class="line">22</span><br><span class="line">23</span><br><span class="line">24</span><br><span class="line">25</span><br><span class="line">26</span><br><span class="line">27</span><br><span class="line">28</span><br><span class="line">29</span><br><span class="line">30</span><br><span class="line">31</span><br><span class="line">32</span><br><span class="line">33</span><br><span class="line">34</span><br><span class="line">35</span><br><span class="line">36</span><br><span class="line">37</span><br><span class="line">38</span><br><span class="line">39</span><br><span class="line">40</span><br><span class="line">41</span><br><span class="line">42</span><br><span class="line">43</span><br><span class="line">44</span><br><span class="line">45</span><br><span class="line">46</span><br><span class="line">47</span><br><span class="line">48</span><br><span class="line">49</span><br><span class="line">50</span><br><span class="line">51</span><br><span class="line">52</span><br><span class="line">53</span><br><span class="line">54</span><br><span class="line">55</span><br></pre></td><td class="code"><pre><span class="line"><span class="function"><span class="keyword">def</span> <span class="title">compute_targets_for_locations</span><span class="params">(self, locations, targets, object_sizes_of_interest)</span>:</span></span><br><span class="line">    labels = []</span><br><span class="line">    reg_targets = []</span><br><span class="line">    xs, ys = locations[:, <span class="number">0</span>], locations[:, <span class="number">1</span>]</span><br><span class="line"></span><br><span class="line">    <span class="keyword">for</span> im_i <span class="keyword">in</span> range(len(targets)):</span><br><span class="line">        targets_per_im = targets[im_i]</span><br><span class="line">        <span class="keyword">assert</span> targets_per_im.mode == <span class="string">"xyxy"</span></span><br><span class="line">        bboxes = targets_per_im.bbox</span><br><span class="line">        labels_per_im = targets_per_im.get_field(<span class="string">"labels"</span>)</span><br><span class="line">        area = targets_per_im.area()</span><br><span class="line"></span><br><span class="line">        l = xs[:, <span class="literal">None</span>] - bboxes[:, <span class="number">0</span>][<span class="literal">None</span>]</span><br><span class="line">        t = ys[:, <span class="literal">None</span>] - bboxes[:, <span class="number">1</span>][<span class="literal">None</span>]</span><br><span class="line">        r = bboxes[:, <span class="number">2</span>][<span class="literal">None</span>] - xs[:, <span class="literal">None</span>]</span><br><span class="line">        b = bboxes[:, <span class="number">3</span>][<span class="literal">None</span>] - ys[:, <span class="literal">None</span>]</span><br><span class="line">        <span class="comment"># shape: (N, M, 4)</span></span><br><span class="line">        reg_targets_per_im = torch.stack([l, t, r, b], dim=<span class="number">2</span>)</span><br><span class="line"></span><br><span class="line">        <span class="keyword">if</span> self.center_sampling_radius &gt; <span class="number">0</span>:</span><br><span class="line">            is_in_boxes = self.get_sample_region(</span><br><span class="line">                bboxes,</span><br><span class="line">                self.fpn_strides,</span><br><span class="line">                self.num_points_per_level,</span><br><span class="line">                xs, ys,</span><br><span class="line">                radius=self.center_sampling_radius</span><br><span class="line">            )</span><br><span class="line">        <span class="keyword">else</span>:</span><br><span class="line">            <span class="comment"># no center sampling, it will use all the locations within a ground-truth box</span></span><br><span class="line">            is_in_boxes = reg_targets_per_im.min(dim=<span class="number">2</span>)[<span class="number">0</span>] &gt; <span class="number">0</span></span><br><span class="line"></span><br><span class="line">        max_reg_targets_per_im = reg_targets_per_im.max(dim=<span class="number">2</span>)[<span class="number">0</span>]</span><br><span class="line">        <span class="comment"># limit the regression range for each location</span></span><br><span class="line">        is_cared_in_the_level = \</span><br><span class="line">            (max_reg_targets_per_im &gt;= object_sizes_of_interest[:, [<span class="number">0</span>]]) &amp; \</span><br><span class="line">            (max_reg_targets_per_im &lt;= object_sizes_of_interest[:, [<span class="number">1</span>]])</span><br><span class="line"></span><br><span class="line">        locations_to_gt_area = area[<span class="literal">None</span>].repeat(len(locations), <span class="number">1</span>)</span><br><span class="line">        locations_to_gt_area[is_in_boxes == <span class="number">0</span>] = INF</span><br><span class="line">        locations_to_gt_area[is_cared_in_the_level == <span class="number">0</span>] = INF</span><br><span class="line"></span><br><span class="line">        <span class="comment"># if there are still more than one objects for a location,</span></span><br><span class="line">        <span class="comment"># we choose the one with minimal area</span></span><br><span class="line"></span><br><span class="line">        <span class="comment"># shape (N)</span></span><br><span class="line">        locations_to_min_area, locations_to_gt_inds = locations_to_gt_area.min(dim=<span class="number">1</span>)</span><br><span class="line"></span><br><span class="line">        reg_targets_per_im = reg_targets_per_im[range(len(locations)), locations_to_gt_inds]</span><br><span class="line">        labels_per_im = labels_per_im[locations_to_gt_inds]</span><br><span class="line">        labels_per_im[locations_to_min_area == INF] = <span class="number">0</span></span><br><span class="line"></span><br><span class="line">        labels.append(labels_per_im)</span><br><span class="line">        reg_targets.append(reg_targets_per_im)</span><br><span class="line"></span><br><span class="line">    <span class="keyword">return</span> labels, reg_targets</span><br></pre></td></tr></table></figure><p>由于每张图像可能含有不同数量的bbox，所以先读取targets的labels和bbox，创建labels_per_im变量和reg_targets_per_im变量（形状为(N, M, 4)，N为所有采样点的个数，M为bbox数量）。</p><p>根据论文3.2节，不同尺度大小的bbox将被分配到不同的fpn level去计算，不在level对应范围的bbox将被忽略。这样操作之后若某一个采样点仍然对应到多个bbox，则取最小面积的bbox。fcos中的实现是把level对应范围之外的bbox面积设成无穷大，用locations_to_gt_area这个变量实现位置到gt中面积的映射，代码48行使reg_targets_per_im取到面积最小的bbox。同理每个采样点也有一个对应的类别，对于不在gt bbox的点类别设成背景。最终的labels_per_im形状为(N)，reg_targets_per_im形状为(N, 4)。</p><figure class="highlight python"><table><tr><td class="gutter"><pre><span class="line">1</span><br><span class="line">2</span><br><span class="line">3</span><br><span class="line">4</span><br><span class="line">5</span><br><span class="line">6</span><br><span class="line">7</span><br><span class="line">8</span><br><span class="line">9</span><br><span class="line">10</span><br><span class="line">11</span><br><span class="line">12</span><br><span class="line">13</span><br><span class="line">14</span><br><span class="line">15</span><br><span class="line">16</span><br><span class="line">17</span><br><span class="line">18</span><br><span class="line">19</span><br><span class="line">20</span><br><span class="line">21</span><br><span class="line">22</span><br><span class="line">23</span><br><span class="line">24</span><br><span class="line">25</span><br><span class="line">26</span><br><span class="line">27</span><br><span class="line">28</span><br><span class="line">29</span><br><span class="line">30</span><br><span class="line">31</span><br><span class="line">32</span><br><span class="line">33</span><br><span class="line">34</span><br><span class="line">35</span><br><span class="line">36</span><br><span class="line">37</span><br><span class="line">38</span><br><span class="line">39</span><br><span class="line">40</span><br><span class="line">41</span><br><span class="line">42</span><br><span class="line">43</span><br><span class="line">44</span><br><span class="line">45</span><br><span class="line">46</span><br><span class="line">47</span><br><span class="line">48</span><br><span class="line">49</span><br><span class="line">50</span><br><span class="line">51</span><br><span class="line">52</span><br><span class="line">53</span><br><span class="line">54</span><br><span class="line">55</span><br><span class="line">56</span><br><span class="line">57</span><br><span class="line">58</span><br><span class="line">59</span><br><span class="line">60</span><br><span class="line">61</span><br><span class="line">62</span><br><span class="line">63</span><br><span class="line">64</span><br><span class="line">65</span><br><span class="line">66</span><br><span class="line">67</span><br><span class="line">68</span><br><span class="line">69</span><br><span class="line">70</span><br><span class="line">71</span><br><span class="line">72</span><br><span class="line">73</span><br><span class="line">74</span><br><span class="line">75</span><br></pre></td><td class="code"><pre><span class="line"><span class="function"><span class="keyword">def</span> <span class="title">__call__</span><span class="params">(self, locations, box_cls, box_regression, centerness, targets)</span>:</span></span><br><span class="line">    <span class="string">"""</span></span><br><span class="line"><span class="string">    Arguments:</span></span><br><span class="line"><span class="string">        locations (list[Tensor])</span></span><br><span class="line"><span class="string">        box_cls (list[Tensor])</span></span><br><span class="line"><span class="string">        box_regression (list[Tensor])</span></span><br><span class="line"><span class="string">        centerness (list[Tensor])</span></span><br><span class="line"><span class="string">        targets (list[BoxList])</span></span><br><span class="line"><span class="string"></span></span><br><span class="line"><span class="string">    Returns:</span></span><br><span class="line"><span class="string">        cls_loss (Tensor)</span></span><br><span class="line"><span class="string">        reg_loss (Tensor)</span></span><br><span class="line"><span class="string">        centerness_loss (Tensor)</span></span><br><span class="line"><span class="string">    """</span></span><br><span class="line">    N = box_cls[<span class="number">0</span>].size(<span class="number">0</span>)</span><br><span class="line">    num_classes = box_cls[<span class="number">0</span>].size(<span class="number">1</span>)</span><br><span class="line">    labels, reg_targets = self.prepare_targets(locations, targets)</span><br><span class="line"></span><br><span class="line">    box_cls_flatten = []</span><br><span class="line">    box_regression_flatten = []</span><br><span class="line">    centerness_flatten = []</span><br><span class="line">    labels_flatten = []</span><br><span class="line">    reg_targets_flatten = []</span><br><span class="line">    <span class="keyword">for</span> l <span class="keyword">in</span> range(len(labels)):</span><br><span class="line">        box_cls_flatten.append(box_cls[l].permute(<span class="number">0</span>, <span class="number">2</span>, <span class="number">3</span>, <span class="number">1</span>).reshape(<span class="number">-1</span>, num_classes))</span><br><span class="line">        box_regression_flatten.append(box_regression[l].permute(<span class="number">0</span>, <span class="number">2</span>, <span class="number">3</span>, <span class="number">1</span>).reshape(<span class="number">-1</span>, <span class="number">4</span>))</span><br><span class="line">        labels_flatten.append(labels[l].reshape(<span class="number">-1</span>))</span><br><span class="line">        reg_targets_flatten.append(reg_targets[l].reshape(<span class="number">-1</span>, <span class="number">4</span>))</span><br><span class="line">        centerness_flatten.append(centerness[l].reshape(<span class="number">-1</span>))</span><br><span class="line"></span><br><span class="line">    box_cls_flatten = torch.cat(box_cls_flatten, dim=<span class="number">0</span>)</span><br><span class="line">    box_regression_flatten = torch.cat(box_regression_flatten, dim=<span class="number">0</span>)</span><br><span class="line">    centerness_flatten = torch.cat(centerness_flatten, dim=<span class="number">0</span>)</span><br><span class="line">    labels_flatten = torch.cat(labels_flatten, dim=<span class="number">0</span>)</span><br><span class="line">    reg_targets_flatten = torch.cat(reg_targets_flatten, dim=<span class="number">0</span>)</span><br><span class="line"></span><br><span class="line">    pos_inds = torch.nonzero(labels_flatten &gt; <span class="number">0</span>).squeeze(<span class="number">1</span>)</span><br><span class="line"></span><br><span class="line">    box_regression_flatten = box_regression_flatten[pos_inds]</span><br><span class="line">    reg_targets_flatten = reg_targets_flatten[pos_inds]</span><br><span class="line">    centerness_flatten = centerness_flatten[pos_inds]</span><br><span class="line"></span><br><span class="line">    num_gpus = get_num_gpus()</span><br><span class="line">    <span class="comment"># sync num_pos from all gpus</span></span><br><span class="line">    total_num_pos = reduce_sum(pos_inds.new_tensor([pos_inds.numel()])).item()</span><br><span class="line">    num_pos_avg_per_gpu = max(total_num_pos / float(num_gpus), <span class="number">1.0</span>)</span><br><span class="line"></span><br><span class="line">    cls_loss = self.cls_loss_func(</span><br><span class="line">        box_cls_flatten,</span><br><span class="line">        labels_flatten.int()</span><br><span class="line">    ) / num_pos_avg_per_gpu</span><br><span class="line"></span><br><span class="line">    <span class="keyword">if</span> pos_inds.numel() &gt; <span class="number">0</span>:</span><br><span class="line">        centerness_targets = self.compute_centerness_targets(reg_targets_flatten)</span><br><span class="line"></span><br><span class="line">        <span class="comment"># average sum_centerness_targets from all gpus,</span></span><br><span class="line">        <span class="comment"># which is used to normalize centerness-weighed reg loss</span></span><br><span class="line">        sum_centerness_targets_avg_per_gpu = \</span><br><span class="line">            reduce_sum(centerness_targets.sum()).item() / float(num_gpus)</span><br><span class="line"></span><br><span class="line">        reg_loss = self.box_reg_loss_func(</span><br><span class="line">            box_regression_flatten,</span><br><span class="line">            reg_targets_flatten,</span><br><span class="line">            centerness_targets</span><br><span class="line">        ) / sum_centerness_targets_avg_per_gpu</span><br><span class="line">        centerness_loss = self.centerness_loss_func(</span><br><span class="line">            centerness_flatten,</span><br><span class="line">            centerness_targets</span><br><span class="line">        ) / num_pos_avg_per_gpu</span><br><span class="line">    <span class="keyword">else</span>:</span><br><span class="line">        reg_loss = box_regression_flatten.sum()</span><br><span class="line">        reduce_sum(centerness_flatten.new_tensor([<span class="number">0.0</span>]))</span><br><span class="line">        centerness_loss = centerness_flatten.sum()</span><br><span class="line"></span><br><span class="line">    <span class="keyword">return</span> cls_loss, reg_loss, centerness_loss</span><br></pre></td></tr></table></figure><h4 id="fcos-core-modeling-rpn-fcos-inference-py"><a href="#fcos-core-modeling-rpn-fcos-inference-py" class="headerlink" title="fcos_core/modeling/rpn/fcos/inference.py"></a>fcos_core/modeling/rpn/fcos/inference.py</h4><figure class="highlight python"><table><tr><td class="gutter"><pre><span class="line">1</span><br><span class="line">2</span><br><span class="line">3</span><br><span class="line">4</span><br><span class="line">5</span><br><span class="line">6</span><br><span class="line">7</span><br><span class="line">8</span><br><span class="line">9</span><br><span class="line">10</span><br><span class="line">11</span><br><span class="line">12</span><br><span class="line">13</span><br><span class="line">14</span><br><span class="line">15</span><br><span class="line">16</span><br><span class="line">17</span><br><span class="line">18</span><br><span class="line">19</span><br><span class="line">20</span><br><span class="line">21</span><br><span class="line">22</span><br><span class="line">23</span><br><span class="line">24</span><br><span class="line">25</span><br><span class="line">26</span><br><span class="line">27</span><br><span class="line">28</span><br><span class="line">29</span><br><span class="line">30</span><br><span class="line">31</span><br><span class="line">32</span><br><span class="line">33</span><br><span class="line">34</span><br><span class="line">35</span><br><span class="line">36</span><br><span class="line">37</span><br><span class="line">38</span><br><span class="line">39</span><br><span class="line">40</span><br><span class="line">41</span><br><span class="line">42</span><br><span class="line">43</span><br><span class="line">44</span><br><span class="line">45</span><br><span class="line">46</span><br><span class="line">47</span><br><span class="line">48</span><br><span class="line">49</span><br><span class="line">50</span><br><span class="line">51</span><br><span class="line">52</span><br><span class="line">53</span><br><span class="line">54</span><br><span class="line">55</span><br><span class="line">56</span><br><span class="line">57</span><br><span class="line">58</span><br><span class="line">59</span><br><span class="line">60</span><br><span class="line">61</span><br><span class="line">62</span><br><span class="line">63</span><br><span class="line">64</span><br><span class="line">65</span><br><span class="line">66</span><br></pre></td><td class="code"><pre><span class="line"><span class="function"><span class="keyword">def</span> <span class="title">forward_for_single_feature_map</span><span class="params">(</span></span></span><br><span class="line"><span class="function"><span class="params">            self, locations, box_cls,</span></span></span><br><span class="line"><span class="function"><span class="params">            box_regression, centerness,</span></span></span><br><span class="line"><span class="function"><span class="params">            image_sizes)</span>:</span></span><br><span class="line">        <span class="string">"""</span></span><br><span class="line"><span class="string">        Arguments:</span></span><br><span class="line"><span class="string">            anchors: list[BoxList]</span></span><br><span class="line"><span class="string">            box_cls: tensor of size N, A * C, H, W</span></span><br><span class="line"><span class="string">            box_regression: tensor of size N, A * 4, H, W</span></span><br><span class="line"><span class="string">        """</span></span><br><span class="line">        N, C, H, W = box_cls.shape</span><br><span class="line"></span><br><span class="line">        <span class="comment"># put in the same format as locations</span></span><br><span class="line">        box_cls = box_cls.view(N, C, H, W).permute(<span class="number">0</span>, <span class="number">2</span>, <span class="number">3</span>, <span class="number">1</span>)</span><br><span class="line">        box_cls = box_cls.reshape(N, <span class="number">-1</span>, C).sigmoid()</span><br><span class="line">        box_regression = box_regression.view(N, <span class="number">4</span>, H, W).permute(<span class="number">0</span>, <span class="number">2</span>, <span class="number">3</span>, <span class="number">1</span>)</span><br><span class="line">        box_regression = box_regression.reshape(N, <span class="number">-1</span>, <span class="number">4</span>)</span><br><span class="line">        centerness = centerness.view(N, <span class="number">1</span>, H, W).permute(<span class="number">0</span>, <span class="number">2</span>, <span class="number">3</span>, <span class="number">1</span>)</span><br><span class="line">        centerness = centerness.reshape(N, <span class="number">-1</span>).sigmoid()</span><br><span class="line"></span><br><span class="line">        candidate_inds = box_cls &gt; self.pre_nms_thresh</span><br><span class="line">        pre_nms_top_n = candidate_inds.view(N, <span class="number">-1</span>).sum(<span class="number">1</span>)</span><br><span class="line">        pre_nms_top_n = pre_nms_top_n.clamp(max=self.pre_nms_top_n)</span><br><span class="line"></span><br><span class="line">        <span class="comment"># multiply the classification scores with centerness scores</span></span><br><span class="line">        box_cls = box_cls * centerness[:, :, <span class="literal">None</span>]</span><br><span class="line"></span><br><span class="line">        results = []</span><br><span class="line">        <span class="keyword">for</span> i <span class="keyword">in</span> range(N):</span><br><span class="line">            per_box_cls = box_cls[i]</span><br><span class="line">            per_candidate_inds = candidate_inds[i]</span><br><span class="line">            per_box_cls = per_box_cls[per_candidate_inds]</span><br><span class="line"></span><br><span class="line">            per_candidate_nonzeros = per_candidate_inds.nonzero()</span><br><span class="line">            per_box_loc = per_candidate_nonzeros[:, <span class="number">0</span>]</span><br><span class="line">            per_class = per_candidate_nonzeros[:, <span class="number">1</span>] + <span class="number">1</span></span><br><span class="line"></span><br><span class="line">            per_box_regression = box_regression[i]</span><br><span class="line">            per_box_regression = per_box_regression[per_box_loc]</span><br><span class="line">            per_locations = locations[per_box_loc]</span><br><span class="line"></span><br><span class="line">            per_pre_nms_top_n = pre_nms_top_n[i]</span><br><span class="line"></span><br><span class="line">            <span class="keyword">if</span> per_candidate_inds.sum().item() &gt; per_pre_nms_top_n.item():</span><br><span class="line">                per_box_cls, top_k_indices = \</span><br><span class="line">                    per_box_cls.topk(per_pre_nms_top_n, sorted=<span class="literal">False</span>)</span><br><span class="line">                per_class = per_class[top_k_indices]</span><br><span class="line">                per_box_regression = per_box_regression[top_k_indices]</span><br><span class="line">                per_locations = per_locations[top_k_indices]</span><br><span class="line"></span><br><span class="line">            detections = torch.stack([</span><br><span class="line">                per_locations[:, <span class="number">0</span>] - per_box_regression[:, <span class="number">0</span>],</span><br><span class="line">                per_locations[:, <span class="number">1</span>] - per_box_regression[:, <span class="number">1</span>],</span><br><span class="line">                per_locations[:, <span class="number">0</span>] + per_box_regression[:, <span class="number">2</span>],</span><br><span class="line">                per_locations[:, <span class="number">1</span>] + per_box_regression[:, <span class="number">3</span>],</span><br><span class="line">            ], dim=<span class="number">1</span>)</span><br><span class="line"></span><br><span class="line">            h, w = image_sizes[i]</span><br><span class="line">            boxlist = BoxList(detections, (int(w), int(h)), mode=<span class="string">"xyxy"</span>)</span><br><span class="line">            boxlist.add_field(<span class="string">"labels"</span>, per_class)</span><br><span class="line">            boxlist.add_field(<span class="string">"scores"</span>, torch.sqrt(per_box_cls))</span><br><span class="line">            boxlist = boxlist.clip_to_image(remove_empty=<span class="literal">False</span>)</span><br><span class="line">            boxlist = remove_small_boxes(boxlist, self.min_size)</span><br><span class="line">            results.append(boxlist)</span><br><span class="line"></span><br><span class="line">        <span class="keyword">return</span> results</span><br></pre></td></tr></table></figure><p>这个文件主要完成推理阶段的操作，forward_for_single_feature_map对每个fpn level的结果做后处理。</p><p>网络输出的box_cls, box_regression, centerness和locations作为输入，由pre_nms_thresh取阈值，得到大于阈值的点的索引candidate_inds。</p><p>对pre_nms_top_n做clamp操作使其最大值为self.pre_nms_top_n，也就是最多保留这么多个点。如果candidate_inds求和（即保留的点数量）大于pre_nms_top_n，则保留box_cls, class, box_regression, locations的top_k个结果。最后把结果添加到boxlist的结构中。</p><figure class="highlight python"><table><tr><td class="gutter"><pre><span class="line">1</span><br><span class="line">2</span><br><span class="line">3</span><br><span class="line">4</span><br><span class="line">5</span><br><span class="line">6</span><br><span class="line">7</span><br><span class="line">8</span><br><span class="line">9</span><br><span class="line">10</span><br><span class="line">11</span><br><span class="line">12</span><br><span class="line">13</span><br><span class="line">14</span><br><span class="line">15</span><br><span class="line">16</span><br><span class="line">17</span><br><span class="line">18</span><br><span class="line">19</span><br><span class="line">20</span><br></pre></td><td class="code"><pre><span class="line"><span class="function"><span class="keyword">def</span> <span class="title">select_over_all_levels</span><span class="params">(self, boxlists)</span>:</span></span><br><span class="line">    num_images = len(boxlists)</span><br><span class="line">    results = []</span><br><span class="line">    <span class="keyword">for</span> i <span class="keyword">in</span> range(num_images):</span><br><span class="line">        <span class="comment"># multiclass nms</span></span><br><span class="line">        result = boxlist_ml_nms(boxlists[i], self.nms_thresh)</span><br><span class="line">        number_of_detections = len(result)</span><br><span class="line"></span><br><span class="line">        <span class="comment"># Limit to max_per_image detections **over all classes**</span></span><br><span class="line">        <span class="keyword">if</span> number_of_detections &gt; self.fpn_post_nms_top_n &gt; <span class="number">0</span>:</span><br><span class="line">            cls_scores = result.get_field(<span class="string">"scores"</span>)</span><br><span class="line">            image_thresh, _ = torch.kthvalue(</span><br><span class="line">                cls_scores.cpu(),</span><br><span class="line">                number_of_detections - self.fpn_post_nms_top_n + <span class="number">1</span></span><br><span class="line">            )</span><br><span class="line">            keep = cls_scores &gt;= image_thresh.item()</span><br><span class="line">            keep = torch.nonzero(keep).squeeze(<span class="number">1</span>)</span><br><span class="line">            result = result[keep]</span><br><span class="line">        results.append(result)</span><br><span class="line">    <span class="keyword">return</span> results</span><br></pre></td></tr></table></figure><p>select_over_all_levels对刚才的所有level的结果做nms（C++实现），然后取得分最高的fpn_post_nms_top_n个检测结果，使用<code>torch.kthvalue</code>得到cls_scores的阈值。</p><h4 id="参考资料"><a href="#参考资料" class="headerlink" title="参考资料"></a>参考资料</h4><p><a href="https://arxiv.org/abs/1904.01355" target="_blank" rel="noopener">[Paper]</a> <a href="https://github.com/tianzhi0549/FCOS/" target="_blank" rel="noopener">[Code]</a> Tian, Zhi, et al. “FCOS: Fully Convolutional One-Stage Object Detection.” arXiv preprint arXiv:1904.01355 (2019). </p>]]></content>
    
    <summary type="html">
    
      &lt;h4 id=&quot;fcos-core-modeling-rpn-fcos-fcos-py&quot;&gt;&lt;a href=&quot;#fcos-core-modeling-rpn-fcos-fcos-py&quot; class=&quot;headerlink&quot; title=&quot;fcos_core/modeling/rpn/fcos/fcos.py&quot;&gt;&lt;/a&gt;fcos_core/modeling/rpn/fcos/fcos.py&lt;/h4&gt;&lt;p&gt;这个文件主要包括fcos的网络结构，包含三个loss: loss_cls, loss_reg, loss_centerness。&lt;/p&gt;
&lt;p&gt;&lt;img src=&quot;/images/fcos-core-code-note/fcos_arch.png&quot; alt=&quot;FCOS Architecture&quot;&gt;&lt;/p&gt;
&lt;p&gt;其中一个关键函数是&lt;code&gt;compute_locations&lt;/code&gt;：&lt;/p&gt;
&lt;figure class=&quot;highlight python&quot;&gt;&lt;table&gt;&lt;tr&gt;&lt;td class=&quot;gutter&quot;&gt;&lt;pre&gt;&lt;span class=&quot;line&quot;&gt;1&lt;/span&gt;&lt;br&gt;&lt;span class=&quot;line&quot;&gt;2&lt;/span&gt;&lt;br&gt;&lt;span class=&quot;line&quot;&gt;3&lt;/span&gt;&lt;br&gt;&lt;span class=&quot;line&quot;&gt;4&lt;/span&gt;&lt;br&gt;&lt;span class=&quot;line&quot;&gt;5&lt;/span&gt;&lt;br&gt;&lt;span class=&quot;line&quot;&gt;6&lt;/span&gt;&lt;br&gt;&lt;span class=&quot;line&quot;&gt;7&lt;/span&gt;&lt;br&gt;&lt;span class=&quot;line&quot;&gt;8&lt;/span&gt;&lt;br&gt;&lt;span class=&quot;line&quot;&gt;9&lt;/span&gt;&lt;br&gt;&lt;span class=&quot;line&quot;&gt;10&lt;/span&gt;&lt;br&gt;&lt;span class=&quot;line&quot;&gt;11&lt;/span&gt;&lt;br&gt;&lt;span class=&quot;line&quot;&gt;12&lt;/span&gt;&lt;br&gt;&lt;span class=&quot;line&quot;&gt;13&lt;/span&gt;&lt;br&gt;&lt;span class=&quot;line&quot;&gt;14&lt;/span&gt;&lt;br&gt;&lt;span class=&quot;line&quot;&gt;15&lt;/span&gt;&lt;br&gt;&lt;span class=&quot;line&quot;&gt;16&lt;/span&gt;&lt;br&gt;&lt;span class=&quot;line&quot;&gt;17&lt;/span&gt;&lt;br&gt;&lt;span class=&quot;line&quot;&gt;18&lt;/span&gt;&lt;br&gt;&lt;span class=&quot;line&quot;&gt;19&lt;/span&gt;&lt;br&gt;&lt;span class=&quot;line&quot;&gt;20&lt;/span&gt;&lt;br&gt;&lt;span class=&quot;line&quot;&gt;21&lt;/span&gt;&lt;br&gt;&lt;span class=&quot;line&quot;&gt;22&lt;/span&gt;&lt;br&gt;&lt;span class=&quot;line&quot;&gt;23&lt;/span&gt;&lt;br&gt;&lt;span class=&quot;line&quot;&gt;24&lt;/span&gt;&lt;br&gt;&lt;span class=&quot;line&quot;&gt;25&lt;/span&gt;&lt;br&gt;&lt;/pre&gt;&lt;/td&gt;&lt;td class=&quot;code&quot;&gt;&lt;pre&gt;&lt;span class=&quot;line&quot;&gt;&lt;span class=&quot;function&quot;&gt;&lt;span class=&quot;keyword&quot;&gt;def&lt;/span&gt; &lt;span class=&quot;title&quot;&gt;compute_locations&lt;/span&gt;&lt;span class=&quot;params&quot;&gt;(self, features)&lt;/span&gt;:&lt;/span&gt;&lt;/span&gt;&lt;br&gt;&lt;span class=&quot;line&quot;&gt;    locations = []&lt;/span&gt;&lt;br&gt;&lt;span class=&quot;line&quot;&gt;    &lt;span class=&quot;keyword&quot;&gt;for&lt;/span&gt; level, feature &lt;span class=&quot;keyword&quot;&gt;in&lt;/span&gt; enumerate(features):&lt;/span&gt;&lt;br&gt;&lt;span class=&quot;line&quot;&gt;        h, w = feature.size()[&lt;span class=&quot;number&quot;&gt;-2&lt;/span&gt;:]&lt;/span&gt;&lt;br&gt;&lt;span class=&quot;line&quot;&gt;        locations_per_level = self.compute_locations_per_level(&lt;/span&gt;&lt;br&gt;&lt;span class=&quot;line&quot;&gt;            h, w, self.fpn_strides[level],&lt;/span&gt;&lt;br&gt;&lt;span class=&quot;line&quot;&gt;            feature.device&lt;/span&gt;&lt;br&gt;&lt;span class=&quot;line&quot;&gt;        )&lt;/span&gt;&lt;br&gt;&lt;span class=&quot;line&quot;&gt;        locations.append(locations_per_level)&lt;/span&gt;&lt;br&gt;&lt;span class=&quot;line&quot;&gt;    &lt;span class=&quot;keyword&quot;&gt;return&lt;/span&gt; locations&lt;/span&gt;&lt;br&gt;&lt;span class=&quot;line&quot;&gt;&lt;/span&gt;&lt;br&gt;&lt;span class=&quot;line&quot;&gt;&lt;span class=&quot;function&quot;&gt;&lt;span class=&quot;keyword&quot;&gt;def&lt;/span&gt; &lt;span class=&quot;title&quot;&gt;compute_locations_per_level&lt;/span&gt;&lt;span class=&quot;params&quot;&gt;(self, h, w, stride, device)&lt;/span&gt;:&lt;/span&gt;&lt;/span&gt;&lt;br&gt;&lt;span class=&quot;line&quot;&gt;    shifts_x = torch.arange(&lt;/span&gt;&lt;br&gt;&lt;span class=&quot;line&quot;&gt;        &lt;span class=&quot;number&quot;&gt;0&lt;/span&gt;, w * stride, step=stride,&lt;/span&gt;&lt;br&gt;&lt;span class=&quot;line&quot;&gt;        dtype=torch.float32, device=device&lt;/span&gt;&lt;br&gt;&lt;span class=&quot;line&quot;&gt;    )&lt;/span&gt;&lt;br&gt;&lt;span class=&quot;line&quot;&gt;    shifts_y = torch.arange(&lt;/span&gt;&lt;br&gt;&lt;span class=&quot;line&quot;&gt;        &lt;span class=&quot;number&quot;&gt;0&lt;/span&gt;, h * stride, step=stride,&lt;/span&gt;&lt;br&gt;&lt;span class=&quot;line&quot;&gt;        dtype=torch.float32, device=device&lt;/span&gt;&lt;br&gt;&lt;span class=&quot;line&quot;&gt;    )&lt;/span&gt;&lt;br&gt;&lt;span class=&quot;line&quot;&gt;    shift_y, shift_x = torch.meshgrid(shifts_y, shifts_x)&lt;/span&gt;&lt;br&gt;&lt;span class=&quot;line&quot;&gt;    shift_x = shift_x.reshape(&lt;span class=&quot;number&quot;&gt;-1&lt;/span&gt;)&lt;/span&gt;&lt;br&gt;&lt;span class=&quot;line&quot;&gt;    shift_y = shift_y.reshape(&lt;span class=&quot;number&quot;&gt;-1&lt;/span&gt;)&lt;/span&gt;&lt;br&gt;&lt;span class=&quot;line&quot;&gt;    locations = torch.stack((shift_x, shift_y), dim=&lt;span class=&quot;number&quot;&gt;1&lt;/span&gt;) + stride // &lt;span class=&quot;number&quot;&gt;2&lt;/span&gt;&lt;/span&gt;&lt;br&gt;&lt;span class=&quot;line&quot;&gt;    &lt;span class=&quot;keyword&quot;&gt;return&lt;/span&gt; locations&lt;/span&gt;&lt;br&gt;&lt;/pre&gt;&lt;/td&gt;&lt;/tr&gt;&lt;/table&gt;&lt;/figure&gt;
&lt;p&gt;对于fpn的5个特征图：P3，P4，P5，P6，P7，计算特征图上的点映射到原图的位置，即生成一个二维网格（meshgrid）。&lt;/p&gt;
&lt;p&gt;上面代码的24行加上&lt;code&gt;stride // 2&lt;/code&gt;是为了解决一个向下取整造成的问题，使原图上的对应点尽可能接近location(x,y)的感受野中心。&lt;/p&gt;
&lt;p&gt;最后得到的locations是一个list，包含5个level特征图的所有点映射到原图的坐标。&lt;/p&gt;
    
    </summary>
    
    
      <category term="CV" scheme="https://www.sun11.me/tags/CV/"/>
    
  </entry>
  
  <entry>
    <title>How to use 10,582 trainaug images on DeeplabV3 code?</title>
    <link href="https://www.sun11.me/blog/2018/how-to-use-10582-trainaug-images-on-DeeplabV3-code/"/>
    <id>https://www.sun11.me/blog/2018/how-to-use-10582-trainaug-images-on-DeeplabV3-code/</id>
    <published>2018-03-16T15:57:00.000Z</published>
    <updated>2019-07-20T02:59:45.726Z</updated>
    
    <content type="html"><![CDATA[<p>You know what I mean if you have experience on training segmentation network models on <a href="http://host.robots.ox.ac.uk:8080/pascal/VOC/" target="_blank" rel="noopener">Pascal VOC dataset</a>. The dataset only provides 1464 pixel-level image annotations for training. But every paper uses 10,582 images for training, which is usually called <code>trainaug</code>. The additional annotations are from <a href="http://home.bharathh.info/pubs/codes/SBD/download.html" target="_blank" rel="noopener">SBD</a>, but the annotation format is not the same as Pascal VOC. Fortunately <a href="https://github.com/DrSleep/tensorflow-deeplab-resnet" target="_blank" rel="noopener">someone</a> has already made a converted version, which is <a href="https://www.dropbox.com/s/oeu149j8qtbs1x0/SegmentationClassAug.zip?dl=0" target="_blank" rel="noopener">SegmentationClassAug</a>.</p><p><a href="https://github.com/tensorflow/models/tree/master/research/deeplab" target="_blank" rel="noopener">DeeplabV3 code</a> do not contain SBD annotations for some reasons that we can understand. So I wrote a simple script to solve this.</p><p><strong>To use 10,582 trainaug images on DeeplabV3 code, you just need to do the following steps:</strong></p><p><strong>1. Create a script named <code>convert_voc2012_aug.sh</code>.</strong></p><figure class="highlight sh"><table><tr><td class="gutter"><pre><span class="line">1</span><br><span class="line">2</span><br><span class="line">3</span><br><span class="line">4</span><br><span class="line">5</span><br><span class="line">6</span><br><span class="line">7</span><br><span class="line">8</span><br><span class="line">9</span><br><span class="line">10</span><br><span class="line">11</span><br><span class="line">12</span><br><span class="line">13</span><br><span class="line">14</span><br><span class="line">15</span><br><span class="line">16</span><br><span class="line">17</span><br><span class="line">18</span><br><span class="line">19</span><br><span class="line">20</span><br><span class="line">21</span><br><span class="line">22</span><br><span class="line">23</span><br><span class="line">24</span><br><span class="line">25</span><br><span class="line">26</span><br><span class="line">27</span><br><span class="line">28</span><br><span class="line">29</span><br><span class="line">30</span><br><span class="line">31</span><br><span class="line">32</span><br><span class="line">33</span><br><span class="line">34</span><br><span class="line">35</span><br><span class="line">36</span><br><span class="line">37</span><br><span class="line">38</span><br><span class="line">39</span><br><span class="line">40</span><br><span class="line">41</span><br><span class="line">42</span><br></pre></td><td class="code"><pre><span class="line"><span class="comment"># Exit immediately if a command exits with a non-zero status.</span></span><br><span class="line"><span class="built_in">set</span> -e</span><br><span class="line"></span><br><span class="line">CURRENT_DIR=$(<span class="built_in">pwd</span>)</span><br><span class="line">WORK_DIR=<span class="string">"./pascal_voc_seg"</span></span><br><span class="line">mkdir -p <span class="variable">$&#123;WORK_DIR&#125;</span></span><br><span class="line"></span><br><span class="line"><span class="built_in">cd</span> <span class="variable">$&#123;WORK_DIR&#125;</span></span><br><span class="line">tar -xf <span class="string">"../VOCtrainval_11-May-2012.tar"</span></span><br><span class="line">cp <span class="string">"../trainaug.txt"</span> <span class="string">"./VOCdevkit/VOC2012/ImageSets/Segmentation"</span></span><br><span class="line">unzip <span class="string">"../SegmentationClassAug.zip"</span> -d <span class="string">"./VOCdevkit/VOC2012"</span></span><br><span class="line">rm -r <span class="string">"./VOCdevkit/VOC2012/__MACOSX"</span></span><br><span class="line"></span><br><span class="line"><span class="built_in">cd</span> <span class="variable">$&#123;CURRENT_DIR&#125;</span></span><br><span class="line"></span><br><span class="line"><span class="comment"># Root path for PASCAL VOC 2012 dataset.</span></span><br><span class="line">PASCAL_ROOT=<span class="string">"<span class="variable">$&#123;WORK_DIR&#125;</span>/VOCdevkit/VOC2012"</span></span><br><span class="line"></span><br><span class="line"><span class="comment"># Remove the colormap in the ground truth annotations.</span></span><br><span class="line">SEG_FOLDER=<span class="string">"<span class="variable">$&#123;PASCAL_ROOT&#125;</span>/SegmentationClassAug"</span></span><br><span class="line">SEMANTIC_SEG_FOLDER=<span class="string">"<span class="variable">$&#123;PASCAL_ROOT&#125;</span>/SegmentationClassAugRaw"</span></span><br><span class="line"></span><br><span class="line"><span class="built_in">echo</span> <span class="string">"Removing the color map in ground truth annotations..."</span></span><br><span class="line">python ./remove_gt_colormap.py \</span><br><span class="line">  --original_gt_folder=<span class="string">"<span class="variable">$&#123;SEG_FOLDER&#125;</span>"</span> \</span><br><span class="line">  --output_dir=<span class="string">"<span class="variable">$&#123;SEMANTIC_SEG_FOLDER&#125;</span>"</span></span><br><span class="line"></span><br><span class="line"><span class="comment"># Build TFRecords of the dataset.</span></span><br><span class="line"><span class="comment"># First, create output directory for storing TFRecords.</span></span><br><span class="line">OUTPUT_DIR=<span class="string">"<span class="variable">$&#123;WORK_DIR&#125;</span>/tfrecord"</span></span><br><span class="line">mkdir -p <span class="string">"<span class="variable">$&#123;OUTPUT_DIR&#125;</span>"</span></span><br><span class="line"></span><br><span class="line">IMAGE_FOLDER=<span class="string">"<span class="variable">$&#123;PASCAL_ROOT&#125;</span>/JPEGImages"</span></span><br><span class="line">LIST_FOLDER=<span class="string">"<span class="variable">$&#123;PASCAL_ROOT&#125;</span>/ImageSets/Segmentation"</span></span><br><span class="line"></span><br><span class="line"><span class="built_in">echo</span> <span class="string">"Converting PASCAL VOC 2012 dataset..."</span></span><br><span class="line">python ./build_voc2012_data.py \</span><br><span class="line">  --image_folder=<span class="string">"<span class="variable">$&#123;IMAGE_FOLDER&#125;</span>"</span> \</span><br><span class="line">  --semantic_segmentation_folder=<span class="string">"<span class="variable">$&#123;SEMANTIC_SEG_FOLDER&#125;</span>"</span> \</span><br><span class="line">  --list_folder=<span class="string">"<span class="variable">$&#123;LIST_FOLDER&#125;</span>"</span> \</span><br><span class="line">  --image_format=<span class="string">"jpg"</span> \</span><br><span class="line">  --output_dir=<span class="string">"<span class="variable">$&#123;OUTPUT_DIR&#125;</span>"</span></span><br></pre></td></tr></table></figure><p><strong>2. Create a txt file named <code>trainaug.txt</code> with <a href="https://gist.githubusercontent.com/sun11/2dbda6b31acc7c6292d14a872d0c90b7/raw/5f5a5270089239ef2f6b65b1cc55208355b5acca/trainaug.txt" target="_blank" rel="noopener">this content</a>.</strong></p><p><strong>3. Download <a href="http://host.robots.ox.ac.uk/pascal/VOC/voc2012/VOCtrainval_11-May-2012.tar" target="_blank" rel="noopener">Pascal VOC dataset</a> and <a href="https://www.dropbox.com/s/oeu149j8qtbs1x0/SegmentationClassAug.zip?dl=0" target="_blank" rel="noopener">SegmentationClassAug annotations</a>.</strong></p><p><strong>4. Put all of them (</strong>‘convert_voc2012_aug.sh’<strong>, </strong>‘trainaug.txt’<strong>, </strong>‘VOCtrainval_11-May-2012.tar’<strong>, </strong>‘SegmentationClassAug.zip’<strong>) to the <code>research/deeplab/datasets</code> folder.</strong></p><p><strong>5. Execute <code>convert_voc2012_aug.sh</code> (give it execute permission) in <code>research/deeplab/datasets</code>.</strong></p><p><strong>6. Change the code in <code>research/deeplab/datasets/segmentation_dataset.py</code> from:</strong></p><figure class="highlight python"><table><tr><td class="gutter"><pre><span class="line">1</span><br><span class="line">2</span><br><span class="line">3</span><br><span class="line">4</span><br><span class="line">5</span><br><span class="line">6</span><br><span class="line">7</span><br><span class="line">8</span><br><span class="line">9</span><br></pre></td><td class="code"><pre><span class="line">_PASCAL_VOC_SEG_INFORMATION = DatasetDescriptor(</span><br><span class="line">    splits_to_sizes=&#123;</span><br><span class="line">        <span class="string">'train'</span>: <span class="number">1464</span>,</span><br><span class="line">        <span class="string">'trainval'</span>: <span class="number">2913</span>,</span><br><span class="line">        <span class="string">'val'</span>: <span class="number">1449</span>,</span><br><span class="line">    &#125;,</span><br><span class="line">    num_classes=<span class="number">21</span>,</span><br><span class="line">    ignore_label=<span class="number">255</span>,</span><br><span class="line">)</span><br></pre></td></tr></table></figure><p><strong>to:</strong></p><figure class="highlight python"><table><tr><td class="gutter"><pre><span class="line">1</span><br><span class="line">2</span><br><span class="line">3</span><br><span class="line">4</span><br><span class="line">5</span><br><span class="line">6</span><br><span class="line">7</span><br><span class="line">8</span><br><span class="line">9</span><br><span class="line">10</span><br></pre></td><td class="code"><pre><span class="line">_PASCAL_VOC_SEG_INFORMATION = DatasetDescriptor(</span><br><span class="line">    splits_to_sizes=&#123;</span><br><span class="line">        <span class="string">'train'</span>: <span class="number">1464</span>,</span><br><span class="line">        <span class="string">'trainaug'</span>: <span class="number">10582</span>,</span><br><span class="line">        <span class="string">'trainval'</span>: <span class="number">2913</span>,</span><br><span class="line">        <span class="string">'val'</span>: <span class="number">1449</span>,</span><br><span class="line">    &#125;,</span><br><span class="line">    num_classes=<span class="number">21</span>,</span><br><span class="line">    ignore_label=<span class="number">255</span>,</span><br><span class="line">)</span><br></pre></td></tr></table></figure><p><strong>7. Don’t forget to change the <code>train_split</code> parameter in <code>research/deeplab/train.py</code> to <code>trainaug</code>.</strong></p>]]></content>
    
    <summary type="html">


        &lt;p&gt;You know what I mean if you have experience on training segmentation network models on &lt;a href=&quot;http://host.robots.ox.ac.uk:8080/pascal/V
      
    
    </summary>
    
    
      <category term="Tensorflow" scheme="https://www.sun11.me/tags/Tensorflow/"/>
    
      <category term="Segmentation" scheme="https://www.sun11.me/tags/Segmentation/"/>
    
  </entry>
  
  <entry>
    <title>解决数据集导致的大内存占用和磁盘IO问题</title>
    <link href="https://www.sun11.me/blog/2017/fix-dataset-caused-high-memory-usage-and-disk-io/"/>
    <id>https://www.sun11.me/blog/2017/fix-dataset-caused-high-memory-usage-and-disk-io/</id>
    <published>2017-03-15T10:26:42.000Z</published>
    <updated>2019-07-20T02:59:45.728Z</updated>
    
    <content type="html"><![CDATA[<p>看到Ubuntu上的磁盘IO和内存占用出奇的高，忍无可忍，决定必须解决一下了。</p><p>内存占用最高的是chrome和gvfsd-metadata，前者1.6G没办法，后者竟然有1.8G。查了一下<a href="https://en.wikipedia.org/wiki/GVfs" target="_blank" rel="noopener">维基百科</a>：</p><blockquote><p>gvfsd-metadata is a daemon acting as a write serialiser to the internal gvfs metadata storage. It is autostarted by GIO clients when they make metadata changes. Read operations are done by client-side GIO code directly, and don’t require the daemon to be running. The gvfs metadata capabilities are used by the GNOME Files file manager, for example.</p></blockquote><p>虽然仍然没搞懂它是个什么东西，但是罪魁祸首就是它没跑了，形成的原因大概是我打开过很多大的数据集的文件夹，比如pascal voc、shapenet、pascal3d，要是还有imagenet就更恐怖了。从<a href="https://ubuntuforums.org/showthread.php?t=1421580" target="_blank" rel="noopener">这个帖子</a>来看，它还导致了100%的CPU占用。后面给出了临时的解决办法：</p><pre><code>rm -rf ~/.local/share/gvfs-metadatapkill gvfsd-metadata</code></pre><p>如果这种情况继续出现，那么直接按照<a href="https://bugs.launchpad.net/ubuntu/+source/gvfs/+bug/517021/comments/92" target="_blank" rel="noopener">这里</a>所说取消<code>gvfsd-metadata</code>的执行权限即可：<code>sudo chmod -x /usr/lib/gvfs/gvfsd-metadata</code>。</p><p>另外，iowait也达到了27%左右，我只不过开了个sublime-text而已。原因仍然是数据集，有好几个<code>sublime_text --crawl</code>的进程在不停地读磁盘，给文件做索引。这些数据集的文件格式大多是图片，所以只要按照<a href="http://stackoverflow.com/questions/29260350/sublimetext-3-using-100-cpu-stuck-while-processing-file" target="_blank" rel="noopener">这个帖子</a>给sublime-text的配置加上：</p><pre><code>&quot;folder_exclude_patterns&quot;: [&quot;.svn&quot;, &quot;.git&quot;, &quot;.hg&quot;, &quot;CVS&quot;, &quot;node_modules/*&quot;],&quot;binary_file_patterns&quot;: [&quot;*.mat&quot;,&quot;*.jpg&quot;, &quot;*.jpeg&quot;, &quot;*.png&quot;, &quot;*.gif&quot;, &quot;*.ttf&quot;, &quot;*.tga&quot;, &quot;*.dds&quot;, &quot;*.ico&quot;, &quot;*.eot&quot;, &quot;*.pdf&quot;, &quot;*.swf&quot;, &quot;*.jar&quot;, &quot;*.zip&quot;],</code></pre><p>问题就解决了。</p><p>不过对于ShapeNet这样的仍然没有办法==，所以最好还是避免用sublime-text打开带有数据集的文件夹（这种需要却并不少见，因为用软链接方便）。</p>]]></content>
    
    <summary type="html">


        &lt;p&gt;看到Ubuntu上的磁盘IO和内存占用出奇的高，忍无可忍，决定必须解决一下了。&lt;/p&gt;
&lt;p&gt;内存占用最高的是chrome和gvfsd-metadata，前者1.6G没办法，后者竟然有1.8G。查了一下&lt;a href=&quot;https://en.wikipedia.org/wi
      
    
    </summary>
    
    
      <category term="Linux" scheme="https://www.sun11.me/tags/Linux/"/>
    
      <category term="Ubuntu" scheme="https://www.sun11.me/tags/Ubuntu/"/>
    
  </entry>
  
  <entry>
    <title>How to make linemod and KinectV2 work with ROS Indigo?</title>
    <link href="https://www.sun11.me/blog/2016/howto-linemod-kinectv2-indigo/"/>
    <id>https://www.sun11.me/blog/2016/howto-linemod-kinectv2-indigo/</id>
    <published>2016-09-05T03:10:16.000Z</published>
    <updated>2019-07-20T02:59:45.726Z</updated>
    
    <content type="html"><![CDATA[<p>I’m using Ubuntu 14.04.5 with ROS Indigo, and I want to make ork work with linemod, a fairly simple need. But sometimes if some packages are not maintained well (especially in ROS), you have to investigate the problem and even to contribute code to the project…</p><p>Following the <a href="http://wg-perception.github.io/object_recognition_core/install.html#install" target="_blank" rel="noopener">installation guide</a> to install ork is very simple, don’t forget to install <a href="http://wg-perception.github.io/object_recognition_core/infrastructure/couch.html#object-recognition-core-db" target="_blank" rel="noopener">couchdb</a>. Building from source is the only choice now, you have to modify the code to make it work as you wish.</p><p>In my case, tabletop method works well with KinectV1, even with KinectV2(but only the hd resolution config worked). However, linemod caused a huge memory leak, nearly 1GB/s, and it didn’t publish /recognized_object_array topic. At the beginning I thought it is the problem is in linemod, but it turned out to be in ork_renderer. A <a href="https://groups.google.com/d/msg/object-recognition-kitchen/aS9YlKJxOnc/du_7gXpxDwAJ" target="_blank" rel="noopener">thread</a> in <a href="https://groups.google.com/forum/#!forum/object-recognition-kitchen" target="_blank" rel="noopener">ORK Google Group</a> said,</p><blockquote><p>Currently LINEMOD uses ork_renderer for its training phase. ork_renderer uses either GLUT or osmesa to generate synthetic images of the training data. It seems that the ork_renderer in your computer is linked to osmesa.</p></blockquote><p>Fortunately now we just can change CMakeLists.txt to use GLUT. Just change <code>option(USE_GLUT &quot;Use GLUT instead of OSMesa&quot; OFF)</code> to <code>option(USE_GLUT &quot;Use GLUT instead of OSMesa&quot; ON)</code>.</p><p><strong>Update</strong>: Now I just use the version from <a href="https://github.com/JimmyDaSilva/linemod/tree/fix_glut" target="_blank" rel="noopener">JimmyDaSilva</a> but not the official wg-perception.</p><p>But the current linemod version still have some problem related to assimp_devel, it seems the developer is working on it, you have to revert linemod to the previous version(35aebd).</p><p>So I just created a repo <a href="https://github.com/sun11/ork" target="_blank" rel="noopener">here</a> to make the whole thing work. When linemod is training it will show a assimp window, but it do not contain anything in my case, not a serious problem, linemod works anyway with KinectV1, but not with KinectV2, because KinectV2 has a special resolution, causing an OpenCV error in linearMemoryPyramid. Fortunately again <a href="https://github.com/wg-perception/linemod/issues/28" target="_blank" rel="noopener">an awesome guy has worked it out</a>, and he also fixed many other issues. I need to use KinectV2 in my work, so I followed <a href="https://github.com/wg-perception/linemod/issues/28#issuecomment-200927751" target="_blank" rel="noopener">this guy’s modification</a> and successfully made it work on KinectV2 with QHD resolution. If you want to use SD resolution, you can <code>set T={2,4}</code> in <code>linemod_detect.cpp</code> and <code>renderer_width: 512 renderer_height: 424</code> in <code>training.ork</code> as <a href="https://github.com/wg-perception/linemod/issues/28#issuecomment-200927751" target="_blank" rel="noopener">JimmyDaSilva said</a>. </p><p>This <a href="https://github.com/sun11/ork" target="_blank" rel="noopener">ork repo</a> integrated all of them, just to make it easier to work on ork, maybe for myself in the future.</p><p>Tips:</p><ul><li>If you used linemod to train, you’d better delete the whole object_recognition database in CouchDB.</li><li>Using <code>coke.stl</code> is simpler, using <code>coke.obj</code> with texture will get a better result.</li><li>When training linemod, make sure you are in the folder which contains the obj, mtl and image files.</li></ul>]]></content>
    
    <summary type="html">


        &lt;p&gt;I’m using Ubuntu 14.04.5 with ROS Indigo, and I want to make ork work with linemod, a fairly simple need. But sometimes if some packages 
      
    
    </summary>
    
    
      <category term="ROS" scheme="https://www.sun11.me/tags/ROS/"/>
    
      <category term="OpenCV" scheme="https://www.sun11.me/tags/OpenCV/"/>
    
      <category term="Linux" scheme="https://www.sun11.me/tags/Linux/"/>
    
  </entry>
  
  <entry>
    <title>多系统多头单尾的工作环境</title>
    <link href="https://www.sun11.me/blog/2016/multi-os-multi-head-single-tail-workspace/"/>
    <id>https://www.sun11.me/blog/2016/multi-os-multi-head-single-tail-workspace/</id>
    <published>2016-08-08T13:07:49.000Z</published>
    <updated>2019-07-20T02:59:45.728Z</updated>
    
    <content type="html"><![CDATA[<p>我总会有一些 <strong>奇怪</strong> 的工作环境需求。比如因为很多软件只有Windows能用，我需要一台Windows，然而工作上的软件又运行在Ubuntu下，可能出于其它原因你甚至还需要一台Mac。除此以外，单个屏幕显然是不够用的，双显示器是必须的，其实三台显示器或许才够用，不过加上一台笔记本我的桌面几乎放不下了。<del>实验室也不会给我辣么多显示器。。。</del></p><p>而且，我还要在所有屏幕所有主机上共享一套鼠标和键盘！还要共享剪贴板，让文本可以直接从一个系统复制粘贴到另一个系统！</p><p>由于我有时用到自带屏幕的笔记本，我还需要有时台式机接双显示器，有时笔记本自带屏幕加一台显示器做双屏！</p><p>经过一番折腾，上述奇怪的需求全都实现了。这可以叫做多系统、多头、单尾的工作环境。5年前B哥的<a href="https://bigeagle.me/2011/04/multihead/" target="_blank" rel="noopener">这篇文章</a>第一次让我知道了计算机的<code>头</code>和<code>尾</code>。</p><p>Synergy是一个通过局域网实现的鼠标键盘共享软件。然而作为一个开源软件，它的下载竟然是收费的！虽然开源软件收费并不是什么坏事，然而开源软件本身是开源的，只要自己能编译出来或者使用别人编译的程序似乎也不违规？我对它的盈利模式深表怀疑。。。而且，Synergy也有Nightly Build是可以搜到的，也就是说你·根·本·就·可·以·免·费·下载到最新的版本（不过可能不够稳定）。</p><p>我尝试了Synergy的很多个版本，发现并不是很稳定，而且如果服务器和客户端是不同的版本会有不兼容的问题。最后找了一个老的版本以<code>Daemon/Windows服务</code>的形式运行，大概图形界面就是罪魁祸首吧，我也懒得去确定最新版本用这种方式能否稳定工作了。</p><a id="more"></a><p>所需硬件：</p><ul><li>两台显示器</li><li>一台台式机</li><li>一台笔记本</li><li>VGA切换器和若干线</li><li>局域网环境</li></ul><p>所需软件：</p><ul><li>Synergy</li></ul><p>Windows Synergy 1.6.2 <a href="http://down.tech.sina.com.cn/content/50073.html" target="_blank" rel="noopener">http://down.tech.sina.com.cn/content/50073.html</a></p><p>Ubuntu Synergy 1.6.2 <a href="https://launchpad.net/ubuntu/+source/synergy/1.6.2-0ubuntu1" target="_blank" rel="noopener">https://launchpad.net/ubuntu/+source/synergy/1.6.2-0ubuntu1</a></p><p>我把Windows用作客户端，Ubuntu作为服务器。不过Ubuntu的这个版本原本是给Vivid，即15.04用的，它需要4.9版本的g++，而我用的是Ubuntu 14.04，g++版本是4.8。那么，就装一个：</p><pre><code>sudo add-apt-repository ppa:ubuntu-toolchain-r/testsudo apt-get updatesudo apt-get install g++-4.9</code></pre><p>配置不多说，有图形界面，调一下hostname和显示器摆放位置就行了。调好配置文件保存一下，在/usr/share/lightdm/lightdm.conf.d/50-ubuntu.conf中加入：</p><pre><code>greeter-setup-script=/usr/bin/synergys -c &lt;CONFIG FILE&gt;</code></pre><p>这样，只要启动还未登录时鼠标和键盘就能共享了。</p><p>Windows客户端配置就更简单了，安装完就有synergy的系统服务。不过最好不要开图形界面，一开似乎就是运行了多个synergy，端口冲突，需要重新启动服务。</p><p>至于显示器的切换，我是在某宝上买了一个VGA切换器。其实某宝上还有卖鼠标键盘共享加多显示器切换的KVM切换器，但通过按按键让鼠标和键盘随显示器从一台主机切换到另一台主机更适合于多主机单头单尾的情况，而且听卖家说必须要接上两个主机供电，对于我来说显然用Synergy和VGA切换器更好一些。</p><p>台式机连接一台固定的显示器，另外抽一根VGA线连到切换器的输入，笔记本也连一根VGA线到切换器的输入，然后切换器输出VGA线连上的显示器就能用切换器上的按键切换主机了。Done。</p><p>（从右边屏幕Windows打开的pdf里复制一段代码移到左边屏幕Ubuntu的终端里粘贴执行，你知道这是多么巨大的工作效率提升么？！！！）</p>]]></content>
    
    <summary type="html">
    
      &lt;p&gt;我总会有一些 &lt;strong&gt;奇怪&lt;/strong&gt; 的工作环境需求。比如因为很多软件只有Windows能用，我需要一台Windows，然而工作上的软件又运行在Ubuntu下，可能出于其它原因你甚至还需要一台Mac。除此以外，单个屏幕显然是不够用的，双显示器是必须的，其实三台显示器或许才够用，不过加上一台笔记本我的桌面几乎放不下了。&lt;del&gt;实验室也不会给我辣么多显示器。。。&lt;/del&gt;&lt;/p&gt;
&lt;p&gt;而且，我还要在所有屏幕所有主机上共享一套鼠标和键盘！还要共享剪贴板，让文本可以直接从一个系统复制粘贴到另一个系统！&lt;/p&gt;
&lt;p&gt;由于我有时用到自带屏幕的笔记本，我还需要有时台式机接双显示器，有时笔记本自带屏幕加一台显示器做双屏！&lt;/p&gt;
&lt;p&gt;经过一番折腾，上述奇怪的需求全都实现了。这可以叫做多系统、多头、单尾的工作环境。5年前B哥的&lt;a href=&quot;https://bigeagle.me/2011/04/multihead/&quot; target=&quot;_blank&quot; rel=&quot;noopener&quot;&gt;这篇文章&lt;/a&gt;第一次让我知道了计算机的&lt;code&gt;头&lt;/code&gt;和&lt;code&gt;尾&lt;/code&gt;。&lt;/p&gt;
&lt;p&gt;Synergy是一个通过局域网实现的鼠标键盘共享软件。然而作为一个开源软件，它的下载竟然是收费的！虽然开源软件收费并不是什么坏事，然而开源软件本身是开源的，只要自己能编译出来或者使用别人编译的程序似乎也不违规？我对它的盈利模式深表怀疑。。。而且，Synergy也有Nightly Build是可以搜到的，也就是说你·根·本·就·可·以·免·费·下载到最新的版本（不过可能不够稳定）。&lt;/p&gt;
&lt;p&gt;我尝试了Synergy的很多个版本，发现并不是很稳定，而且如果服务器和客户端是不同的版本会有不兼容的问题。最后找了一个老的版本以&lt;code&gt;Daemon/Windows服务&lt;/code&gt;的形式运行，大概图形界面就是罪魁祸首吧，我也懒得去确定最新版本用这种方式能否稳定工作了。&lt;/p&gt;
    
    </summary>
    
    
      <category term="Customize" scheme="https://www.sun11.me/tags/Customize/"/>
    
  </entry>
  
  <entry>
    <title>SIFT算法的Matlab实现</title>
    <link href="https://www.sun11.me/blog/2016/sift-implementation-in-matlab/"/>
    <id>https://www.sun11.me/blog/2016/sift-implementation-in-matlab/</id>
    <published>2016-05-16T16:52:46.000Z</published>
    <updated>2019-07-20T02:59:45.727Z</updated>
    
    <content type="html"><![CDATA[<p>这是一次作业，内容是给出两张图像，检测特征点和匹配特征点。要求不能用诸如OpenCV的现成特征点检测函数。于是就只能造轮子了，写了这个Matlab版的sift。<del>（其实就是把c语言的opensift翻译成了matlab</del></p><p>以下是算法流程，其实网上的类似博文已经很多了，只不过我看的过程中也看得不很明白，只能对照着好几个看，所以干脆自己又写了一遍。下面的图均来自于参考资料中，然而参考资料的图也是来自于参考资料的参考资料中。</p><h3 id="1-构建尺度空间"><a href="#1-构建尺度空间" class="headerlink" title="1. 构建尺度空间"></a>1. 构建尺度空间</h3><blockquote><p>定理1 对图像做 <script type="math/tex">\sigma = \sigma_1</script> 的高斯平滑，再做一次 <script type="math/tex">\sigma = \sigma_2</script> 的高斯平滑，等效于对原图像做一次 <script type="math/tex">\sigma = \sqrt{\sigma_1^2+\sigma_2^2}</script> 的高斯平滑。</p></blockquote><h4 id="1-1-构建高斯金字塔"><a href="#1-1-构建高斯金字塔" class="headerlink" title="1.1 构建高斯金字塔"></a>1.1 构建高斯金字塔</h4><p>高斯卷积核是实现尺度变换的唯一线性核（Koenderink, 1984; Lindeberg, 1994）。</p><p>一幅图像的尺度空间被定义为对其做可变尺度的高斯卷积：</p><script type="math/tex; mode=display">\begin{split}L(x,y,\sigma)&=G(x,y,\sigma) * I(x,y)\\其中G(x,y,\sigma)&=\frac{1}{2\pi\sigma^2}e^{-(x^2+y^2)/2\sigma^2}\end{split}</script><p>对于给定的彩色图像，转化为灰度图像，用不同大小的<script type="math/tex">\sigma</script>做高斯平滑（按照 3<script type="math/tex">\sigma</script> 准则，高斯核矩阵的大小设为 <script type="math/tex">(6\sigma+1)\cdot(6\sigma+1)</script> ，并保证行和列为奇数），再此基础上将图像降采样得到不同大小的组(octave)，每组若干图像(interval)。详细描述如下：</p><p>为了得到更多的特征点，将图像扩大为原来的两倍。假设原图像已有 <script type="math/tex">\sigma=0.5</script> 的高斯平滑，而我们需要第一个octave的第一张图像的 <script type="math/tex">\sigma=1.6</script> ，按照定理1，我们要对扩大两倍的图像做一次高斯平滑，<script type="math/tex">\sigma=\sqrt{1.6^2-(0.5\times2)^2}</script> 。</p><p>上一个octave的图像的长度和宽度分别是下一个octave的图像的两倍。因此图像组数(octaves)可由图像大小决定，将其设为 <script type="math/tex">log_2(min(height,width))</script> <script type="math/tex">-\ 2</script> ，这样将使顶层octave图像的长度和宽度最小值在8像素左右。</p><p>设第m个octave的第n张图像相对于原始图像的参数<script type="math/tex">\sigma</script>为 <script type="math/tex">sigma(m,n)</script>，则<script type="math/tex">sigma(1,1)=\sigma_0=1.6</script>。每个octave有s+1张图像（即intervals），这样得到的高斯差分金字塔(DoG)每个octave将有s张图像，我们设s为3。为了满足在不同octave间尺度的连续性，并使 <script type="math/tex">sigma(m,n)=</script> <script type="math/tex">2 \cdot sigma(m-1,n)</script>，按照定理1，则：</p><script type="math/tex; mode=display">\begin{split}sigma(1,n)&=\sigma_0\cdot k^{n-1},其中k=2^{1/s}\\sigma(m,n)&=\sigma_0\cdot 2^{m-1}\cdot k^{n-1}\end{split}</script><p><img src="/images/sift-implementation-in-matlab/pyr.png" alt="Parameter Sigma"></p><a id="more"></a><p>如上图所示，在第一个octave中尺度为<script type="math/tex">k^3\cdot \sigma_0</script>的“最后”一张图像进行下采样得到第二个octave的第一张图像，尺度仍为<script type="math/tex">k^3\cdot \sigma_0=2\cdot \sigma_0</script>。</p><p>但实际上我们需要做出更多不同尺度的高斯平滑图像，这是因为在后续高斯差分金字塔的极值检测中，需要前后两级尺度都存在图像。如图中红框所示，高斯差分金字塔中每个octave有s幅图像，则需要高斯金字塔中每个octave包含s+3幅图像。其中第s+1幅图像用作下一个octave第一幅图像的降采样。</p><p>具体实现中并未对单幅图像多次进行高斯平滑，而是由上一幅图像进行高斯平滑得到下一幅图像并迭代之，按照定理1计算<script type="math/tex">\sigma</script>。</p><h4 id="1-2-构建高斯差分金字塔"><a href="#1-2-构建高斯差分金字塔" class="headerlink" title="1.2 构建高斯差分金字塔"></a>1.2 构建高斯差分金字塔</h4><p>对两幅高斯金字塔的图像作差。</p><h4 id="1-3-检测极值点"><a href="#1-3-检测极值点" class="headerlink" title="1.3 检测极值点"></a>1.3 检测极值点</h4><p><img src="/images/sift-implementation-in-matlab/extremum.png" alt="Extremum"></p><p>如上图，与前后两幅图像及自身的共26个邻域像素点比较灰度值检测极值。</p><h3 id="2-关键点精确定位"><a href="#2-关键点精确定位" class="headerlink" title="2. 关键点精确定位"></a>2. 关键点精确定位</h3><p>检测到的极值点是离散的，通过三元二次函数拟合来精确确定关键点的位置和尺度，达到亚像素精度。以某关键点为中心的尺度空间函数 <script type="math/tex">D(x,y,intvl)</script> 的二次泰勒展开式为：</p><script type="math/tex; mode=display">D(\mathbf{X}) = D + \frac{\partial D}{\partial\mathbf{X}}^T\mathbf{X} + \frac{1}{2}\mathbf{X}^T\frac{\partial ^2D}{\partial\mathbf{X}^2}\mathbf{X}</script><p>其中等号右边第一个D为某关键点处的灰度值， <script type="math/tex">\mathbf{X}=(x,y,intvl)^T</script> 是以此点为中心的偏移量，由于 <script type="math/tex">D(\mathbf{X})</script> 是离散的，其导数用差分法求得。令 <script type="math/tex">D(\mathbf{X})</script> 导数为零，得到精确极值位置的偏移量为：</p><script type="math/tex; mode=display">\mathbf{\hat{X}}=-\frac{\partial ^2D}{\partial \mathbf{X}^2}^{-1}\frac{\partial D}{\partial\mathbf{X}}</script><p>若<script type="math/tex">\mathbf{\hat{X}}</script>在任意一个维度大于0.5，说明极值点精确位置距离另一个点更近，应该将关键点定位于更近的那个位置。定位到新点后再进行相同操作，若迭代5次位置仍不收敛，则不认为此点为关键点。设定图像边缘img_border，若关键点落在图像边缘区域（以img_border为宽度的矩形外框）也不认为此点为关键点。</p><h4 id="2-1-去除低反差-low-contrast-的点"><a href="#2-1-去除低反差-low-contrast-的点" class="headerlink" title="2.1 去除低反差(low contrast)的点"></a>2.1 去除低反差(low contrast)的点</h4><p>精确极值点处函数值：</p><script type="math/tex; mode=display">D(\mathbf{\hat{X}}) = D + \frac{1}{2}\frac{\partial D}{\partial\mathbf{X}}^T\mathbf{\hat{X}}</script><p>若 <script type="math/tex">|D(\mathbf{\hat{X}})|<0.04/s</script> ，同样不认为此点是极值点。在此过程中保存极值点的数据ddata，为特征的构建做准备。计算出<script type="math/tex">\sigma\_octv</script>，即位于一个相同的octave内的尺度，某个octave内第n张图像的 <script type="math/tex">\sigma\_octv= \sigma_0\cdot k^{intvl-1}</script> ，此处intvl为精确定位后的intvl。</p><h4 id="2-2-消除边缘响应"><a href="#2-2-消除边缘响应" class="headerlink" title="2.2 消除边缘响应"></a>2.2 消除边缘响应</h4><p>高斯差分函数有较强的边缘响应，对于比较像边缘的点应该去除掉。这样的点的特征为在某个方向有较大主曲率，而在垂直的方向主曲率很小。</p><p>设r为大主曲率与小主曲率的比值，H为关键点处的Hessian矩阵，则有（具体推导可见Lowe的论文）：</p><script type="math/tex; mode=display">\frac{Tr(H)^2}{Det(H)}=\frac{(r+1)^2}{r}</script><p>若满足：</p><script type="math/tex; mode=display">\frac{Tr(H)^2}{Det(H)}<\frac{(r_t+1)^2}{r_t},其中r_t为一阈值，设为10</script><p>说明此处r较小，认为此关键点不位于边缘，否则则去除该点。</p><h3 id="3-方向指定"><a href="#3-方向指定" class="headerlink" title="3. 方向指定"></a>3. 方向指定</h3><p>根据关键点的局部特性为每个关键点指定一个方向，可以具备旋转不变性。关键点局部特性在检测到关键点的高斯差分金字塔图像临近的高斯金字塔图像中计算。在关键点3σ邻域窗口计算梯度和方向分布，计算方式如下：</p><script type="math/tex; mode=display">\begin{split}m(x,y)&=\sqrt{[L(x+1,y)-L(x-1,y)]^2+[L(x,y+1)-L(x,y-1)]^2}\\\theta(x,y)&=tan^{-1}\{[L(x,y+1)-L(x,y-1)]/[L(x+1,y)-L(x-1,y)]\}\end{split}</script><p>此处的x正方向向右，y正方向向上。其中L为关键点在上述精确定位后所处尺度的灰度值，m(x,y)为梯度的幅值，<script type="math/tex">\theta(x,y)</script>为关键点处梯度方向的弧度（范围为<script type="math/tex">(-\pi,\pi]</script>）。将360度的方向划分为36个区域(bins),第一个区域的范围是<script type="math/tex">[\frac{35\pi}{36},\frac{37\pi}{36})</script>,按逆时针方向依次划分。对m(x,y)按 <script type="math/tex">\sigma=1.5\sigma\_octv</script> 的高斯分布，在 <script type="math/tex">3\sigma=3\cdot1.5\sigma\_octv</script> 的邻域窗口加权计算，得到36个方向的直方图。然后对直方图进行两次平滑处理，即按0.25,0.5,0.25的大小对每3个连续的bin加权两次。</p><p>直方图最大值的方向代表该关键点的主方向，对于其他峰值，若大于或等于主方向值的80%，则再分配一个方向。所以对于一个关键点，可能会有多个对应的方向，将带有方向的关键点定义为feature，则一个关键点可能对应多个feature。由于第一个octave是双倍大小的图像，feature的坐标和尺度应转换到原始图像所在的octave处理。最后用抛物插值精确定位feature的方向。</p><p>对于x为-1,0,1，y为l,c,r的三个点来说，抛物插值得到极值点的x为：</p><script type="math/tex; mode=display">0.5\cdot\frac{l-r}{l-2c+r}</script><h3 id="4-关键点描述子"><a href="#4-关键点描述子" class="headerlink" title="4. 关键点描述子"></a>4. 关键点描述子</h3><p>上一步已得到具有主方向的关键点，即feature，下一步是对feature的邻域进行采样，形成对该局部图像的描述，然后可用某种度量方法对描述进行匹配。<br>Lowe提出的sift描述子是一个 <script type="math/tex">4\times4\times8=128</script> 维的向量。描述子的数学形式可定义为 <script type="math/tex">h(x,y,\theta)</script> ，其中的x,y代表 <script type="math/tex">4\times4=16</script> 个图像区域的位置，<script type="math/tex">\theta</script>即梯度方向，只能取8个值。<script type="math/tex">h(x,y,\theta)</script>的值就是在(x,y)代表的图像区域计算得到的在<script type="math/tex">\theta</script>方向的梯度大小。</p><h4 id="4-1-描述子采样区域"><a href="#4-1-描述子采样区域" class="headerlink" title="4.1 描述子采样区域"></a>4.1 描述子采样区域</h4><p>这16个图像区域中的每一个区域均为 <script type="math/tex">3\sigma\_octv</script> 像素，因此16个区域的半边长为 <script type="math/tex">4\times3\sigma\_octv/2</script> ，考虑到后续操作需要三线性插值，采样区域半边长设为 <script type="math/tex">(4+1)\times3\sigma\_octv/2</script> ，又由于旋转操作，这个值需要乘以<script type="math/tex">\sqrt{2}</script>，得到 <script type="math/tex">radius=(4+1)\times</script> <script type="math/tex">\sqrt{2}\times3\sigma\_octv/2</script> 。</p><p>如下图所示，图中 <script type="math/tex">m=3,</script> <script type="math/tex">B_p=4,\sigma=\sigma\_octv</script> 。</p><p><img src="/images/sift-implementation-in-matlab/descr_sampling.png" alt="Sampling Area"></p><h4 id="4-2-旋转至主方向"><a href="#4-2-旋转至主方向" class="headerlink" title="4.2 旋转至主方向"></a>4.2 旋转至主方向</h4><p>为了使描述符具有旋转不变性，将坐标轴旋转至关键点主方向。设i，j分别为采样点相对关键点的行偏移量和列偏移量，i = -radius:radius，j = -radius:radius，关键点左上角i和j均为负数。关键点主方向为<script type="math/tex">\theta</script>，范围是<script type="math/tex">(-\pi,\pi]</script>。</p><blockquote><p>定理2 在右手平面直角坐标系中，向量(x,y)逆时针旋转<script type="math/tex">\theta</script>，得到的向量(x’,y’)为：</p><script type="math/tex; mode=display">  \begin{bmatrix}    x'\\    y'  \end{bmatrix}  =\begin{bmatrix}    cos\theta & -sin\theta \\    sin\theta & cos\theta  \end{bmatrix}  \begin{bmatrix}    x\\    y  \end{bmatrix}</script></blockquote><p><img src="/images/sift-implementation-in-matlab/rotation.png" alt="Rotation"></p><p>在左图以关键点为中心建立右手平面直角坐标系o-uv，u的正方向与左图<script type="math/tex">\mathbf{x}</script>方向相同，v的正方向与左图<script type="math/tex">\mathbf{y}</script>方向相反。左图中<script type="math/tex">\mathbf{x}</script>=(1,0),<script type="math/tex">\mathbf{y}</script>=(0,-1)，将<script type="math/tex">\mathbf{x}</script>,<script type="math/tex">\mathbf{y}</script>代入定理2的公式，得到右图中 <script type="math/tex">\mathbf{x'}=(cos\theta,sin\theta),</script> <script type="math/tex">\mathbf{y'}=(sin\theta,-cos\theta)</script> 。其中<script type="math/tex">\theta</script>为左图坐标系旋转到右图坐标系的角度，在上图中为一负数。设图像中有一点按左图的<script type="math/tex">\mathbf{x}</script>,<script type="math/tex">\mathbf{y}</script>可表示为 <script type="math/tex">j \cdot\mathbf{x} + i\cdot\mathbf{y}</script> ，按右图中的<script type="math/tex">\mathbf{x'}</script>,<script type="math/tex">\mathbf{y'}</script>可表示为 <script type="math/tex">j'\cdot\mathbf{x'}+i'\cdot\mathbf{y'}</script> ，则有：</p><script type="math/tex; mode=display">  j\begin{bmatrix}  1\\  0  \end{bmatrix}  +i\begin{bmatrix}  0\\  -1  \end{bmatrix}  =j'\begin{bmatrix}  cos\theta\\  sin\theta  \end{bmatrix}  +i'\begin{bmatrix}  sin\theta\\  -cos\theta  \end{bmatrix}</script><p>解得 <script type="math/tex">j'=j\cdot cosθ-i\cdot sinθ,</script> <script type="math/tex">i'=j\cdot sinθ+i\cdot cosθ</script> 。</p><p>得到新的行、列偏移量后，将 <script type="math/tex">3\sigma\_octv</script> 设为单位长度，并将中心转移至最左上角区域中心，得到新的坐标r_bin和c_bin。对梯度方向弧度值减去主方向弧度，并设 <script type="math/tex">\frac{2\pi}{8}</script> 为一个单位，得到o_bin。</p><p>采样点的梯度幅值按照 <script type="math/tex">\sigma=0.5\cdot4\cdot3\sigma\_octv</script> （即16个区域边长的一半）的高斯函数加权：</p><script type="math/tex; mode=display">w=m(a+j,b+i)\cdot e^{\frac{-j'^2+i'^2}{2\sigma^2}}</script><p>其中a，b为关键点在高斯金字塔图像中的位置坐标。</p><h4 id="4-3-三线性插值"><a href="#4-3-三线性插值" class="headerlink" title="4.3 三线性插值"></a>4.3 三线性插值</h4><p>上述过程中构造了一个三维的bin空间，如4.1中右图所示，维度包括r_bin，c_bin和o_bin。注意最上层格子和最底层格子是相连的，因为0度等于360度。所有带有三维坐标的梯度幅值都将分配到三维格子里。</p><p>为了减少一个梯度幅值从一个格子漂移(shift)到另一个格子引起的描述子突变，需要对梯度值做三线性插值。也就是根据三维坐标计算距离周围格子的距离，按距离的倒数计算权重，将梯度幅值按权重分配到临近的格子里。</p><p><img src="/images/sift-implementation-in-matlab/interpolation.png" alt="Trilinear Interpolation"></p><p>某点在三维bin空间的坐标为<script type="math/tex">(r\_bin，c\_bin，o\_bin)</script>，求出<script type="math/tex">r=\lfloor r\_bin\rfloor,</script> <script type="math/tex">c=\lfloor c\_bin\rfloor,</script> <script type="math/tex">o=\lfloor o\_bin\rfloor,</script> <script type="math/tex">dr=r\_bin-r,</script> <script type="math/tex">dc=c\_bin-c,</script> <script type="math/tex">do=o\_bin-o</script>，它的梯度幅值最多可能分配到周围的8个格子中。计算公式如下：</p><script type="math/tex; mode=display">\begin{split}&weightedValue[r+i+1][c+j+1][((o+k)\ mod\ 8)+1]\\=&\ w\cdot dr^i\cdot(1-dr)^{1-i}\cdot dc^j\cdot(1-dc)^{1-j}\cdot do^k\cdot(1-do)^{1-k}\end{split}</script><p>其中i，j，k均可取0或1，weightedValue下标加1的目的是使下标从1开始。</p><p>为简化计算，可改为：</p><script type="math/tex; mode=display">\begin{split}&weightedValue[r+i+1][c+j+1][((o+k)\ mod\ 8)+1]\\=&\ w\cdot(0.5+(dr-0.5)(2i-1))\cdot(0.5+(dc-0.5)(2j-1))\cdot\\&\ (0.5+(do-0.5)(2k-1))\end{split}</script><h4 id="4-4-生成描述子"><a href="#4-4-生成描述子" class="headerlink" title="4.4 生成描述子"></a>4.4 生成描述子</h4><p>将上述直方图数组按顺序排列可转换为一个128维的向量。</p><p>为了减少光照变化的影响，对该向量进行归一化处理。非线性光照变化仍可能导致梯度幅值的较大变化，然而影响梯度方向的可能性较小。因此对于超过阈值0.2的梯度幅值设为0.2，然后再进行一次归一化。最后将描述子按照对应高斯金字塔图像的尺度大小排序。</p><h3 id="5-匹配"><a href="#5-匹配" class="headerlink" title="5. 匹配"></a>5. 匹配</h3><p>描述子向量已经归一化，所以可直接用向量之间的夹角进行匹配，相当于球面距离。图像A 的描述子匹配图像B最近的两个描述子点积之比小于0.6，则认为匹配成功。</p><h3 id="6-一些废话"><a href="#6-一些废话" class="headerlink" title="6. 一些废话"></a>6. 一些废话</h3><h4 id="6-1-性能优化"><a href="#6-1-性能优化" class="headerlink" title="6.1 性能优化"></a>6.1 性能优化</h4><p>因为用的是Matlab，所以不注重性能。然而又不得不注重性能，因为第一次跑通程序的时候跑了一晚上都没跑完一半！也就是一张图片的描述子都没算完。后来发现是因为在运行次数最多的for循环(描述子计算中的梯度计算)里用到了cell数组。把对这个cell数组的查询操作提到两重循环前以后，这个程序好像跑了半个小时左右跑出结果了。然而还是太慢，于是我又用Matlab的计时分析工具分析了程序最耗时的地方:</p><ul><li>把cell数组的查询尽可能减少</li><li>充分利用Matlab的向量操作</li><li>一些没用的参数给去掉了（如计算梯度时的三个返回值合并到了一个二维数组）</li><li>一个三维数组折叠成了一维的（hist）</li></ul><p>程序里用了很多全局变量，是因为我把函数分成了文件而不是放在一个文件，为了节省点内存（以及方便）只能这么做（虽然据说Matlab在不改变变量的情况下函数传值等于引用，然而我并不清楚究竟是怎样的）。把for循环换成parfor的时候提示，parfor里似乎不推荐用全局变量，而且实际运行的时候全局变量似乎也会影响性能，于是我把全局变量复制成了局部的再放进parfor里。</p><p>我还发现一个奇葩的问题，在运行次数最多的计算梯度的函数里用zeros(1,2)创建一个数组竟然也耗时非常多，改成[0 0]就好了。</p><p>经过这些修改后，在开启parallel pool的情况下运行时间缩短到了7分钟左右。<del>（然而Lowe的C语言版本只要十几秒</del></p><h4 id="6-2-运行结果"><a href="#6-2-运行结果" class="headerlink" title="6.2 运行结果"></a>6.2 运行结果</h4><p><img src="/images/sift-implementation-in-matlab/book-result.png" alt="Book"></p><p><img src="/images/sift-implementation-in-matlab/scene-result.png" alt="Scene"></p><p><img src="/images/sift-implementation-in-matlab/match-result.png" alt="Match"></p><p>这次作业老师给的是两张768x1024的图片，分别检测到5288和4798个特征点，最后匹配了906对点。用Lowe的siftDemoV4跑出来的结果是1252对匹配。</p><p>这个程序的参数基本都是参照opensift，但最后的匹配用的是Lowe的方案。Lowe的实现毕竟不太一样，运行的结果和opensift有一些差异。以下是匹配<code>siftDemoV4.zip</code>里的<code>scene.pgm</code>和<code>book.pgm</code>的结果：</p><div class="table-container"><table><thead><tr><th style="text-align:left">Item</th><th style="text-align:right">siftDemoV4</th><th style="text-align:right">opensift</th><th style="text-align:right">sw-sift</th></tr></thead><tbody><tr><td style="text-align:left">scene.pgm</td><td style="text-align:right">1021</td><td style="text-align:right">746</td><td style="text-align:right">766</td></tr><tr><td style="text-align:left">book.pgm</td><td style="text-align:right">882</td><td style="text-align:right">740</td><td style="text-align:right">741</td></tr><tr><td style="text-align:left">Matched</td><td style="text-align:right">98</td><td style="text-align:right">84</td><td style="text-align:right">58</td></tr></tbody></table></div><p>sw-sift和opensift的区别主要是在高斯平滑和匹配算法上。opensift的高斯平滑用的是OpenCV的CVSmooth函数，匹配用的是欧式距离（而且把描述子乘以512从double类型转成了int）。和opensift相比，sw-sift检测到的特征点数量很接近，但是匹配数量较少，所以可改进的地方主要是匹配算法（然而我不想改了==）。另外，我发现高斯平滑的核矩阵大小对结果有很大影响，根据<script type="math/tex">3\sigma</script>准则它的宽度应该是 <script type="math/tex">(6\sigma+1)\cdot(6\sigma+1)</script> ，然而有人设成 <script type="math/tex">(3\sigma+1)\cdot(3\sigma+1)</script> 却取得了更多特征点，因此调整这个参数再用其它参数限制错误数量或许可以得到更好的结果。</p><h4 id="6-3-源代码"><a href="#6-3-源代码" class="headerlink" title="6.3 源代码"></a>6.3 源代码</h4><p>代码发布在github: <a href="https://github.com/sun11/sw-sift" target="_blank" rel="noopener">sw-sift</a>，请注意sift是有专利的。</p><h3 id="参考资料"><a href="#参考资料" class="headerlink" title="参考资料"></a>参考资料</h3><p>David G. Lowe, “Distinctive image features from scale-invariant keypoints,” International Journal of Computer Vision, 60, 2 (2004), pp. 91-110. <a href="http://www.cs.ubc.ca/~lowe/papers/ijcv04.pdf" target="_blank" rel="noopener">[PDF]</a> <a href="http://www.cs.ubc.ca/~lowe/keypoints/siftDemoV4.zip" target="_blank" rel="noopener">[CODE]</a><br>Rob Hess, OpenSIFT源码: <a href="https://github.com/robwhess/opensift" target="_blank" rel="noopener">https://github.com/robwhess/opensift</a><br>zddhub, SIFT算法详解: <a href="http://blog.csdn.net/zddblog/article/details/7521424" target="_blank" rel="noopener">http://blog.csdn.net/zddblog/article/details/7521424</a><br>Rachel Zhang, SIFT特征提取分析: <a href="http://blog.csdn.net/abcjennifer/article/details/7639681" target="_blank" rel="noopener">http://blog.csdn.net/abcjennifer/article/details/7639681</a><br>JiePro, SIFT算法：特征描述子: <a href="http://www.cnblogs.com/JiePro/p/sift_4.html" target="_blank" rel="noopener">http://www.cnblogs.com/JiePro/p/sift_4.html</a></p>]]></content>
    
    <summary type="html">
    
      &lt;p&gt;这是一次作业，内容是给出两张图像，检测特征点和匹配特征点。要求不能用诸如OpenCV的现成特征点检测函数。于是就只能造轮子了，写了这个Matlab版的sift。&lt;del&gt;（其实就是把c语言的opensift翻译成了matlab&lt;/del&gt;&lt;/p&gt;
&lt;p&gt;以下是算法流程，其实网上的类似博文已经很多了，只不过我看的过程中也看得不很明白，只能对照着好几个看，所以干脆自己又写了一遍。下面的图均来自于参考资料中，然而参考资料的图也是来自于参考资料的参考资料中。&lt;/p&gt;
&lt;h3 id=&quot;1-构建尺度空间&quot;&gt;&lt;a href=&quot;#1-构建尺度空间&quot; class=&quot;headerlink&quot; title=&quot;1. 构建尺度空间&quot;&gt;&lt;/a&gt;1. 构建尺度空间&lt;/h3&gt;&lt;blockquote&gt;
&lt;p&gt;定理1 对图像做 &lt;script type=&quot;math/tex&quot;&gt;\sigma = \sigma_1&lt;/script&gt; 的高斯平滑，再做一次 &lt;script type=&quot;math/tex&quot;&gt;\sigma = \sigma_2&lt;/script&gt; 的高斯平滑，等效于对原图像做一次 &lt;script type=&quot;math/tex&quot;&gt;\sigma = \sqrt{\sigma_1^2+\sigma_2^2}&lt;/script&gt; 的高斯平滑。&lt;/p&gt;
&lt;/blockquote&gt;
&lt;h4 id=&quot;1-1-构建高斯金字塔&quot;&gt;&lt;a href=&quot;#1-1-构建高斯金字塔&quot; class=&quot;headerlink&quot; title=&quot;1.1 构建高斯金字塔&quot;&gt;&lt;/a&gt;1.1 构建高斯金字塔&lt;/h4&gt;&lt;p&gt;高斯卷积核是实现尺度变换的唯一线性核（Koenderink, 1984; Lindeberg, 1994）。&lt;/p&gt;
&lt;p&gt;一幅图像的尺度空间被定义为对其做可变尺度的高斯卷积：&lt;/p&gt;
&lt;script type=&quot;math/tex; mode=display&quot;&gt;
\begin{split}
L(x,y,\sigma)&amp;=G(x,y,\sigma) * I(x,y)\\
其中G(x,y,\sigma)&amp;=\frac{1}{2\pi\sigma^2}e^{-(x^2+y^2)/2\sigma^2}
\end{split}&lt;/script&gt;&lt;p&gt;对于给定的彩色图像，转化为灰度图像，用不同大小的&lt;script type=&quot;math/tex&quot;&gt;\sigma&lt;/script&gt;做高斯平滑（按照 3&lt;script type=&quot;math/tex&quot;&gt;\sigma&lt;/script&gt; 准则，高斯核矩阵的大小设为 &lt;script type=&quot;math/tex&quot;&gt;(6\sigma+1)\cdot(6\sigma+1)&lt;/script&gt; ，并保证行和列为奇数），再此基础上将图像降采样得到不同大小的组(octave)，每组若干图像(interval)。详细描述如下：&lt;/p&gt;
&lt;p&gt;为了得到更多的特征点，将图像扩大为原来的两倍。假设原图像已有 &lt;script type=&quot;math/tex&quot;&gt;\sigma=0.5&lt;/script&gt; 的高斯平滑，而我们需要第一个octave的第一张图像的 &lt;script type=&quot;math/tex&quot;&gt;\sigma=1.6&lt;/script&gt; ，按照定理1，我们要对扩大两倍的图像做一次高斯平滑，&lt;script type=&quot;math/tex&quot;&gt;\sigma=\sqrt{1.6^2-(0.5\times2)^2}&lt;/script&gt; 。&lt;/p&gt;
&lt;p&gt;上一个octave的图像的长度和宽度分别是下一个octave的图像的两倍。因此图像组数(octaves)可由图像大小决定，将其设为 &lt;script type=&quot;math/tex&quot;&gt;log_2(min(height,width))&lt;/script&gt; &lt;script type=&quot;math/tex&quot;&gt;-\ 2&lt;/script&gt; ，这样将使顶层octave图像的长度和宽度最小值在8像素左右。&lt;/p&gt;
&lt;p&gt;设第m个octave的第n张图像相对于原始图像的参数&lt;script type=&quot;math/tex&quot;&gt;\sigma&lt;/script&gt;为 &lt;script type=&quot;math/tex&quot;&gt;sigma(m,n)&lt;/script&gt;，则&lt;script type=&quot;math/tex&quot;&gt;sigma(1,1)=\sigma_0=1.6&lt;/script&gt;。每个octave有s+1张图像（即intervals），这样得到的高斯差分金字塔(DoG)每个octave将有s张图像，我们设s为3。为了满足在不同octave间尺度的连续性，并使 &lt;script type=&quot;math/tex&quot;&gt;sigma(m,n)=&lt;/script&gt; &lt;script type=&quot;math/tex&quot;&gt;2 \cdot sigma(m-1,n)&lt;/script&gt;，按照定理1，则：&lt;/p&gt;
&lt;script type=&quot;math/tex; mode=display&quot;&gt;
\begin{split}
sigma(1,n)&amp;=\sigma_0\cdot k^{n-1},其中k=2^{1/s}\\
sigma(m,n)&amp;=\sigma_0\cdot 2^{m-1}\cdot k^{n-1}
\end{split}&lt;/script&gt;&lt;p&gt;&lt;img src=&quot;/images/sift-implementation-in-matlab/pyr.png&quot; alt=&quot;Parameter Sigma&quot;&gt;&lt;/p&gt;
    
    </summary>
    
    
      <category term="CV" scheme="https://www.sun11.me/tags/CV/"/>
    
  </entry>
  
  <entry>
    <title>Ubuntu14.04 安装 Caffe+CUDA 7.5</title>
    <link href="https://www.sun11.me/blog/2016/Ubuntu-14-04-Caffe-CUDA-7-5-installation/"/>
    <id>https://www.sun11.me/blog/2016/Ubuntu-14-04-Caffe-CUDA-7-5-installation/</id>
    <published>2016-02-21T12:21:30.000Z</published>
    <updated>2019-07-20T02:59:45.728Z</updated>
    
    <content type="html"><![CDATA[<p>Caffe官网的 <a href="http://caffe.berkeleyvision.org/installation.html" target="_blank" rel="noopener">安装说明</a> 实在太简单了点，主要是参考的 <a href="https://gist.github.com/bearpaw/c38ef18ec45ba6548ec0#file-caffe-ubuntu-14-04-64bit-cuda-6-5-md" target="_blank" rel="noopener">Caffe + Ubuntu 14.04 64bit + CUDA 6.5 配置说明</a> 和 <a href="http://weibo.com/p/2304189db078090102vdvx" target="_blank" rel="noopener">Ubuntu14.04下安装Caffe总结</a> 。系统是Ubuntu 14.04 64bit，显卡是GTX 950M。</p><h3 id="1-Caffe依赖包"><a href="#1-Caffe依赖包" class="headerlink" title="1. Caffe依赖包"></a>1. Caffe依赖包</h3><figure class="highlight bash"><table><tr><td class="gutter"><pre><span class="line">1</span><br><span class="line">2</span><br></pre></td><td class="code"><pre><span class="line">sudo apt-get install build-essential  <span class="comment"># basic requirement</span></span><br><span class="line">sudo apt-get install libprotobuf-dev libleveldb-dev libsnappy-dev libopencv-dev libboost-all-dev libhdf5-serial-dev libgflags-dev libgoogle-glog-dev liblmdb-dev protobuf-compiler <span class="comment">#required by caffe</span></span><br></pre></td></tr></table></figure><h3 id="2-安装CUDA-7-5"><a href="#2-安装CUDA-7-5" class="headerlink" title="2. 安装CUDA 7.5"></a>2. 安装CUDA 7.5</h3><h4 id="2-1-禁用nouveau驱动"><a href="#2-1-禁用nouveau驱动" class="headerlink" title="2.1 禁用nouveau驱动"></a>2.1 禁用nouveau驱动</h4><p>我作死地相信了上述第二篇文章的话，没有禁用nouveau驱动，结果第一次重启神奇地成功了，第二次重启就无法登陆。。。后来用recovery mode禁用了nouveau。所以一定要禁用nouveau：</p><p>创建文件<code>/etc/modprobe.d/blacklist-nouveau.conf</code></p><pre><code>blacklist nouveauoptions nouveau modeset=0</code></pre><h4 id="2-2-安装CUDA"><a href="#2-2-安装CUDA" class="headerlink" title="2.2 安装CUDA"></a>2.2 安装CUDA</h4><p>在NVIDIA开发者<a href="https://developer.nvidia.com/cuda-downloads" target="_blank" rel="noopener">官网</a>下载CUDA 7.5，我直接用的deb包，因为觉得比较方便。可以直接双击打开安装，也可以用命令行：</p><figure class="highlight bash"><table><tr><td class="gutter"><pre><span class="line">1</span><br><span class="line">2</span><br><span class="line">3</span><br></pre></td><td class="code"><pre><span class="line">sudo dpkg -i cuda-repo-&lt;distro&gt;_&lt;version&gt;_&lt;architecture&gt;.deb</span><br><span class="line">sudo apt-get update</span><br><span class="line">sudo apt-get install cuda</span><br></pre></td></tr></table></figure><p>都说要禁用lightdm安装cuda，但是用deb包安装的话没有关掉lightdm也没有遇到什么问题。安装完CUDA以后使用的就是nvidia闭源驱动了。</p><a id="more"></a><h4 id="2-3-配置环境变量"><a href="#2-3-配置环境变量" class="headerlink" title="2.3 配置环境变量"></a>2.3 配置环境变量</h4><p>在<code>/etc/profile</code>中添加：</p><figure class="highlight bash"><table><tr><td class="gutter"><pre><span class="line">1</span><br></pre></td><td class="code"><pre><span class="line"><span class="built_in">export</span> PATH=<span class="variable">$PATH</span>:/usr/<span class="built_in">local</span>/cuda/bin</span><br></pre></td></tr></table></figure><p>创建文件<code>/etc/ld.so.conf.d/cuda.conf</code>:</p><pre><code>/usr/local/cuda/lib64</code></pre><p>使上述配置直接生效：</p><figure class="highlight bash"><table><tr><td class="gutter"><pre><span class="line">1</span><br><span class="line">2</span><br></pre></td><td class="code"><pre><span class="line"><span class="built_in">source</span> /etc/profile</span><br><span class="line">sudo ldconfig</span><br></pre></td></tr></table></figure><h4 id="2-4-编译SAMPLE"><a href="#2-4-编译SAMPLE" class="headerlink" title="2.4 编译SAMPLE"></a>2.4 编译SAMPLE</h4><p>进入<code>/usr/local/cuda/samples</code>:</p><figure class="highlight bash"><table><tr><td class="gutter"><pre><span class="line">1</span><br></pre></td><td class="code"><pre><span class="line">sudo make all -j4</span><br></pre></td></tr></table></figure><p>完成后进入<code>samples/bin/x86_64/linux/release</code>:</p><figure class="highlight bash"><table><tr><td class="gutter"><pre><span class="line">1</span><br></pre></td><td class="code"><pre><span class="line">./deviceQuery</span><br></pre></td></tr></table></figure><p>可以看到你的显卡信息（其实并没什么卵用。</p><h3 id="3-安装cuDNN"><a href="#3-安装cuDNN" class="headerlink" title="3. 安装cuDNN"></a>3. 安装cuDNN</h3><p>cuDNN要注册NVIDIA开发者账号才能下载，我注册了下很快就收到邮件可以下载了，但是蛋疼的intel MKL至今都没收到回复下载不了。。。</p><p>这个比较简单，下载下来直接是编译好的lib和include，丢进<code>/usr/local/cuda</code>里就行了：</p><figure class="highlight bash"><table><tr><td class="gutter"><pre><span class="line">1</span><br><span class="line">2</span><br><span class="line">3</span><br><span class="line">4</span><br></pre></td><td class="code"><pre><span class="line"><span class="built_in">cd</span> cudnn-* <span class="comment">#下载解压后的文件夹</span></span><br><span class="line">sudo cp lib64/* /usr/<span class="built_in">local</span>/cuda/lib64/</span><br><span class="line">sudo cp include/* /usr/<span class="built_in">local</span>/cuda/include/</span><br><span class="line">sudo ldconfig</span><br></pre></td></tr></table></figure><p>如果你遇到<code>/sbin/ldconfig.real: /usr/local/cuda/lib64/libcudnn.so.5 is not a symbolic link</code>这样的问题，重新链接一下(根据版本自行调整)：<br><figure class="highlight bash"><table><tr><td class="gutter"><pre><span class="line">1</span><br><span class="line">2</span><br><span class="line">3</span><br></pre></td><td class="code"><pre><span class="line"><span class="built_in">cd</span> /usr/<span class="built_in">local</span>/cuda/lib64</span><br><span class="line">sudo ln -sf libcudnn.so.5.1.3 libcudnn.so.5</span><br><span class="line">sudo ln -sf libcudnn.so.5 libcudnn.so</span><br></pre></td></tr></table></figure></p><h3 id="4-安装BLAS"><a href="#4-安装BLAS" class="headerlink" title="4. 安装BLAS"></a>4. 安装BLAS</h3><p><del>为在intel网站申请学生版始终没回复，所以就只有用OpenBLAS了。。。</del><br>Intel的MKL在<a href="https://software.intel.com/en-us/articles/free_mkl" target="_blank" rel="noopener">这里</a>注册一下也能用，有图形界面，安装完成之后创建文件<code>/etc/ld.so.conf.d/intel_mkl.conf</code>：</p><pre><code>/opt/intel/lib/intel64/opt/intel/mkl/lib/intel64</code></pre><p>然后<code>sudo ldconfig</code>。</p><p>OpenBLAS安装如下：</p><figure class="highlight bash"><table><tr><td class="gutter"><pre><span class="line">1</span><br><span class="line">2</span><br><span class="line">3</span><br><span class="line">4</span><br></pre></td><td class="code"><pre><span class="line">git <span class="built_in">clone</span> https://github.com/xianyi/OpenBLAS.git</span><br><span class="line"><span class="built_in">cd</span> OpenBLAS</span><br><span class="line">make -j4</span><br><span class="line">sudo make install PREFIX=/usr/<span class="built_in">local</span>/openblas</span><br></pre></td></tr></table></figure><p>创建文件<code>/etc/ld.conf.d/openblas.conf</code>:</p><pre><code>/usr/local/openblas/lib</code></pre><h3 id="5-安装Anaconda"><a href="#5-安装Anaconda" class="headerlink" title="5. 安装Anaconda"></a>5. 安装Anaconda</h3><p>我是直接用pyenv安装的，因为需要在多个python环境下切换。<del>其实一开始直接编译安装了Anaconda后来发现pyenv又删掉了…</del></p><h4 id="5-1-安装pyenv"><a href="#5-1-安装pyenv" class="headerlink" title="5.1 安装pyenv"></a>5.1 安装pyenv</h4><figure class="highlight bash"><table><tr><td class="gutter"><pre><span class="line">1</span><br><span class="line">2</span><br><span class="line">3</span><br><span class="line">4</span><br><span class="line">5</span><br></pre></td><td class="code"><pre><span class="line">git <span class="built_in">clone</span> https://github.com/yyuu/pyenv.git ~/.pyenv</span><br><span class="line"><span class="built_in">echo</span> <span class="string">'export PYENV_ROOT="$HOME/.pyenv"'</span> &gt;&gt; ~/.bashrc</span><br><span class="line"><span class="built_in">echo</span> <span class="string">'export PATH="$PYENV_ROOT/bin:$PATH"'</span> &gt;&gt; ~/.bashrc</span><br><span class="line"><span class="built_in">echo</span> <span class="string">'eval "$(pyenv init -)"'</span> &gt;&gt; ~/.bashrc</span><br><span class="line"><span class="built_in">exec</span> <span class="variable">$SHELL</span> -l</span><br></pre></td></tr></table></figure><h4 id="5-2-用pyenv安装Anaconda"><a href="#5-2-用pyenv安装Anaconda" class="headerlink" title="5.2 用pyenv安装Anaconda"></a>5.2 用pyenv安装Anaconda</h4><p>如果觉得网络不好可以直接把anaconda的sh文件下载下来放到~/.pyenv/cache里。</p><figure class="highlight bash"><table><tr><td class="gutter"><pre><span class="line">1</span><br><span class="line">2</span><br><span class="line">3</span><br></pre></td><td class="code"><pre><span class="line">pyenv install anaconda2-4.1.0</span><br><span class="line">pyenv global anaconda2-4.1.0</span><br><span class="line">pyenv versions</span><br></pre></td></tr></table></figure><p>这时你应该可以看到你切换到anaconda2-4.1.0了。另外还可以用<a href="https://github.com/yyuu/pyenv-virtualenv" target="_blank" rel="noopener">pyenv-virtualenv</a>，不过我没有折腾。</p><h3 id="6-安装OpenCV"><a href="#6-安装OpenCV" class="headerlink" title="6. 安装OpenCV"></a>6. 安装OpenCV</h3><p>方案一：</p><figure class="highlight bash"><table><tr><td class="gutter"><pre><span class="line">1</span><br><span class="line">2</span><br><span class="line">3</span><br></pre></td><td class="code"><pre><span class="line">sudo add-apt-repository --yes ppa:xqms/opencv-nonfree</span><br><span class="line">sudo apt-get update</span><br><span class="line">sudo apt-get install libopencv-nonfree-dev libopencv-nonfree2.4</span><br></pre></td></tr></table></figure><p>方案二：</p><p>有个<a href="https://github.com/jayrambhia/Install-OpenCV/blob/master/Ubuntu/2.4/opencv2_4_10.sh" target="_blank" rel="noopener">安装脚本</a>，不过靠脚本安装OpenCV毕竟太不靠谱，我是看着脚本一点点自己敲命令装好的。直接把脚本贴上来吧：</p><figure class="highlight bash"><table><tr><td class="gutter"><pre><span class="line">1</span><br><span class="line">2</span><br><span class="line">3</span><br><span class="line">4</span><br><span class="line">5</span><br><span class="line">6</span><br><span class="line">7</span><br><span class="line">8</span><br><span class="line">9</span><br><span class="line">10</span><br><span class="line">11</span><br><span class="line">12</span><br><span class="line">13</span><br><span class="line">14</span><br><span class="line">15</span><br><span class="line">16</span><br><span class="line">17</span><br><span class="line">18</span><br><span class="line">19</span><br><span class="line">20</span><br><span class="line">21</span><br><span class="line">22</span><br><span class="line">23</span><br><span class="line">24</span><br><span class="line">25</span><br><span class="line">26</span><br><span class="line">27</span><br><span class="line">28</span><br><span class="line">29</span><br><span class="line">30</span><br><span class="line">31</span><br><span class="line">32</span><br><span class="line">33</span><br><span class="line">34</span><br><span class="line">35</span><br><span class="line">36</span><br><span class="line">37</span><br><span class="line">38</span><br><span class="line">39</span><br><span class="line">40</span><br><span class="line">41</span><br></pre></td><td class="code"><pre><span class="line">arch=$(uname -m)</span><br><span class="line"><span class="keyword">if</span> [ <span class="string">"<span class="variable">$arch</span>"</span> == <span class="string">"i686"</span> -o <span class="string">"<span class="variable">$arch</span>"</span> == <span class="string">"i386"</span> -o <span class="string">"<span class="variable">$arch</span>"</span> == <span class="string">"i486"</span> -o <span class="string">"<span class="variable">$arch</span>"</span> == <span class="string">"i586"</span> ]; <span class="keyword">then</span></span><br><span class="line">flag=1</span><br><span class="line"><span class="keyword">else</span></span><br><span class="line">flag=0</span><br><span class="line"><span class="keyword">fi</span></span><br><span class="line"><span class="built_in">echo</span> <span class="string">"Installing OpenCV 2.4.10"</span></span><br><span class="line">mkdir OpenCV</span><br><span class="line"><span class="built_in">cd</span> OpenCV</span><br><span class="line"><span class="built_in">echo</span> <span class="string">"Removing any pre-installed ffmpeg and x264"</span></span><br><span class="line">sudo apt-get -y remove ffmpeg x264 libx264-dev</span><br><span class="line"><span class="built_in">echo</span> <span class="string">"Installing Dependenices"</span></span><br><span class="line">sudo apt-get -y install libopencv-dev</span><br><span class="line">sudo apt-get -y install build-essential checkinstall cmake pkg-config yasm</span><br><span class="line">sudo apt-get -y install libtiff4-dev libjpeg-dev libjasper-dev</span><br><span class="line">sudo apt-get -y install libavcodec-dev libavformat-dev libswscale-dev libdc1394-22-dev libxine-dev libgstreamer0.10-dev libgstreamer-plugins-base0.10-dev libv4l-dev</span><br><span class="line">sudo apt-get -y install python-dev python-numpy</span><br><span class="line">sudo apt-get -y install libtbb-dev libeigen3-dev</span><br><span class="line">sudo apt-get -y install libqt4-dev libgtk2.0-dev</span><br><span class="line">sudo apt-get -y install libfaac-dev libmp3lame-dev libopencore-amrnb-dev libopencore-amrwb-dev libtheora-dev libvorbis-dev libxvidcore-dev</span><br><span class="line">sudo apt-get -y install x264 v4l-utils ffmpeg</span><br><span class="line">sudo apt-get -y install libgtk2.0-dev</span><br><span class="line"><span class="built_in">echo</span> <span class="string">"Downloading OpenCV 2.4.10"</span></span><br><span class="line"><span class="keyword">if</span> ! [ -f <span class="string">"OpenCV-2.4.10.zip"</span> ]; <span class="keyword">then</span></span><br><span class="line">  wget -O OpenCV-2.4.10.zip http://sourceforge.net/projects/opencvlibrary/files/opencv-unix/2.4.10/opencv-2.4.10.zip/download</span><br><span class="line"><span class="keyword">fi</span></span><br><span class="line"><span class="built_in">echo</span> <span class="string">"Installing OpenCV 2.4.10"</span></span><br><span class="line"><span class="keyword">if</span> ! [ -d <span class="string">"opencv-2.4.10"</span> ]; <span class="keyword">then</span></span><br><span class="line">  unzip OpenCV-2.4.10.zip</span><br><span class="line"><span class="keyword">fi</span></span><br><span class="line">rm OpenCV-2.4.10.zip</span><br><span class="line"><span class="built_in">cd</span> opencv-2.4.10</span><br><span class="line">rm -rf build</span><br><span class="line">mkdir build</span><br><span class="line"><span class="built_in">cd</span> build</span><br><span class="line">cmake -D CUDA_ARCH_BIN=3.2 -D CUDA_ARCH_PTX=3.2 -D CMAKE_BUILD_TYPE=RELEASE -D CMAKE_INSTALL_PREFIX=/usr/<span class="built_in">local</span> -D WITH_TBB=ON -D BUILD_NEW_PYTHON_SUPPORT=ON -D WITH_V4L=ON -D BUILD_TIFF=ON -D WITH_QT=ON -D WITH_OPENGL=ON ..</span><br><span class="line">make -j</span><br><span class="line">sudo make install</span><br><span class="line">sudo sh -c <span class="string">'echo "/usr/local/lib" &gt; /etc/ld.so.conf.d/opencv.conf'</span></span><br><span class="line">sudo ldconfig</span><br><span class="line"><span class="built_in">echo</span> <span class="string">"OpenCV 2.4.10 ready to be used"</span></span><br></pre></td></tr></table></figure><p>前面的安装依赖包倒没什么，到了25行<code>wget opencv</code>的时候发现sourceforge的下载链接已经变了，下不下来，于是到sourceforge.net把OpenCV 2.4.10下下来，再命名成脚本需要的<code>OpenCV-2.4.10.zip</code>（注意大小写，如果你需要按脚本来的话）。</p><p>其实已经基本不需要这个脚本文件了，直接一点点敲命令来吧。</p><figure class="highlight bash"><table><tr><td class="gutter"><pre><span class="line">1</span><br><span class="line">2</span><br><span class="line">3</span><br><span class="line">4</span><br><span class="line">5</span><br><span class="line">6</span><br><span class="line">7</span><br><span class="line">8</span><br></pre></td><td class="code"><pre><span class="line"><span class="built_in">cd</span> opencv-2.4.10</span><br><span class="line">mkdir build</span><br><span class="line"><span class="built_in">cd</span> build</span><br><span class="line">cmake -D CUDA_ARCH_BIN=3.2 -D CUDA_ARCH_PTX=3.2 -D CMAKE_BUILD_TYPE=RELEASE -D CMAKE_INSTALL_PREFIX=/usr/<span class="built_in">local</span> -D WITH_TBB=ON -D BUILD_NEW_PYTHON_SUPPORT=ON -D WITH_V4L=ON -D BUILD_TIFF=ON -D WITH_QT=ON -D WITH_OPENGL=ON ..</span><br><span class="line">make -j4</span><br><span class="line">sudo make install</span><br><span class="line">sudo sh -c <span class="string">'echo "/usr/local/lib" &gt; /etc/ld.so.conf.d/opencv.conf'</span></span><br><span class="line">sudo ldconfig</span><br></pre></td></tr></table></figure><h3 id="7-安装Caffe"><a href="#7-安装Caffe" class="headerlink" title="7. 安装Caffe"></a>7. 安装Caffe</h3><p>终于能装Caffe了，不过先要安装python依赖库。进入caffe安装目录下的python文件夹：</p><figure class="highlight bash"><table><tr><td class="gutter"><pre><span class="line">1</span><br></pre></td><td class="code"><pre><span class="line"><span class="keyword">for</span> req <span class="keyword">in</span> $(cat requirements.txt); <span class="keyword">do</span> pip install <span class="variable">$req</span>; <span class="keyword">done</span></span><br></pre></td></tr></table></figure><p>修改<code>Makefile.config</code>，注意需要的几项就行：</p><pre><code># cuDNN acceleration switch (uncomment to build with cuDNN).USE_CUDNN := 1# CUDA directory contains bin/ and lib/ directories that we need.CUDA_DIR := /usr/local/cuda# BLAS choice:# atlas for ATLAS (default)# mkl for MKL# open for OpenBlasBLAS := mkl# This is required only if you will compile the matlab interface.# MATLAB directory should contain the mex binary in /bin.MATLAB_DIR := /usr/local/MATLAB/R2016b# Anaconda Python distribution is quite popular. Include path:# Verify anaconda location, sometimes it&#39;s in root.ANACONDA_HOME := $(HOME)/.pyenv/versions/anaconda2-4.1.0PYTHON_INCLUDE := $(ANACONDA_HOME)/include \    $(ANACONDA_HOME)/include/python2.7 \    $(ANACONDA_HOME)/lib/python2.7/site-packages/numpy/core/include \# PYTHON_LIB := /usr/libPYTHON_LIB := $(ANACONDA_HOME)/libWITH_PYTHON_LAYER := 1</code></pre><p>上面的并不是完整文件，只是贴出来需要修改的几项。若使用matlab，注意要把matlab加入PATH环境变量，如在<code>/etc/profile</code>中加入<code>export PATH=$PATH:/usr/local/MATLAB/R2016b/bin</code>。如果你的BLAS选择的是openblas，那在<code>BLAS := open</code>后面应该加上:</p><pre><code># Custom (MKL/ATLAS/OpenBLAS) include and lib directories.# Leave commented to accept the defaults for your choice of BLAS# (which should work)!BLAS_INCLUDE := /usr/local/openblas/includeBLAS_LIB := /usr/local/openblas/lib</code></pre><p>最后编译caffe:</p><figure class="highlight bash"><table><tr><td class="gutter"><pre><span class="line">1</span><br><span class="line">2</span><br><span class="line">3</span><br></pre></td><td class="code"><pre><span class="line">make all -j4</span><br><span class="line">make <span class="built_in">test</span> -j4</span><br><span class="line">make runtest</span><br></pre></td></tr></table></figure><p>如果还需要python或者matlab接口(需确保Makefile.config中的python和matlab路径正确)：</p><figure class="highlight bash"><table><tr><td class="gutter"><pre><span class="line">1</span><br><span class="line">2</span><br></pre></td><td class="code"><pre><span class="line">make pycaffe</span><br><span class="line">make matcaffe</span><br></pre></td></tr></table></figure><p>如果在<code>make runtest</code>的时候遇到<code>error while loading shared libraries: libhdf5_hl.so.10: cannot open shared object file: No such file or directory</code>类似的错误，为了避免冲突尽量不要把anaconda的lib路径(即上面的<code>~/.pyenv/versions/anaconda2-4.1.0/lib</code>)添加到<code>LD_LIBRARY_PATH</code>，因为其它软件可能需要系统自带的python而不是anaconda。在<code>/usr/lib/x86_64-linux-gnu</code>下面可能有<code>libhdf5_hl.so.7</code>，版本太低了。</p><p>我是这样做的：</p><figure class="highlight bash"><table><tr><td class="gutter"><pre><span class="line">1</span><br><span class="line">2</span><br><span class="line">3</span><br><span class="line">4</span><br><span class="line">5</span><br><span class="line">6</span><br></pre></td><td class="code"><pre><span class="line"><span class="built_in">cd</span> /usr/lib/x86_64-linux-gnu/</span><br><span class="line">sudo cp ~/.pyenv/versions/anaconda2-4.1.0/lib/libhdf5.so.10* .</span><br><span class="line">sudo cp ~/.pyenv/versions/anaconda2-4.1.0/lib/libhdf5_hl.so.10* .</span><br><span class="line"><span class="built_in">cd</span> /usr/lib/x86_64-linux-gnu/</span><br><span class="line">sudo ln -sf libhdf5.so.10.1.0 libhdf5.so.10</span><br><span class="line">sudo ln -sf libhdf5_hl.so.10.0.2 libhdf5_hl.so.10</span><br></pre></td></tr></table></figure><p>或者更直接的方法是修改caffe的Makefile？</p><p>如果还有部分runtest失败：</p><pre><code>[  FAILED  ] SGDSolverTest/0.TestSnapshotShare, where TypeParam = caffe::CPUDevice&lt;float&gt;[  FAILED  ] AdaGradSolverTest/0.TestSnapshotShare, where TypeParam = caffe::CPUDevice&lt;float&gt;[  FAILED  ] NesterovSolverTest/0.TestSnapshot, where TypeParam = caffe::CPUDevice&lt;float&gt;[  FAILED  ] NesterovSolverTest/0.TestSnapshotShare, where TypeParam = caffe::CPUDevice&lt;float&gt;[  FAILED  ] AdaDeltaSolverTest/0.TestSnapshotShare, where TypeParam = caffe::CPUDevice&lt;float&gt;[  FAILED  ] AdamSolverTest/0.TestSnapshotShare, where TypeParam = caffe::CPUDevice&lt;float&gt;[  FAILED  ] RMSPropSolverTest/0.TestSnapshotShare, where TypeParam = caffe::CPUDevice&lt;float&gt;</code></pre><p>在<code>/etc/profile</code>加入：</p><figure class="highlight bash"><table><tr><td class="gutter"><pre><span class="line">1</span><br><span class="line">2</span><br></pre></td><td class="code"><pre><span class="line"><span class="built_in">export</span> CUDA_VISIBLE_DEVICES=0</span><br><span class="line"><span class="built_in">export</span> MKL_CBWR=AUTO</span><br></pre></td></tr></table></figure><p>别忘了<code>source /etc/profile</code>。</p>]]></content>
    
    <summary type="html">
    
      &lt;p&gt;Caffe官网的 &lt;a href=&quot;http://caffe.berkeleyvision.org/installation.html&quot; target=&quot;_blank&quot; rel=&quot;noopener&quot;&gt;安装说明&lt;/a&gt; 实在太简单了点，主要是参考的 &lt;a href=&quot;https://gist.github.com/bearpaw/c38ef18ec45ba6548ec0#file-caffe-ubuntu-14-04-64bit-cuda-6-5-md&quot; target=&quot;_blank&quot; rel=&quot;noopener&quot;&gt;Caffe + Ubuntu 14.04 64bit + CUDA 6.5 配置说明&lt;/a&gt; 和 &lt;a href=&quot;http://weibo.com/p/2304189db078090102vdvx&quot; target=&quot;_blank&quot; rel=&quot;noopener&quot;&gt;Ubuntu14.04下安装Caffe总结&lt;/a&gt; 。系统是Ubuntu 14.04 64bit，显卡是GTX 950M。&lt;/p&gt;
&lt;h3 id=&quot;1-Caffe依赖包&quot;&gt;&lt;a href=&quot;#1-Caffe依赖包&quot; class=&quot;headerlink&quot; title=&quot;1. Caffe依赖包&quot;&gt;&lt;/a&gt;1. Caffe依赖包&lt;/h3&gt;&lt;figure class=&quot;highlight bash&quot;&gt;&lt;table&gt;&lt;tr&gt;&lt;td class=&quot;gutter&quot;&gt;&lt;pre&gt;&lt;span class=&quot;line&quot;&gt;1&lt;/span&gt;&lt;br&gt;&lt;span class=&quot;line&quot;&gt;2&lt;/span&gt;&lt;br&gt;&lt;/pre&gt;&lt;/td&gt;&lt;td class=&quot;code&quot;&gt;&lt;pre&gt;&lt;span class=&quot;line&quot;&gt;sudo apt-get install build-essential  &lt;span class=&quot;comment&quot;&gt;# basic requirement&lt;/span&gt;&lt;/span&gt;&lt;br&gt;&lt;span class=&quot;line&quot;&gt;sudo apt-get install libprotobuf-dev libleveldb-dev libsnappy-dev libopencv-dev libboost-all-dev libhdf5-serial-dev libgflags-dev libgoogle-glog-dev liblmdb-dev protobuf-compiler &lt;span class=&quot;comment&quot;&gt;#required by caffe&lt;/span&gt;&lt;/span&gt;&lt;br&gt;&lt;/pre&gt;&lt;/td&gt;&lt;/tr&gt;&lt;/table&gt;&lt;/figure&gt;
&lt;h3 id=&quot;2-安装CUDA-7-5&quot;&gt;&lt;a href=&quot;#2-安装CUDA-7-5&quot; class=&quot;headerlink&quot; title=&quot;2. 安装CUDA 7.5&quot;&gt;&lt;/a&gt;2. 安装CUDA 7.5&lt;/h3&gt;&lt;h4 id=&quot;2-1-禁用nouveau驱动&quot;&gt;&lt;a href=&quot;#2-1-禁用nouveau驱动&quot; class=&quot;headerlink&quot; title=&quot;2.1 禁用nouveau驱动&quot;&gt;&lt;/a&gt;2.1 禁用nouveau驱动&lt;/h4&gt;&lt;p&gt;我作死地相信了上述第二篇文章的话，没有禁用nouveau驱动，结果第一次重启神奇地成功了，第二次重启就无法登陆。。。后来用recovery mode禁用了nouveau。所以一定要禁用nouveau：&lt;/p&gt;
&lt;p&gt;创建文件&lt;code&gt;/etc/modprobe.d/blacklist-nouveau.conf&lt;/code&gt;&lt;/p&gt;
&lt;pre&gt;&lt;code&gt;blacklist nouveau
options nouveau modeset=0
&lt;/code&gt;&lt;/pre&gt;&lt;h4 id=&quot;2-2-安装CUDA&quot;&gt;&lt;a href=&quot;#2-2-安装CUDA&quot; class=&quot;headerlink&quot; title=&quot;2.2 安装CUDA&quot;&gt;&lt;/a&gt;2.2 安装CUDA&lt;/h4&gt;&lt;p&gt;在NVIDIA开发者&lt;a href=&quot;https://developer.nvidia.com/cuda-downloads&quot; target=&quot;_blank&quot; rel=&quot;noopener&quot;&gt;官网&lt;/a&gt;下载CUDA 7.5，我直接用的deb包，因为觉得比较方便。可以直接双击打开安装，也可以用命令行：&lt;/p&gt;
&lt;figure class=&quot;highlight bash&quot;&gt;&lt;table&gt;&lt;tr&gt;&lt;td class=&quot;gutter&quot;&gt;&lt;pre&gt;&lt;span class=&quot;line&quot;&gt;1&lt;/span&gt;&lt;br&gt;&lt;span class=&quot;line&quot;&gt;2&lt;/span&gt;&lt;br&gt;&lt;span class=&quot;line&quot;&gt;3&lt;/span&gt;&lt;br&gt;&lt;/pre&gt;&lt;/td&gt;&lt;td class=&quot;code&quot;&gt;&lt;pre&gt;&lt;span class=&quot;line&quot;&gt;sudo dpkg -i cuda-repo-&amp;lt;distro&amp;gt;_&amp;lt;version&amp;gt;_&amp;lt;architecture&amp;gt;.deb&lt;/span&gt;&lt;br&gt;&lt;span class=&quot;line&quot;&gt;sudo apt-get update&lt;/span&gt;&lt;br&gt;&lt;span class=&quot;line&quot;&gt;sudo apt-get install cuda&lt;/span&gt;&lt;br&gt;&lt;/pre&gt;&lt;/td&gt;&lt;/tr&gt;&lt;/table&gt;&lt;/figure&gt;
&lt;p&gt;都说要禁用lightdm安装cuda，但是用deb包安装的话没有关掉lightdm也没有遇到什么问题。安装完CUDA以后使用的就是nvidia闭源驱动了。&lt;/p&gt;
    
    </summary>
    
    
      <category term="OpenCV" scheme="https://www.sun11.me/tags/OpenCV/"/>
    
      <category term="Linux" scheme="https://www.sun11.me/tags/Linux/"/>
    
      <category term="PRML" scheme="https://www.sun11.me/tags/PRML/"/>
    
  </entry>
  
  <entry>
    <title>Hexo主题Paperbox</title>
    <link href="https://www.sun11.me/blog/2016/hexo-theme-paperbox/"/>
    <id>https://www.sun11.me/blog/2016/hexo-theme-paperbox/</id>
    <published>2016-02-12T15:56:11.000Z</published>
    <updated>2019-07-20T02:59:45.726Z</updated>
    
    <content type="html"><![CDATA[<p><img src="/images/hexo-theme-paperbox/responsive-design.png" alt="Responsive Design"></p><p>基于基于Landscape主题的Landscape-Plus主题修改而来的主题，带有几张纸和一个会动的<strong>纸盒子</strong>。</p><p>3年前折腾Hexo的时候看到自带的light主题，风格很喜欢，感觉很简洁，只是有点<strong>太</strong>简洁了…</p><p>于是自己动手改造。发现light主题的文章背景和widget背景都有点像纸的样子，就有了个想法，把所有的东西都变成纸！碰巧在<a href="http://cssdeck.com/labs/9avpkiv8vl" target="_blank" rel="noopener">cssdeck</a>看到了一个很酷的用CSS做成的立方体，于是直接拿来做成了一个<code>纸盒子</code>，即Paperbox。然后给文章的白色背景增加了卷起边角的阴影，这就是当时的Paperbox主题：</p><p><img src="/images/hexo-theme-paperbox/old-paperbox-theme1.png" alt="Old Paperbox"></p><a id="more"></a><p><img src="/images/hexo-theme-paperbox/old-paperbox-theme2.png" alt="Old Paperbox"></p><p>然而当时对移动设备的响应式设计几乎一无所知，所以这个主题在移动设备下简直就是一团糟。。。后来Hexo2.4以后有了Landscape主题，于是我就把Paperbox再修改了一次，不过当时精力有限对github的操作也是每次用了就忘，木有上传更新代码。。。只用到了自己的博客上。</p><p>有一篇关于苹果网站首页CSS特效的<a href="http://blog.zhusee.in/post/40014919870/curved-shadow-by-css-box-shadow" target="_blank" rel="noopener">文章</a>，用这个效果替换了原来的边角卷起（原来的边角卷起在文章内容比较长的时候貌似会出现问题）。然后用上了CSS的动画让纸盒子<a href="http://cssdeck.com/labs/htore5cz" target="_blank" rel="noopener">动</a>了起来，主导航栏也重新设计了一下，效果就跟现在的一样。不过这样的主题仍然存在不少bug，很多主题在PC上看起来很正常，但是到了宽度只有320点的iPhone 4-5s上面的时候就各种毛病了。。。</p><p>然后。。。就到了现在，来填坑了。。。</p><p>时间已经是2016年，Hexo已经进化到了3.1.1。。。作者更新得真他妈快。。。</p><p>Landscape有了一个叫做Landscape-plus的衍生主题，有不少功能增强，所以我就以它为起点，把原来的外观再照搬过去。不过搬过去的过程中发现不少显示细节上的问题，强迫症不能忍…比如，把浏览器窗口缩小至移动设备大小，点开导航按钮，然后再最大化。。。（完全不是一个正常用户干的事！蛇精病!)，不过我就是不能忍地把它给修复了。。。</p><p>还有，页面里每个文章都有分享按钮，如果点了一篇文章的分享按钮不关闭，再点另一个分享按钮不关闭，回来再点原来文章的分享按钮，突然失灵了。。。（同样蛇精病！）但我还是不能忍地修好了。。。</p><p>还有底部分页器（Paginator）的<code>...</code>在移动设备界面也显示出来，我把它给隐藏了。。。</p><p>还有很多这样的小细节问题，都给解决了。</p><p>最头疼的是mathjax的公式，因为不管怎么改CSS我发现公式太长都会溢出文章元素外，后来改用catx的<a href="https://github.com/akfish/hexo-math" target="_blank" rel="noopener">hexo-math插件</a>，加上这句css：</p><figure class="highlight css"><table><tr><td class="gutter"><pre><span class="line">1</span><br><span class="line">2</span><br></pre></td><td class="code"><pre><span class="line"><span class="selector-class">.MathJax_Display</span></span><br><span class="line">    <span class="selector-tag">overflow-x</span>: <span class="selector-tag">auto</span></span><br></pre></td></tr></table></figure><p>就解决了。。。(不过在某些渲染器下不存在这个类，这我就撒手不管了…)</p><p>另外对主题原生的分享按钮做了增强，把Pinterest换成了Linkedin，毕竟Pinterest上的大多都是图片。。。然后加上了国内的四个社交网站，微博，人人，QQ空间，微信，用jquery的qrcode插件生成文章链接的QR码用来做微信的分享。百度的那个分享感觉太累赘（而且还有js的warning），还和swiftype有冲突，干脆就删掉了。</p><p>文章目录（TOC）的添加是参考的<a href="http://kuangqi.me/tricks/enable-table-of-contents-on-hexo/" target="_blank" rel="noopener">这篇文章</a>。</p><p>最后来测试一下Mathjax的公式显示：</p><script type="math/tex; mode=display">i\hbar\frac{\partial \psi}{\partial t}= \frac{-\hbar^2}{2m} \left(\frac{\partial^2}{\partial x^2}+ \frac{\partial^2}{\partial y^2}+ \frac{\partial^2}{\partial z^2}\right) \psi + V \psi.</script>]]></content>
    
    <summary type="html">
    
      &lt;p&gt;&lt;img src=&quot;/images/hexo-theme-paperbox/responsive-design.png&quot; alt=&quot;Responsive Design&quot;&gt;&lt;/p&gt;
&lt;p&gt;基于基于Landscape主题的Landscape-Plus主题修改而来的主题，带有几张纸和一个会动的&lt;strong&gt;纸盒子&lt;/strong&gt;。&lt;/p&gt;
&lt;p&gt;3年前折腾Hexo的时候看到自带的light主题，风格很喜欢，感觉很简洁，只是有点&lt;strong&gt;太&lt;/strong&gt;简洁了…&lt;/p&gt;
&lt;p&gt;于是自己动手改造。发现light主题的文章背景和widget背景都有点像纸的样子，就有了个想法，把所有的东西都变成纸！碰巧在&lt;a href=&quot;http://cssdeck.com/labs/9avpkiv8vl&quot; target=&quot;_blank&quot; rel=&quot;noopener&quot;&gt;cssdeck&lt;/a&gt;看到了一个很酷的用CSS做成的立方体，于是直接拿来做成了一个&lt;code&gt;纸盒子&lt;/code&gt;，即Paperbox。然后给文章的白色背景增加了卷起边角的阴影，这就是当时的Paperbox主题：&lt;/p&gt;
&lt;p&gt;&lt;img src=&quot;/images/hexo-theme-paperbox/old-paperbox-theme1.png&quot; alt=&quot;Old Paperbox&quot;&gt;&lt;/p&gt;
    
    </summary>
    
    
      <category term="Customize" scheme="https://www.sun11.me/tags/Customize/"/>
    
      <category term="Web" scheme="https://www.sun11.me/tags/Web/"/>
    
  </entry>
  
  <entry>
    <title>Rosmin与Rossum</title>
    <link href="https://www.sun11.me/blog/2013/rosmin-and-rossum/"/>
    <id>https://www.sun11.me/blog/2013/rosmin-and-rossum/</id>
    <published>2013-08-10T11:45:02.000Z</published>
    <updated>2019-07-20T02:59:45.727Z</updated>
    
    <content type="html"><![CDATA[<p>Rossum demo:</p><div class="video-container"><iframe height="270" width="480" src="https://player.youku.com/embed/XNTY0MTUwMTMy?x" frameborder="0" allowfullscreen></iframe></div><p>Rosmin demo:</p><div class="video-container"><iframe height="270" width="480" src="https://player.youku.com/embed/XNDg2OTMzNDEy" frameborder="0" allowfullscreen></iframe></div><h3 id="Rosmin"><a href="#Rosmin" class="headerlink" title="Rosmin"></a>Rosmin</h3><p>项目地址：<a href="https://code.google.com/p/wtfrobot-rosmin/" target="_blank" rel="noopener">https://code.google.com/p/wtfrobot-rosmin/</a></p><p>相关文章：</p><p><a href="http://blog.csdn.net/wtfrobot/article/details/8029640/" target="_blank" rel="noopener">Rosmin—OpenCV Color Blob Tracker on Android</a></p><p><a href="http://blog.csdn.net/wtfrobot/article/details/8034640/" target="_blank" rel="noopener">Android下PocketSphinx的离线语音识别</a></p><p><a href="http://blog.csdn.net/wtfrobot/article/details/9173609/" target="_blank" rel="noopener">Rosmin—OpenCV Color Blob Tracker on Android</a></p><p><a href="http://blog.csdn.net/wtfrobot/article/details/9173619/" target="_blank" rel="noopener">Rosmin—两台Android手机的Socket双向通信</a></p><p><a href="http://blog.csdn.net/wtfrobot/article/details/9173631/" target="_blank" rel="noopener">Rosmin—在Android上绘制小车行进路线图并标记</a></p><p><a href="http://blog.csdn.net/wtfrobot/article/details/9173643/" target="_blank" rel="noopener">Rosmin—折腾USB Host Shield的日子</a></p><p>Rosmin机器人是我们去年（2012年）制作的一个使用Arduino驱动的小型移动机器人，连接上Android手机，可以完成手机控制的基本运动，追踪乒乓球，以QR码为人工路标移动到指定区域，搜寻目标，视频监控等等。</p><p>硬件结构：<br><img src="/images/54389a22c578eb6789380abdc70ea156.png" alt></p><a id="more"></a><p>软件结构：<br><img src="/images/fa93e566fdba33847d86c97c66e9f6fa.png" alt></p><ul><li><p>图像处理</p><p>利用Android版OpenCV的ColorBlobTrack，控制舵机追踪乒乓球一类有明显颜色特征的物体。</p></li><li><p>语音识别</p><p>利用CMU Sphinx语音库实现的小范围离线语音识别，识别速度、准确度都还不错，而且是离线的，不需要连接网络。</p></li><li><p>Google ADK Mega2560</p><p>使用Google ADK Mega2560 通过USB线与Android手机相连，让小车由小车上搭载的手机运行的服务端程序控制，另外另一台Android设备通过WiFi连接到小车上的手机作为客户端可对小车远程控制。</p></li><li><p>陀螺仪</p></li></ul><p>用陀螺仪的角加速度信息计算出角度，综合手机发出的控制命令绘制小车运行轨迹。</p><p>实现的功能有：</p><ol><li><p>基本运动：用Android设备控制小车完成基本运动，可以用控制界面的按钮和语音来操控。如前进，后退，停止，左转，右转，车身左转90度，车身右转90度，舵机云台的转动等。</p></li><li><p>追踪乒乓球： 由小车上的Android手机做图像处理获取小球坐标，通过Arduino控制舵机对正小球。根据小球偏离中心位置的距离调整运动速度。详见这篇：<a href="http://blog.csdn.net/sununs11/article/details/8034294" target="_blank" rel="noopener">Rosmin—OpenCV Color Blob Tracker on Android</a><br><img src="/images/c15d2ab7157f666de39873659dd37697.jpg" alt></p></li><li><p>以QR码为人工路标的导航： 我们设计了一个以QR码作为人工路标的导航策略，根据超声波传感器检测拐角，利用QR码提供的信息和陀螺仪传感器的信息运动到指定区域。会有一篇水论文，不过现在还没发出来。<br><img src="/images/c6b152e0d811b66b675a416fe8ded013.png" alt></p></li><li><p>绘制运动轨迹： 我们利用Android上的Google Maps控件做了一个绘制小车运动轨迹的程序，由小车上手机陀螺仪获取角加速度，计算出角度。不知是我们算法不行还是手机加速度计不够精确，用加速度计算出的里程误差太大根本用不了。于是我们就给小车一个恒定的速度，综合控制命令的信息（比如前进后退停止）来绘制轨迹。在客户端可以显示出小车的运行轨迹，还有QR码路标和目标的位置。详见这篇：<a href="http://blog.csdn.net/f_season/article/details/9171523" target="_blank" rel="noopener">在Android上绘制小车行进路线图并标记</a><br><img src="/images/2685dfa7f0443ccf12d4a01a1c3b2568.jpeg" alt></p></li><li><p>寻找目标： 不断转动寻找目标，发现目标以后就向目标前进。根据目标区域面积判断是否足够靠近，足够靠近了就认为到达了目标自动停止。关于怎么检测目标和计算目标区域面积仍然在：<a href="http://blog.csdn.net/sununs11/article/details/8034294" target="_blank" rel="noopener">Rosmin—OpenCV Color Blob Tracker on Android</a><br><img src="/images/6d604c137f34654f216066332f1245e0.jpg" alt></p></li><li><p>视频监控： 用手机的WiFi Camera应用即可，可以通过PC端的Web界面控制。<br><img src="/images/2eb1613837654cb598482f7b495cc4ee.jpg" alt></p></li></ol><h3 id="Rossum"><a href="#Rossum" class="headerlink" title="Rossum"></a>Rossum</h3><p>项目地址：<a href="https://code.google.com/p/wtfrobot-rossum/" target="_blank" rel="noopener">https://code.google.com/p/wtfrobot-rossum/</a></p><p>相关文章：</p><p><a href="http://blog.csdn.net/wtfrobot/article/details/9173633/" target="_blank" rel="noopener">Rossum—Android上ROS开发介绍与安装简介</a></p><p><a href="http://blog.csdn.net/wtfrobot/article/details/9881749/" target="_blank" rel="noopener">Rossum—PID与里程计</a></p><p><a href="http://blog.csdn.net/wtfrobot/article/details/9881771/" target="_blank" rel="noopener">Rossum—slam</a></p><p><a href="http://blog.csdn.net/wtfrobot/article/details/9881815/" target="_blank" rel="noopener">Rossum—Android上ROS开发——android_core创建一个android应用</a></p><p><a href="http://blog.csdn.net/wtfrobot/article/details/9881859/" target="_blank" rel="noopener">Rossum—ROSjava-android控制ROS机器人</a></p><p><a href="http://blog.csdn.net/wtfrobot/article/details/9881889/" target="_blank" rel="noopener">Rossum—ROSjava的消息发送</a></p><p><a href="http://blog.csdn.net/wtfrobot/article/details/9881965/" target="_blank" rel="noopener">Rossum—tpofinder 平面纹理物体识别</a></p><p>Rossum是我们以ROS机器人操作系统为核心做的一个自主导航机器人，名字来自于《罗萨姆的万能机器人( Rossum’s Universal Robots)》里的Rossum一词。使用 Kinect 传感器模拟激光测距仪,Arduino 控制器驱动电机控制机器人运动,Atom上网本置于机器人内作为主要的处理设备。<br><img src="/images/7239941384c0d7713355636d212b0035.png" alt></p><p>实现的功能：</p><ol><li><p>基本运动控制： 机器人运动模式为轮式运动,由两个驱动轮驱动机器人运动,一个万向轮辅助,采用 PI 反馈,闭环控制机器人速度,可以精确平滑地控制机器人的运动,同时利用编码器获取的数据,由运动学模型推算机器人的当前坐标系位姿。</p></li><li><p>语音控制： 通过 Android 手机发送语音控制机器人运动,可进行离线英文语音识别(和Rosmin相同)，在线中文语音识别(讯飞)。</p></li><li><p>跟随运动： 即turtlebot_follower，使机器人与人保持一定距离并正对人体,当人转向或移动时,机器人相应跟随人体转向和移动。</p></li><li><p>同时定位与地图构建(SLAM)： 移动机器人在未知环境中依靠传感器获取的信息进行环境建模,同时利用所创建的环境地图估计其本身的位姿。</p></li><li><p>自主导航： 在构建出静态地图的基础上,实现机器人从一个位置运动到地图上的另一个指定位置。</p></li><li><p>物体识别： 利用tpofinder,实现识别有纹理特征的物体,如书本封面,咖啡盒等，识别后用TTS发声，通过舵机云台对准物体。详见：<a href="http://blog.csdn.net/sununs11/article/details/9180085" target="_blank" rel="noopener">Rossum—tpofinder 平面纹理物体识别</a></p></li></ol><p>最开始确定方案的时候我们找到了<a href="http://www.hessmer.org/blog/2011/04/10/2d-slam-with-ros-and-kinect/" target="_blank" rel="noopener">Dr. Rainer Hessmer的一篇文章</a>,它是用Kinect来模拟激光测距仪来做SLAM的，里程计只靠电机上的编码器。他的博客上讲得非常详细，Arduino的介绍，Kinect模拟激光测距仪，惯性导航，SLAM和路径规划的参数这些全都有。当时我们啥都不懂，就把他的博客打印出来一篇一篇地看。</p><p>由于时间很紧，而且在机器人功能还没完全实现前就要写各种文档，我们真正用在这个机器人身上的开发时间很少，甚至可能不如Rosmin，但这个项目却是准备时间最长的，从一开始接触ROS，Android编程，Python，长时间犹豫不决地选购底盘，到后来的调试SLAM耗时有半年，调试SLAM和导航实际时间也就一个多月。</p><p>一开始我还想在ARM上实现它。那个时候ROS的网站上还没有Ubuntu ARM的源，但是刚刚发布ROS Groovy，把构建工具由rosbuild改成了catkin，还给出了详细的编译步骤。于是我就照着步骤编译了一下，<a href="http://www.sun11.me/blog/ros-on-arm--native-compile-ros-on-rk3066/">核心包比较顺利地编译成功了</a>。不过现在即使官方网站有源了，除了核心的库外，其它比较上层的包多数都没有构建成功。用它来做难度太大，而且性能不太好，于是我还是放弃了。图个方便不想遇到驱动问题，而且那时侯我们时间也比较紧了，所以没用mini-itx主板什么的，直接用了10寸的Atom上网本。至于底盘，在ROS的qq群里刚好发现有人出售专门用于ROS的机器人底盘<a href="http://boomrangrobot.sinaapp.com/" target="_blank" rel="noopener">Boomerang</a>，于是我们就直接买了，包括它整个亚克力板的外壳和两个带编码器的电机、轮子。</p><p>虽然我们找到了这么详细的教程，不过要适配上我们的机器人硬件仍然有很多麻烦。Dr. Rainer Hessmer使用的ros版本是electric，而我们要用fuerte，有一些代码要改，比如参数的双引号什么的。还有一些包被废弃了，改名了，要把launch文件改一下。还有Kinect放置的位置和轮子的距离参数之类的，里程计的调试耗费了最长时间。但是编码器精确度有限，到最后里程计也还是很不准的。在我们视频里可以发现，其实机器人的位置估计是很不准的，万幸的是可以用SLAM算法纠正过来，在SLAM建图的时候注意对准拐角，建出的地图勉强可用，我们还可以用GIMP或者其它图片编辑工具小小滴修正一下，用来导航效果还行。SLAM的参数我们一开始尝试调过，不过后来觉得调整的意义不大，因为Dr. Rainer Hessmer做的已经很好了，我们效果没他的好主要原因应该是里程计。关于PID和里程计：<a href="http://blog.csdn.net/xiaoqiaoaidianzi/article/details/9179809/" target="_blank" rel="noopener">http://blog.csdn.net/xiaoqiaoaidianzi/article/details/9179809/</a>,slam:<a href="http://blog.csdn.net/xiaoqiaoaidianzi/article/details/9190829/" target="_blank" rel="noopener">http://blog.csdn.net/xiaoqiaoaidianzi/article/details/9190829/</a></p><p>地图手工修正前后对比：<br><img src="/images/1aeabdfde10505cca6a2d87994b19dcf.png" alt></p><p>最后，其实我开始想实现的远远不止这些，我还想用OpenCV的blob检测来绘制出空中乒乓球的运动轨迹，利用运动轨迹做一些有意思的事情，让机器人具有简单的“认知”，还有三维的rgbd-slam，还有PCL的三维物体识别，还有利用语音识别让机器人完成一些有逻辑的任务，可惜时间远远比我们预料的少，遇到的问题远远比我们预料的多，我们的精力也有限，仍然有一些遗憾吧，现在我们WTFRobot团队的三人都已经加入考研大军了。</p><p><img src="/images/0123ae700d696feab9ee6379956a1512.jpg" alt></p><p><img src="/images/a26081e9e8c6b4a7f6a87984574eac06.jpg" alt></p>]]></content>
    
    <summary type="html">
    
      &lt;p&gt;Rossum demo:&lt;/p&gt;
&lt;div class=&quot;video-container&quot;&gt;
&lt;iframe height=&quot;270&quot; width=&quot;480&quot; src=&quot;https://player.youku.com/embed/XNTY0MTUwMTMy?x&quot; frameborder=&quot;0&quot; allowfullscreen&gt;&lt;/iframe&gt;
&lt;/div&gt;

&lt;p&gt;Rosmin demo:&lt;/p&gt;
&lt;div class=&quot;video-container&quot;&gt;
&lt;iframe height=&quot;270&quot; width=&quot;480&quot; src=&quot;https://player.youku.com/embed/XNDg2OTMzNDEy&quot; frameborder=&quot;0&quot; allowfullscreen&gt;&lt;/iframe&gt;
&lt;/div&gt;

&lt;h3 id=&quot;Rosmin&quot;&gt;&lt;a href=&quot;#Rosmin&quot; class=&quot;headerlink&quot; title=&quot;Rosmin&quot;&gt;&lt;/a&gt;Rosmin&lt;/h3&gt;&lt;p&gt;项目地址：&lt;a href=&quot;https://code.google.com/p/wtfrobot-rosmin/&quot; target=&quot;_blank&quot; rel=&quot;noopener&quot;&gt;https://code.google.com/p/wtfrobot-rosmin/&lt;/a&gt;&lt;/p&gt;
&lt;p&gt;相关文章：&lt;/p&gt;
&lt;p&gt;&lt;a href=&quot;http://blog.csdn.net/wtfrobot/article/details/8029640/&quot; target=&quot;_blank&quot; rel=&quot;noopener&quot;&gt;Rosmin—OpenCV Color Blob Tracker on Android&lt;/a&gt;&lt;/p&gt;
&lt;p&gt;&lt;a href=&quot;http://blog.csdn.net/wtfrobot/article/details/8034640/&quot; target=&quot;_blank&quot; rel=&quot;noopener&quot;&gt;Android下PocketSphinx的离线语音识别&lt;/a&gt;&lt;/p&gt;
&lt;p&gt;&lt;a href=&quot;http://blog.csdn.net/wtfrobot/article/details/9173609/&quot; target=&quot;_blank&quot; rel=&quot;noopener&quot;&gt;Rosmin—OpenCV Color Blob Tracker on Android&lt;/a&gt;&lt;/p&gt;
&lt;p&gt;&lt;a href=&quot;http://blog.csdn.net/wtfrobot/article/details/9173619/&quot; target=&quot;_blank&quot; rel=&quot;noopener&quot;&gt;Rosmin—两台Android手机的Socket双向通信&lt;/a&gt;&lt;/p&gt;
&lt;p&gt;&lt;a href=&quot;http://blog.csdn.net/wtfrobot/article/details/9173631/&quot; target=&quot;_blank&quot; rel=&quot;noopener&quot;&gt;Rosmin—在Android上绘制小车行进路线图并标记&lt;/a&gt;&lt;/p&gt;
&lt;p&gt;&lt;a href=&quot;http://blog.csdn.net/wtfrobot/article/details/9173643/&quot; target=&quot;_blank&quot; rel=&quot;noopener&quot;&gt;Rosmin—折腾USB Host Shield的日子&lt;/a&gt;&lt;/p&gt;
&lt;p&gt;Rosmin机器人是我们去年（2012年）制作的一个使用Arduino驱动的小型移动机器人，连接上Android手机，可以完成手机控制的基本运动，追踪乒乓球，以QR码为人工路标移动到指定区域，搜寻目标，视频监控等等。&lt;/p&gt;
&lt;p&gt;硬件结构：&lt;br&gt;&lt;img src=&quot;/images/54389a22c578eb6789380abdc70ea156.png&quot; alt&gt;&lt;/p&gt;
    
    </summary>
    
    
      <category term="Robot" scheme="https://www.sun11.me/tags/Robot/"/>
    
  </entry>
  
  <entry>
    <title>ROS on ARM--RK3066上本地编译ROS Groovy</title>
    <link href="https://www.sun11.me/blog/2013/ros-on-arm--native-compilation-on-rk3066/"/>
    <id>https://www.sun11.me/blog/2013/ros-on-arm--native-compilation-on-rk3066/</id>
    <published>2013-02-03T15:08:16.000Z</published>
    <updated>2019-07-20T02:59:45.727Z</updated>
    
    <content type="html"><![CDATA[<h3 id="1-开源机器人操作系统ROS-Robot-Operating-System-简介"><a href="#1-开源机器人操作系统ROS-Robot-Operating-System-简介" class="headerlink" title="1. 开源机器人操作系统ROS(Robot Operating System)简介"></a>1. 开源机器人操作系统ROS(Robot Operating System)简介</h3><p>ROS（Robot Operating System）是一个开源的为机器人软件开发设计的软件框架，在异构计算机集群中提供类似操作系统的功能。它并不是一个计算机的操作系统，而是机器人的操作系统，或者称为元级操作系统（Meta Operating System）。据目前唯一一本比较官方的关于ROS的书《ROS By Example Volume 1》介绍，“The primary goal of ROS (pronounced “Ross”) is to provide a unified and open source<br>programming framework for controlling robots in a variety of real world and simulated<br>environments.”，ROS的原始目的就是为了在一系列真实和模拟的环境中控制机器人提供一个统一的开源编程框架。为了实现这一目标，ROS架构中有<a href="http://www.ros.org/wiki/ROS/Concepts" target="_blank" rel="noopener">三个层次</a>的概念：文件系统级（Filesystem Level），计算图级（Computation Graph Level）和社区级（Community Level）。<br>具体可以查阅<a href="http://zh.wikipedia.org/wiki/ROS" target="_blank" rel="noopener">维基百科</a>和<a href="http://www.ros.org/wiki/" target="_blank" rel="noopener">官网wiki</a>，这里就不过多介绍了。</p><h3 id="2-ROS-Groovy-Galapagos"><a href="#2-ROS-Groovy-Galapagos" class="headerlink" title="2. ROS Groovy Galapagos"></a>2. ROS Groovy Galapagos</h3><p><a href="http://www.ros.org/news/2012/12/ros-groovy-galapagos-released.html" target="_blank" rel="noopener">ROS Groovy Galapagos</a>是2012年12月31日发布的ROS最新版本，主要支持Ubuntu 11.10、Ubuntu 12.04和Ubuntu 12.10。提到这个版本的原因是它采用了新的构建系统——catkin，准备逐渐取代之前的rosbuild。它解决了rosbuild当中的几个问题，让ROS可以持续发展和扩大规模，相对于rosbuild更符合文件系统层次结构标准（Filesystem Hierarchy Standard，FHS），使在其它操作系统和架构上发布ROS包更加容易。正是这个原因让我在MK802 IIIS上编译ROS的时候轻松很多，如果编译之前的版本（比如fuerte）将会遇到更多问题。</p><p>因为catkin的引入，ROS文件系统级的Stacks概念被移除了，原因是Package和Stack之间依赖性跟踪出现的问题，取代的是元包（metapackage）的概念。</p><h3 id="3-Ubuntu-on-ARM"><a href="#3-Ubuntu-on-ARM" class="headerlink" title="3. Ubuntu on ARM"></a>3. Ubuntu on ARM</h3><p>ARM版Ubuntu的软件源是在<code>http://ports.ubuntu.com/</code>上，和桌面版的略有区别，我遇到的一个问题就是桌面版python-*的包ARM版几乎都没有，解决办法是使用python的包管理工具pip安装，比如桌面版上<code>apt-get install python-PACKAGENAME</code>，用<code>pip install PACKAGENAME</code>替代。据说easy_install的维护不够好，所以应该尽量用pip。</p><p>我使用的是RK3066上的Picuntu，关于Picuntu请看前一篇文章。</p><h3 id="4-编译ROS-for-ARM"><a href="#4-编译ROS-for-ARM" class="headerlink" title="4. 编译ROS for ARM"></a>4. 编译ROS for ARM</h3><a id="more"></a><p>从前为ARM编译一般都需要在x86的上位机上交叉编译，有一个叫做<a href="http://www.ros.org/wiki/eros" target="_blank" rel="noopener">EROS</a>的项目,但是似乎文档不全，个人觉得用它成功编译的人应该也不多。近几年ARM性能足够强了，在ARM运行的操作系统上直接编译也不是什么问题。所以完全可以参考官网<a href="http://ros.org/wiki/groovy/Installation/Source" target="_blank" rel="noopener">从源码编译</a>的教程，官网还特别搞了一个<a href="http://ros.org/wiki/groovy/Installation/Raspbian/Source" target="_blank" rel="noopener">在树莓派上编译</a>的教程。</p><p>当然，树莓派的内存只有512MB，而且是ARM 11，使用ROS会受到很大的限制，既然它都可以编译ROS Groovy，那么双核A9的RK3066，1G内存就更不是问题了。</p><p>下面一步步按照官网上从源码编译的wiki来：</p><h4 id="4-1-安装基础依赖包"><a href="#4-1-安装基础依赖包" class="headerlink" title="4.1 安装基础依赖包"></a>4.1 安装基础依赖包</h4><p>操作系统相关的：</p><pre><code>sudo apt-get install build-essential git python-pip</code></pre><p>ROS Common（或者叫ROS Base，Base Bones什么的）依赖的：</p><pre><code>sudo apt-get install libtinyxml-dev libgtest-dev  liblog4cxx10-dev</code></pre><p>注意这里只是在Picuntu RC2 上需要额外安装的库，可能你还会遇到其它库的问题。desktop或者desktop-full依赖的库更多，所以更难解决。</p><p>还有一些重要的工具：</p><pre><code>sudo pip install wstool rospkg rosdep</code></pre><p>可能会遇到很多<code>python-*</code>的包缺少的问题，需要用<code>sudo pip install PACKAGENAME</code>安装</p><p>安装完rosdep以后初始化一下：</p><pre><code>sudo rosdep initrosdep update</code></pre><h4 id="4-2-构建catkin包"><a href="#4-2-构建catkin包" class="headerlink" title="4.2 构建catkin包"></a>4.2 构建catkin包</h4><p>上面提到过，ROS Galapagos采用了新的构建工具catkin代替rosbuild，但并不是所有的包都转换成了catkin的版本，所以先构建ROS的核心包（使用catkin），然后再构建其余的使用rosbuild的部分。</p><h5 id="4-2-1-创建catkin工作空间"><a href="#4-2-1-创建catkin工作空间" class="headerlink" title="4.2.1 创建catkin工作空间"></a>4.2.1 创建catkin工作空间</h5><pre><code>mkdir ~/ros_catkin_wscd ~/ros_catkin_ws</code></pre><p>下一步是下载核心包的源码并构建它们，你有三种选择：</p><p>Desktop-Full Install: ROS, rqt, rviz, robot-generic libraries, 2D/3D simulators, navigation and 2D/3D perception</p><pre><code>wstool init -j8 src http://packages.ros.org/web/rosinstall/generate/raw/groovy/desktop-full</code></pre><p>Desktop Install : ROS, rqt, rviz, and robot-generic libraries</p><pre><code>wstool init -j8 src http://packages.ros.org/web/rosinstall/generate/raw/groovy/desktop-full</code></pre><p>ROS-Comm: (Bare Bones) ROS package, build, and communication libraries. No GUI tools.</p><pre><code>wstool init src -j8 http://packages.ros.org/web/rosinstall/generate/raw/groovy/ros_comm</code></pre><p>这个操作是下载catkin包的代码到<code>~/ros_catkin_ws/src</code>目录下，-j8是指并行下载8个包，在RK3066上是无压力的，如果是树莓派可能需要减少。</p><p>注意，在后面解决依赖关系和构建的时候很多包依赖的库可能会缺，你可以根据错误提示自行安装所缺的库。我在MK802 IIIS上只成功编译了ROS-Comm，Desktop编译失败了，而Desktop full在官网wiki中说还有问题：<code>There are build errors in desktop-full (gazebo simulator) at the moment, so the desktop variant is suggested at this time. See: https://code.ros.org/trac/ros-pkg/ticket/5595</code>。</p><p>还可以安装其它的包，如robot：</p><pre><code>wstool init -j8 http://packages.ros.org/web/rosinstall/generate/dry/raw/groovy/robot</code></pre><p>更多的可以在<a href="http://ros.org/reps/rep-0131.html#variants" target="_blank" rel="noopener">REP 131</a>中查阅。</p><h5 id="4-2-2-解决依赖关系"><a href="#4-2-2-解决依赖关系" class="headerlink" title="4.2.2 解决依赖关系"></a>4.2.2 解决依赖关系</h5><p>在构建包之前你必须确保你解决了所有的依赖关系</p><pre><code>rosdep install --from-paths src --ignore-src --rosdistro groovy -y</code></pre><p><code>--from-paths</code>选项表示我们想要安装某个文件夹下的所有包，这里是<code>src</code>文件夹。<code>--ignore-src</code>选项表示rosdep不应该从包管理器安装任何<code>src</code>文件夹的包，因为我们现在做的就是构建它。<code>--rosdistro</code>选项之所以需要是因为我们没有设置好ROS的环境，所以我们必须指明我们构建的是ROS的哪个版本。最后，<code>-y</code>选项表示出现的提示选择都选择<code>yes</code></p><p>另外如果你在安装某些包出现错误的情况下仍想安装其它所有可以安装的包，你可以使用-r选项，也就是<code>rosdep install --from-paths src --ignore-src --rosdistro groovy -yr</code>。</p><h5 id="4-2-3-构建catkin工作空间"><a href="#4-2-3-构建catkin工作空间" class="headerlink" title="4.2.3 构建catkin工作空间"></a>4.2.3 构建catkin工作空间</h5><p>调用<code>catkin_make_isolated</code>:</p><pre><code>./src/catkin/bin/catkin_make_isolated --install</code></pre><p>默认安装在<code>~/ros_catkin_ws/install_isolated</code>下，如果要安装到其它地方，比如<code>/opt/ros/groovy</code>，可以使用<code>--install-space /opt/ros/groovy</code></p><p>如果编译过程中出现错误提示缺少库，需要自行安装解决。</p><p>如果构建完成了，再执行：</p><pre><code>source ~/ros_catkin_ws/install_isolated/setup.bash</code></pre><p>如果你只需要ROS Common那么就结束了。可以测试一下在终端里输入<code>roscore</code>，我运行的时候报错了，后来注释掉了一个python文件里的几行就跑起来了，具体是哪个文件也忘了，根据报错的信息修改就可以了。</p><p><img src="/images/f0d3de5d6003319e3bee42370fa2b466.jpg" alt></p><h4 id="4-3-构建rosbuild包"><a href="#4-3-构建rosbuild包" class="headerlink" title="4.3 构建rosbuild包"></a>4.3 构建rosbuild包</h4><p>只构建ROS Common（Bare Bones）是不需要这一步的，在上一步我也没有成功编译desktop，<br>如果你成功了可以继续下面的步骤：</p><h5 id="4-3-1-创建rosbuild工作空间"><a href="#4-3-1-创建rosbuild工作空间" class="headerlink" title="4.3.1 创建rosbuild工作空间"></a>4.3.1 创建rosbuild工作空间</h5><pre><code>mkdir ~/ros_wscd ~/ros_wsrosws init . ~/ros_catkin_ws/install_isolated</code></pre><h5 id="4-3-2-下载ROS-Stacks"><a href="#4-3-2-下载ROS-Stacks" class="headerlink" title="4.3.2 下载ROS Stacks"></a>4.3.2 下载ROS Stacks</h5><p>Desktop-Full Install: 2d/3d simulators, navigation, robot models and several tutorial stacks</p><pre><code>rosws merge http://packages.ros.org/web/rosinstall/generate/dry/raw/groovy/desktop-full</code></pre><p>Desktop Install: ROS, rqt, rviz, and robot-generic libraries</p><pre><code>rosws merge http://packages.ros.org/web/rosinstall/generate/dry/raw/groovy/desktop</code></pre><p>Desktop-Full仍然有问题：<code>There are build errors in desktop-full (gazebo simulator) at the moment, so the desktop variant is suggested at this time. See: https://code.ros.org/trac/ros-pkg/ticket/5595</code></p><pre><code>rosws update -j8</code></pre><h5 id="4-3-3-构建ROS-Stacks"><a href="#4-3-3-构建ROS-Stacks" class="headerlink" title="4.3.3 构建ROS Stacks"></a>4.3.3 构建ROS Stacks</h5><p>下载完后：</p><pre><code>source ~/ros_ws/setup.bashrosmake -a</code></pre><h3 id="5-其它"><a href="#5-其它" class="headerlink" title="5. 其它"></a>5. 其它</h3><p>如果你不满足于ROS Common，而且跟我一样没有成功编译desktop的话，可以试试单独编译其它组件，比如OpenCV和PCL。</p><p>OpenCV 2.4.3的编译非常顺利，几乎没有遇到什么障碍，有GTK+2.0，highgui库都可以正常使用。</p><p><img src="/images/47326a0e384f8fb9d04dcd1eec575f19.jpg" alt></p><p>PCL在我去掉少数几个编译选项以后也成功了，pcl_viewer正常工作。//另外我还安装了OpenNI和Kinect驱动</p><p><img src="/images/d778fdf85992a2e308d31eb2192dbe64.jpg" alt></p><p>我编译PCL时的CMakeCache.txt在<a href="https://gist.github.com/4689753" target="_blank" rel="noopener">https://gist.github.com/4689753</a></p><h3 id="参考资料"><a href="#参考资料" class="headerlink" title="参考资料"></a>参考资料</h3><ol><li><a href="http://en.wikipedia.org/wiki/ROS_(Robot_Operating_System)" target="_blank" rel="noopener">http://en.wikipedia.org/wiki/ROS_(Robot_Operating_System)</a></li><li><a href="http://www.ros.org/wiki/" target="_blank" rel="noopener">http://www.ros.org/wiki/</a></li><li>R. Patrick Goebel,ROS By Example Volume 1</li><li><a href="http://www.ros.org/news/2012/12/ros-groovy-galapagos-released.html" target="_blank" rel="noopener">http://www.ros.org/news/2012/12/ros-groovy-galapagos-released.html</a></li><li><a href="http://ros.org/wiki/groovy/Installation/Source" target="_blank" rel="noopener">http://ros.org/wiki/groovy/Installation/Source</a></li><li><a href="http://answers.ros.org/question/10716/ros-on-arm/" target="_blank" rel="noopener">http://answers.ros.org/question/10716/ros-on-arm/</a></li><li><a href="http://ros.org/wiki/groovy/Installation/Raspbian/Source" target="_blank" rel="noopener">http://ros.org/wiki/groovy/Installation/Raspbian/Source</a></li></ol>]]></content>
    
    <summary type="html">
    
      &lt;h3 id=&quot;1-开源机器人操作系统ROS-Robot-Operating-System-简介&quot;&gt;&lt;a href=&quot;#1-开源机器人操作系统ROS-Robot-Operating-System-简介&quot; class=&quot;headerlink&quot; title=&quot;1. 开源机器人操作系统ROS(Robot Operating System)简介&quot;&gt;&lt;/a&gt;1. 开源机器人操作系统ROS(Robot Operating System)简介&lt;/h3&gt;&lt;p&gt;ROS（Robot Operating System）是一个开源的为机器人软件开发设计的软件框架，在异构计算机集群中提供类似操作系统的功能。它并不是一个计算机的操作系统，而是机器人的操作系统，或者称为元级操作系统（Meta Operating System）。据目前唯一一本比较官方的关于ROS的书《ROS By Example Volume 1》介绍，“The primary goal of ROS (pronounced “Ross”) is to provide a unified and open source&lt;br&gt;programming framework for controlling robots in a variety of real world and simulated&lt;br&gt;environments.”，ROS的原始目的就是为了在一系列真实和模拟的环境中控制机器人提供一个统一的开源编程框架。为了实现这一目标，ROS架构中有&lt;a href=&quot;http://www.ros.org/wiki/ROS/Concepts&quot; target=&quot;_blank&quot; rel=&quot;noopener&quot;&gt;三个层次&lt;/a&gt;的概念：文件系统级（Filesystem Level），计算图级（Computation Graph Level）和社区级（Community Level）。&lt;br&gt;具体可以查阅&lt;a href=&quot;http://zh.wikipedia.org/wiki/ROS&quot; target=&quot;_blank&quot; rel=&quot;noopener&quot;&gt;维基百科&lt;/a&gt;和&lt;a href=&quot;http://www.ros.org/wiki/&quot; target=&quot;_blank&quot; rel=&quot;noopener&quot;&gt;官网wiki&lt;/a&gt;，这里就不过多介绍了。&lt;/p&gt;
&lt;h3 id=&quot;2-ROS-Groovy-Galapagos&quot;&gt;&lt;a href=&quot;#2-ROS-Groovy-Galapagos&quot; class=&quot;headerlink&quot; title=&quot;2. ROS Groovy Galapagos&quot;&gt;&lt;/a&gt;2. ROS Groovy Galapagos&lt;/h3&gt;&lt;p&gt;&lt;a href=&quot;http://www.ros.org/news/2012/12/ros-groovy-galapagos-released.html&quot; target=&quot;_blank&quot; rel=&quot;noopener&quot;&gt;ROS Groovy Galapagos&lt;/a&gt;是2012年12月31日发布的ROS最新版本，主要支持Ubuntu 11.10、Ubuntu 12.04和Ubuntu 12.10。提到这个版本的原因是它采用了新的构建系统——catkin，准备逐渐取代之前的rosbuild。它解决了rosbuild当中的几个问题，让ROS可以持续发展和扩大规模，相对于rosbuild更符合文件系统层次结构标准（Filesystem Hierarchy Standard，FHS），使在其它操作系统和架构上发布ROS包更加容易。正是这个原因让我在MK802 IIIS上编译ROS的时候轻松很多，如果编译之前的版本（比如fuerte）将会遇到更多问题。&lt;/p&gt;
&lt;p&gt;因为catkin的引入，ROS文件系统级的Stacks概念被移除了，原因是Package和Stack之间依赖性跟踪出现的问题，取代的是元包（metapackage）的概念。&lt;/p&gt;
&lt;h3 id=&quot;3-Ubuntu-on-ARM&quot;&gt;&lt;a href=&quot;#3-Ubuntu-on-ARM&quot; class=&quot;headerlink&quot; title=&quot;3. Ubuntu on ARM&quot;&gt;&lt;/a&gt;3. Ubuntu on ARM&lt;/h3&gt;&lt;p&gt;ARM版Ubuntu的软件源是在&lt;code&gt;http://ports.ubuntu.com/&lt;/code&gt;上，和桌面版的略有区别，我遇到的一个问题就是桌面版python-*的包ARM版几乎都没有，解决办法是使用python的包管理工具pip安装，比如桌面版上&lt;code&gt;apt-get install python-PACKAGENAME&lt;/code&gt;，用&lt;code&gt;pip install PACKAGENAME&lt;/code&gt;替代。据说easy_install的维护不够好，所以应该尽量用pip。&lt;/p&gt;
&lt;p&gt;我使用的是RK3066上的Picuntu，关于Picuntu请看前一篇文章。&lt;/p&gt;
&lt;h3 id=&quot;4-编译ROS-for-ARM&quot;&gt;&lt;a href=&quot;#4-编译ROS-for-ARM&quot; class=&quot;headerlink&quot; title=&quot;4. 编译ROS for ARM&quot;&gt;&lt;/a&gt;4. 编译ROS for ARM&lt;/h3&gt;
    
    </summary>
    
    
      <category term="ROS" scheme="https://www.sun11.me/tags/ROS/"/>
    
      <category term="Linux" scheme="https://www.sun11.me/tags/Linux/"/>
    
      <category term="Android" scheme="https://www.sun11.me/tags/Android/"/>
    
      <category term="Embedded Linux" scheme="https://www.sun11.me/tags/Embedded-Linux/"/>
    
      <category term="Robot" scheme="https://www.sun11.me/tags/Robot/"/>
    
      <category term="Ubuntu" scheme="https://www.sun11.me/tags/Ubuntu/"/>
    
  </entry>
  
  <entry>
    <title>ROS on ARM--Picuntu 安装配置</title>
    <link href="https://www.sun11.me/blog/2013/ros-on-arm--picuntu-configuration/"/>
    <id>https://www.sun11.me/blog/2013/ros-on-arm--picuntu-configuration/</id>
    <published>2013-01-28T15:11:32.000Z</published>
    <updated>2019-07-20T02:59:45.727Z</updated>
    
    <content type="html"><![CDATA[<p>上篇提到一个叫做Picuntu的项目，目的是为RK3066芯片的设备移植传统Linux，目前基本的使用已经没有什么问题，UG802/MK808（不含MK808B）已经可以使用内置的无线网卡，而其它型号，比如MK802 IIIS或者UG007，由于使用的是MTK的芯片，没有办法找到驱动（话说国内厂商有几个遵守了GPL协议的）所以只能外接USB网卡。另外是VPU和Mali 400，<a href="http://www.slatedroid.com/topic/41654-pre-alpha-03-ubuntu-linux-for-mk802-iii-ug802-mk808-ug007-imito-mx1/page__st__380" target="_blank" rel="noopener">slatedroid</a>论坛里有人正在折腾。</p><p>MK80X开机后一般有两种模式，正常模式和恢复(recovery)模式。所以我们如果需要Android/Linux双启动，就只需要在recovery里刷入linux的kernel，Android可以正常运行互不影响。当然你也可以直接刷入原来的kernel空间覆盖掉Android，但是这种方式并不推荐。官方的recovery似乎功能不多，只有作为u盘的功能。Bob’s Finless ROM是一个修改的ROM，包含了替换recovery等img文件的工具。如果你的设备是MK808/MK808B或者UG802，就可以试试对应的Finless ROM，暂时没有针对其它型号的版本（公元2013年1月28日）。如果其它型号刷入，由于硬件不是都相同，可能会有一些问题。</p><p>需要的工具有：</p><ul><li>显示器<br>有HDMI接口直接插上就可以了，如果是VGA或者DVI接口的可以使用转接线，淘宝上有HDMI转VGA带3.5mm音频输出的转接线</li><li>RKAndroidTool v1.35<br>在<a href="http://www.armtvtech.com/armtvtechforum/viewtopic.php?f=12&amp;t=775" target="_blank" rel="noopener">Bob’s Finless ROM</a>的包里</li><li>一个大于4G的TF卡或U盘或移动硬盘</li><li>Linux和Windows<br>Windows用于刷入recovery，Linux用于格式化上面所说的TF卡或U盘，写入rootfs。这个要求似乎有点苛刻，但是你可以寻找Windows下用于Ext4文件系统格式化的工具，或者寻找Linux的刷入recovery的工具，但这可能更加麻烦。</li><li>USB网卡<br>如果你的设备不是UG802/MK808</li><li><a href="http://rk3066-linux.googlecode.com/files/ug802recovkernel.img" target="_blank" rel="noopener">Kernel镜像</a></li><li><a href="http://download.g8.net/picuntu/picuntu-linuxroot-0.9-RC2.2.tgz" target="_blank" rel="noopener">Root file system(Picuntu-linuxroot-0.9-RC2.2.tgz)</a><br>你也可以使用一个<a href="http://download.g8.net/picuntu/pre-picuntu-0.9-RC2.2.tgz" target="_blank" rel="noopener">安装脚本</a>来更方便地完成安装过程，但这里介绍最直接（或者麻烦？）的方式</li></ul><p>都准备好了的话，开刷吧！</p><a id="more"></a><h3 id="1-刷入kernel镜像"><a href="#1-刷入kernel镜像" class="headerlink" title="1. 刷入kernel镜像"></a><strong>1. 刷入kernel镜像</strong></h3><ul><li><p>把你的设备通过USB线与运行Windows的PC相连，注意不能用只用于供电的Micro USB口连接。</p></li><li><p>在Android中安装“终端模拟器”，打开终端模拟器输入<code>su</code>和<code>reboot bootloader</code>，设备会变成黑屏，Windows会检测到RK30的硬件。然后安装驱动，当然如果之前安装过就不需要。</p></li><li><p>打开RKAndroidTool,这时应该显示<code>Found RKAndroid Mass Storage Usb</code>，而不是<code>No found RKAndroid rock usb</code>，否则就是你的驱动没有安装好或者设备没有进入bootloader。</p></li><li><p><code>只</code>选择在recovery空间刷入recovery镜像，几秒之后刷好，立刻自动重启。</p></li><li><p>如果你重启以后进入recovery发现一只躺着的带着红色三角形Android，那么可能是你的recovery没有刷对。 //可能的原因是<code>recovery-from-boot.p</code>这个万恶的文件存在于你的Android系统根目录下，自动恢复原recovery，把它删掉或者重命名</p></li></ul><p>刷好以后你将看到Linux的控制台滚屏，然后就可以进行下一步了</p><h3 id="2-创建rootfs"><a href="#2-创建rootfs" class="headerlink" title="2. 创建rootfs"></a><strong>2. 创建rootfs</strong></h3><p>可以使用4GB以上容量的TF卡、U盘甚至移动硬盘来完成这步。</p><ul><li><p>在Linux上打开GParted，在存储设备上创建一个至少4GB的Ext4分区，卷标为<code>linuxroot</code>  //对，kernel就是根据这个卷标来找文件系统的</p></li><li><p>切换到root用户，解压tar压缩包，使用<code>copy -a</code>拷贝解压的所有文件和文件夹到linuxroot分区。 //注意最好不要直接解压到linuxroot分区，以我的失败经验做反例，好几次解压以后用不了就是一些文件没有完整复制过去</p></li></ul><p>如果进不了登录界面，可能就是一些文件没有完整复制过去，或者你没有切换到root用户，又或者是其它什么原因？比如我。</p><h3 id="3-配置"><a href="#3-配置" class="headerlink" title="3. 配置"></a><strong>3. 配置</strong></h3><p>首先我是没有成功用Picuntu直接进到图形登录界面的，不知道是哪里出的问题，但是用Ctrl+Alt+F2打开的控制台是可用的，用户名<code>ubuntu</code>，密码<code>ubuntu</code>，root用户密码是<code>12qwaszx</code>，登录以后输入startxfce4可以正常进入图形界面，其它一切功能正常。</p><p><em>如果</em> 你的显示器分辨率不够不支持1080p，那么最好用720p，在<code>/etc/rc.local</code>里取消</p><figure class="highlight plain"><table><tr><td class="gutter"><pre><span class="line">1</span><br><span class="line">2</span><br></pre></td><td class="code"><pre><span class="line"># fbset 1280x720-60-32 -a </span><br><span class="line"># fbset -rgba 8/16,8/8,8/0,8/24 -a</span><br></pre></td></tr></table></figure><p>这两行前面的’#’注释即可。</p><p><em>如果</em> 你使用的是USB无线网卡，那么你的设备名应该是wlan1,首先<code>sudo ifconfig wlan1 up</code>,然后<code>ifconfig</code>应该能看到你的无线网卡，默认的<code>/etc/network/interfaces</code>是这样的：</p><figure class="highlight plain"><table><tr><td class="gutter"><pre><span class="line">1</span><br><span class="line">2</span><br><span class="line">3</span><br><span class="line">4</span><br><span class="line">5</span><br><span class="line">6</span><br><span class="line">7</span><br><span class="line">8</span><br><span class="line">9</span><br><span class="line">10</span><br><span class="line">11</span><br><span class="line">12</span><br><span class="line">13</span><br><span class="line">14</span><br><span class="line">15</span><br><span class="line">16</span><br><span class="line">17</span><br></pre></td><td class="code"><pre><span class="line"> # interfaces(5) file used by ifup(8) and ifdown(8)</span><br><span class="line">auto lo</span><br><span class="line">iface lo inet loopback</span><br><span class="line"></span><br><span class="line"></span><br><span class="line"></span><br><span class="line"></span><br><span class="line"></span><br><span class="line"></span><br><span class="line">auto usbnet0</span><br><span class="line">iface usbnet0 inet dhcp</span><br><span class="line"></span><br><span class="line"></span><br><span class="line">auto wlan0</span><br><span class="line">iface wlan0 inet dhcp</span><br><span class="line">      wpa-ssid Alok_Yamuna</span><br><span class="line">      wpa-psk abcdefgh</span><br></pre></td></tr></table></figure><p>你需要改成</p><figure class="highlight plain"><table><tr><td class="gutter"><pre><span class="line">1</span><br><span class="line">2</span><br><span class="line">3</span><br><span class="line">4</span><br><span class="line">5</span><br><span class="line">6</span><br><span class="line">7</span><br><span class="line">8</span><br><span class="line">9</span><br><span class="line">10</span><br><span class="line">11</span><br><span class="line">12</span><br><span class="line">13</span><br><span class="line">14</span><br><span class="line">15</span><br><span class="line">16</span><br><span class="line">17</span><br></pre></td><td class="code"><pre><span class="line"> # interfaces(5) file used by ifup(8) and ifdown(8)</span><br><span class="line">auto lo</span><br><span class="line">iface lo inet loopback</span><br><span class="line"></span><br><span class="line"></span><br><span class="line"></span><br><span class="line"></span><br><span class="line"></span><br><span class="line"></span><br><span class="line">auto usbnet0</span><br><span class="line">iface usbnet0 inet dhcp</span><br><span class="line"></span><br><span class="line"></span><br><span class="line">auto wlan1</span><br><span class="line">iface wlan1 inet dhcp</span><br><span class="line">      wpa-ssid your-ssid</span><br><span class="line">      wpa-psk your-passwd</span><br></pre></td></tr></table></figure><p>连上网络之后一切都好办了，各种apt-get。。。</p><p><em>如果</em> 你的机器刷坏了，我。。。不负责。。。</p><h3 id="参考资料"><a href="#参考资料" class="headerlink" title="参考资料"></a>参考资料</h3><ol><li><a href="https://code.google.com/p/rk3066-linux/" target="_blank" rel="noopener">https://code.google.com/p/rk3066-linux/</a></li><li><a href="http://www.slatedroid.com/topic/41654-pre-alpha-03-ubuntu-linux-for-mk802-iii-ug802-mk808-ug007-imito-mx1/" target="_blank" rel="noopener">http://www.slatedroid.com/topic/41654-pre-alpha-03-ubuntu-linux-for-mk802-iii-ug802-mk808-ug007-imito-mx1/</a></li><li><a href="http://www.slatedroid.com/topic/46881-picuntu-09-rc-22-bug-fix-version-arrives/" target="_blank" rel="noopener">http://www.slatedroid.com/topic/46881-picuntu-09-rc-22-bug-fix-version-arrives/</a></li><li><a href="http://ubuntu.g8.net/" target="_blank" rel="noopener">http://ubuntu.g8.net/</a></li></ol>]]></content>
    
    <summary type="html">
    
      &lt;p&gt;上篇提到一个叫做Picuntu的项目，目的是为RK3066芯片的设备移植传统Linux，目前基本的使用已经没有什么问题，UG802/MK808（不含MK808B）已经可以使用内置的无线网卡，而其它型号，比如MK802 IIIS或者UG007，由于使用的是MTK的芯片，没有办法找到驱动（话说国内厂商有几个遵守了GPL协议的）所以只能外接USB网卡。另外是VPU和Mali 400，&lt;a href=&quot;http://www.slatedroid.com/topic/41654-pre-alpha-03-ubuntu-linux-for-mk802-iii-ug802-mk808-ug007-imito-mx1/page__st__380&quot; target=&quot;_blank&quot; rel=&quot;noopener&quot;&gt;slatedroid&lt;/a&gt;论坛里有人正在折腾。&lt;/p&gt;
&lt;p&gt;MK80X开机后一般有两种模式，正常模式和恢复(recovery)模式。所以我们如果需要Android/Linux双启动，就只需要在recovery里刷入linux的kernel，Android可以正常运行互不影响。当然你也可以直接刷入原来的kernel空间覆盖掉Android，但是这种方式并不推荐。官方的recovery似乎功能不多，只有作为u盘的功能。Bob’s Finless ROM是一个修改的ROM，包含了替换recovery等img文件的工具。如果你的设备是MK808/MK808B或者UG802，就可以试试对应的Finless ROM，暂时没有针对其它型号的版本（公元2013年1月28日）。如果其它型号刷入，由于硬件不是都相同，可能会有一些问题。&lt;/p&gt;
&lt;p&gt;需要的工具有：&lt;/p&gt;
&lt;ul&gt;
&lt;li&gt;显示器&lt;br&gt;有HDMI接口直接插上就可以了，如果是VGA或者DVI接口的可以使用转接线，淘宝上有HDMI转VGA带3.5mm音频输出的转接线&lt;/li&gt;
&lt;li&gt;RKAndroidTool v1.35&lt;br&gt;在&lt;a href=&quot;http://www.armtvtech.com/armtvtechforum/viewtopic.php?f=12&amp;amp;t=775&quot; target=&quot;_blank&quot; rel=&quot;noopener&quot;&gt;Bob’s Finless ROM&lt;/a&gt;的包里&lt;/li&gt;
&lt;li&gt;一个大于4G的TF卡或U盘或移动硬盘&lt;/li&gt;
&lt;li&gt;Linux和Windows&lt;br&gt;Windows用于刷入recovery，Linux用于格式化上面所说的TF卡或U盘，写入rootfs。这个要求似乎有点苛刻，但是你可以寻找Windows下用于Ext4文件系统格式化的工具，或者寻找Linux的刷入recovery的工具，但这可能更加麻烦。&lt;/li&gt;
&lt;li&gt;USB网卡&lt;br&gt;如果你的设备不是UG802/MK808&lt;/li&gt;
&lt;li&gt;&lt;a href=&quot;http://rk3066-linux.googlecode.com/files/ug802recovkernel.img&quot; target=&quot;_blank&quot; rel=&quot;noopener&quot;&gt;Kernel镜像&lt;/a&gt;&lt;/li&gt;
&lt;li&gt;&lt;a href=&quot;http://download.g8.net/picuntu/picuntu-linuxroot-0.9-RC2.2.tgz&quot; target=&quot;_blank&quot; rel=&quot;noopener&quot;&gt;Root file system(Picuntu-linuxroot-0.9-RC2.2.tgz)&lt;/a&gt;&lt;br&gt;你也可以使用一个&lt;a href=&quot;http://download.g8.net/picuntu/pre-picuntu-0.9-RC2.2.tgz&quot; target=&quot;_blank&quot; rel=&quot;noopener&quot;&gt;安装脚本&lt;/a&gt;来更方便地完成安装过程，但这里介绍最直接（或者麻烦？）的方式&lt;/li&gt;
&lt;/ul&gt;
&lt;p&gt;都准备好了的话，开刷吧！&lt;/p&gt;
    
    </summary>
    
    
      <category term="Linux" scheme="https://www.sun11.me/tags/Linux/"/>
    
      <category term="Android" scheme="https://www.sun11.me/tags/Android/"/>
    
      <category term="Embedded Linux" scheme="https://www.sun11.me/tags/Embedded-Linux/"/>
    
      <category term="Robot" scheme="https://www.sun11.me/tags/Robot/"/>
    
      <category term="Ubuntu" scheme="https://www.sun11.me/tags/Ubuntu/"/>
    
  </entry>
  
  <entry>
    <title>ROS on ARM--Linux For RK3066 Mini PC简介</title>
    <link href="https://www.sun11.me/blog/2013/ros-on-arm--linux-for-rk3066/"/>
    <id>https://www.sun11.me/blog/2013/ros-on-arm--linux-for-rk3066/</id>
    <published>2013-01-24T09:27:26.000Z</published>
    <updated>2019-07-20T02:59:45.727Z</updated>
    
    <content type="html"><![CDATA[<p><a href="http://www.cnbeta.com/articles/188613.htm" target="_blank" rel="noopener">去年6月左右</a>国内厂商（瑞科美 Rikomagic）推出了一款叫做MK802的Mini PC。采用Allwinner A10/ 1GHz Cortex-A8做处理器，运行Android 4.0系统，内存512MB或1G。实际上相当于一个没有触摸屏和电池的平板，不过可以用USB OTG连接鼠标键盘，通过HDMI接口输出音视频。</p><p>“少即是多”，正因为它小，靠外部供电而非电池，有很多扩展的可能性，上市以后很火。到现在淘宝一搜MK802，会出现各种各样厂商（比如酷优乐，联力胜）的也叫做MK802或者UG802,MK803,MK808,MK809的之类的产品。可以给它刷上Linux，然后把它当成一个普通PC使用（因为驱动的原因，用自带的Android可能是更好的选择）。或者，不接显示器，做一个Headless Server？接移动硬盘做一个BT下载机？又或者，加上Arduino，连接上各种传感器，作为机器人的主控制器？总之可以做到很多平板做不到的事情。这里有一个<a href="http://bluefox.com.tw/2012/11/22/%E5%AE%89%E5%8D%93-android-mini-pc-%E7%B0%A1%E6%98%93%E5%B0%8D%E7%85%A7%E8%A1%A8/#more-2654" target="_blank" rel="noopener">简易对照表</a>。</p><p>MK802的第一代产品是使用全志A10芯片的，在半年后看来这个芯片性能不够强了，运行桌面Ubuntu不是很流畅，但是它的Android ROM和Linux的支持已经比较完善了。后面有一个MK802 II是它的升级版，改动不大，系统基本也可以通用。</p><p>接下来出现了一个UG802,它不是由原来MK802的厂商瑞科美生产的，而是一个叫做酷优乐的公司。在搜索引擎上搜索“酷优乐”这个词都搜不到这个公司的网站。我是问淘宝客服才知道这个公司的网站的（kuyoule.cn），它是第一个使用RK3066芯片（1.66GHz,双核A9）的Mini PC。然后又出现了一个MK808（不知道是哪个产商的）ROM提升到8G，后来的MK808B增加了蓝牙，改进了WiFi天线（原来的好像WiFi信号不太好）。然后瑞科美才推出MK802 III，同样是使用RK3066芯片，不过个人感觉可能质量和ROM支持好一些。然后就是去年12月份推出的MK802 IIIS了，我买的就是这个。</p><p><img src="/images/7f826aef8756ce136c0262bd5a49a17f.jpg" alt></p><p><img src="/images/eccbaf8ff5d4a416e546a1f2e18401b7.jpg" alt></p><a id="more"></a><p>RK3066的linux源码从一个西班牙的公司释出，然后AndrewDB开始开发，<a href="http://www.slatedroid.com/topic/40717-ubuntu-linux-for-the-ug802" target="_blank" rel="noopener">成功跑上了Ubuntu 12.10</a>。</p><p>AndrewDB开发了一段时间，放出了kernel镜像和rootfs，最后的版本是Pre-Alpha 0.3,在MK802 III/UG802/MK808/UG007/iMito MX1等RK3066芯片的设备上都测试正常。然后他放出了一个Roadmap，就在论坛里神秘消失了==，再也没有出现。。。大神们都是神龙见首不见尾么。。。</p><p>AndrewDB在Google Code上创建了一个叫做<a href="https://code.google.com/p/rk3066-linux/" target="_blank" rel="noopener">rk3066-linux</a>的项目,现在主要由AlokSinha2001接手了。他用<a href="http://ubuntu.g8.net/" target="_blank" rel="noopener">MK808做了一个服务器</a>，现在已经持续运行一个月了。1月15号正式发布了PicUntu，主要对服务器的用途做了一些改进，做了一个安装脚本还有一个apk的安装导引。目前（2013年1月24日）最新的版本是0.9 RC 2.2，google code不让放那么大的文件下载，于是直接转到了那个用MK808做的网站上提供下载。</p><p>运行起来还算流畅，使用Chromium没有什么问题，用ports.ubuntu.com的软件源安装软件也很方便，只是速度有点慢(似乎没有其它镜像？)。<a href="http://www.slatedroid.com/topic/41654-pre-alpha-03-ubuntu-linux-for-mk802-iii-ug802-mk808-ug007-imito-mx1/page__st__380" target="_blank" rel="noopener">Mali 400的驱动有人正在尝试中…</a></p><p>Picuntu的安装在下一篇文章里介绍。</p>]]></content>
    
    <summary type="html">
    
      &lt;p&gt;&lt;a href=&quot;http://www.cnbeta.com/articles/188613.htm&quot; target=&quot;_blank&quot; rel=&quot;noopener&quot;&gt;去年6月左右&lt;/a&gt;国内厂商（瑞科美 Rikomagic）推出了一款叫做MK802的Mini PC。采用Allwinner A10/ 1GHz Cortex-A8做处理器，运行Android 4.0系统，内存512MB或1G。实际上相当于一个没有触摸屏和电池的平板，不过可以用USB OTG连接鼠标键盘，通过HDMI接口输出音视频。&lt;/p&gt;
&lt;p&gt;“少即是多”，正因为它小，靠外部供电而非电池，有很多扩展的可能性，上市以后很火。到现在淘宝一搜MK802，会出现各种各样厂商（比如酷优乐，联力胜）的也叫做MK802或者UG802,MK803,MK808,MK809的之类的产品。可以给它刷上Linux，然后把它当成一个普通PC使用（因为驱动的原因，用自带的Android可能是更好的选择）。或者，不接显示器，做一个Headless Server？接移动硬盘做一个BT下载机？又或者，加上Arduino，连接上各种传感器，作为机器人的主控制器？总之可以做到很多平板做不到的事情。这里有一个&lt;a href=&quot;http://bluefox.com.tw/2012/11/22/%E5%AE%89%E5%8D%93-android-mini-pc-%E7%B0%A1%E6%98%93%E5%B0%8D%E7%85%A7%E8%A1%A8/#more-2654&quot; target=&quot;_blank&quot; rel=&quot;noopener&quot;&gt;简易对照表&lt;/a&gt;。&lt;/p&gt;
&lt;p&gt;MK802的第一代产品是使用全志A10芯片的，在半年后看来这个芯片性能不够强了，运行桌面Ubuntu不是很流畅，但是它的Android ROM和Linux的支持已经比较完善了。后面有一个MK802 II是它的升级版，改动不大，系统基本也可以通用。&lt;/p&gt;
&lt;p&gt;接下来出现了一个UG802,它不是由原来MK802的厂商瑞科美生产的，而是一个叫做酷优乐的公司。在搜索引擎上搜索“酷优乐”这个词都搜不到这个公司的网站。我是问淘宝客服才知道这个公司的网站的（kuyoule.cn），它是第一个使用RK3066芯片（1.66GHz,双核A9）的Mini PC。然后又出现了一个MK808（不知道是哪个产商的）ROM提升到8G，后来的MK808B增加了蓝牙，改进了WiFi天线（原来的好像WiFi信号不太好）。然后瑞科美才推出MK802 III，同样是使用RK3066芯片，不过个人感觉可能质量和ROM支持好一些。然后就是去年12月份推出的MK802 IIIS了，我买的就是这个。&lt;/p&gt;
&lt;p&gt;&lt;img src=&quot;/images/7f826aef8756ce136c0262bd5a49a17f.jpg&quot; alt&gt;&lt;/p&gt;
&lt;p&gt;&lt;img src=&quot;/images/eccbaf8ff5d4a416e546a1f2e18401b7.jpg&quot; alt&gt;&lt;/p&gt;
    
    </summary>
    
    
      <category term="Linux" scheme="https://www.sun11.me/tags/Linux/"/>
    
      <category term="Android" scheme="https://www.sun11.me/tags/Android/"/>
    
      <category term="Embedded Linux" scheme="https://www.sun11.me/tags/Embedded-Linux/"/>
    
      <category term="Robot" scheme="https://www.sun11.me/tags/Robot/"/>
    
      <category term="Ubuntu" scheme="https://www.sun11.me/tags/Ubuntu/"/>
    
  </entry>
  
  <entry>
    <title>WTFRobot Rosmin</title>
    <link href="https://www.sun11.me/blog/2012/wtfrobot-rosmin/"/>
    <id>https://www.sun11.me/blog/2012/wtfrobot-rosmin/</id>
    <published>2012-12-15T03:27:35.000Z</published>
    <updated>2019-07-20T02:59:45.728Z</updated>
    
    <content type="html"><![CDATA[<div class="video-container"><iframe height="270" width="480" src="http://player.youku.com/embed/XNDg2OTMzNDEy" frameborder="0" allowfullscreen></iframe></div><p>2012年8月，W、T、F三人陆续回到学校。</p><p>因为共同的机器人之梦，这个团队在今年5月份组建。</p><p>首先W同学有了一个想法，觉得可以把ARM11放在小车上，做一些图像处理的工作，然后再连上Arduino控制器控制小车运动，另外用一台Android手机来操控。</p><p>开始考虑用纯Linux加上Qt作为图形界面，用上OpenCV来做。事实上W同学之前因为做过类似的东西对这个已经比较熟悉了。只是由于摄像头驱动以及USB接口只支持1.1的原因，采集摄像头图像的速度非常慢，慢到无法忍受。</p><p> 但是经过多次尝试，发现一款USB摄像头在ARM板厂商的测试程序当中速度很快，效果很理想，问题是厂商并没有开源这个摄像头测试程序的代码，如果要自己做驱动的话就不是一时半会能搞定的了。于是W同学又尝试了把板子刷上Android操作系统，由于有API可以调用，尽管这个程序闭源仍然可以使用。</p><p>于是W同学又从C/C++版本的OpenCV转到Android版本的OpenCV，在Android测试了一下自带的示例程序，发现会花屏。尝试了很多方法都未能解决。后来ARM板的损坏也导致不得不思考新的方案。</p><p>于是就到了8月份。</p><p>F同学由于要做Android客户端程序学习了Android编程。于是想到直接用Android手机代替ARM11开发板，这样会省去很多麻烦。而在这时，Android手机之间的单向socket通信已经基本完成，在解决了一些小问题以后工作很稳定，速度也很快。</p><p>很快，由于F同学曾经有做小车的经验，以及Arduino编程的经验，由Arduino控制的小车耗不费力地就跑了起来。<br>接下来遇到的第一个难题是Arduino与Android的通信。开始买Arduino的时候没有考虑这个问题，但现在需要与Android手机通信，主要有两个办法，蓝牙和USB，我们觉得蓝牙这个东西开关比较麻烦，也可能不够稳定，于是决定直接用USB Accessory，该特性由Android 2.3.4（平板是3.1）以上支持。开始看到很多论坛的帖子说华为中兴的手机不支持，真心捏了一把汗，还好后来证明三个人的手机都是可用的。</p><p>要解决这个问题，F同学查找了很多资料，最终终于完成了Android手机（客户端）传递信息到另一台Android手机（服务器），再由这台服务器传递信息到Arduino控制小车运动。反应很灵敏，效果很不错，非常好的一个玩具遥控车。</p><p>这个时候，bug只是偶尔出现，解决了以后基本就很完美了，工作都非常稳定。</p><p>可是一切才刚刚开始。</p><p>9月份，W研究了众多可用于Android平台上的计算机视觉库，包括OpenCV，SimpleCV，JavaCV以后，最终发现还是OpenCV比较适合，但是由于JNI接口使用觉得过于复杂，没有深入研究下去。于是利用Android上的OpenCV实现了追踪有明显颜色特征的物体（ColorBlob Track）并且绘制出其中心坐标。</p><p>在T同学完成数模一段时间之后，小车的Arduino部分主要转给他负责。买好了舵机，却发现转起来吱吱地响。让舵机云台根据前面所说的图像处理得到的点的位置跟踪目标，经过一个下午调整终于调好了，可舵机已经坏得差不多了，声音很吓人。后来拆开发现里面的齿轮是塑料的！顿时觉得被坑了，180多买来的二自由度舵机云台居然如此劣质！淘宝立刻给差评！后来买了两个20多块的MG995,质量都很好一直用到现在。</p><p>当然这还远远不是结束。接下来我们陆续实现了：</p><ol><li><p>TTS</p></li><li><p>小范围英文离线语音识别</p></li><li><p>Socket双向通信</p></li><li><p>各种代码的分离和整合</p></li></ol><p>F同学开始研究利用Android服务器上的陀螺仪计算角度和客户端的地图绘制。</p><p>借了一个平板过来。。。</p><p><img src="/images/ed79edf141de1d98a5f212396be5c3a8.jpg" alt></p><a id="more"></a><p>然后，设计利用超声波测距检测拐角和使用QR码作为人工路标的导航机制：</p><p><img src="/images/b567f86412ac9a51823976c67d52b27c.jpg" alt></p><p>此图好象是刚刚调通超声波模块，但却不知这是暴风雨前的宁静。</p><p>本以为超声波传感器+Arduino就一切OK了的，可后来发现事情远没有这么简单，因为Arduino Romeo的资源不足，开始认为是定时器不足导致超声波测距和USB Accessory无法使用。可后来尝试了各种方法，这个问题变得越纠结。</p><p>我们于是增加了一个MSP430作为辅助板来控制超声波传感器。调了很多天之后发现还是不可行，最终发现I/O口不足。</p><p>于是我们换用Google ADK。</p><p>可谁知道我们第一次买来的竟然是假货，用了不到24个小时就坏了，后来淘宝退货，立刻买下了另一个原装进口的。这一耽误又是好多天，这个时候星火杯如果按照原计划已经快开始了。</p><p>真假ADK：</p><p><img src="/images/88c8896e89dd13d2092a2cb18ea42480.jpg" alt></p><p>在光棍节那天，我们终于完成了超声波和USB Accessory的共同测试！</p><p><img src="/images/352d794c5728cbe9748f0ce4431ef49f.jpg" alt></p><p>经历了设备大换血之后，下面的一段时间，我们一直在做小车的导航。每天至少几十次的测试。小车跑过了好几百次了吧。还好星火杯也延迟又延迟，否则我们无法有很多时间来改进。</p><p><img src="/images/bb3a855a31c8227a9e786ee8551008cc.jpg" alt></p><p>在前几天，Arduino与Android双向通信问题才完美解决，舵机转动影响陀螺仪的角度问题也基本解决。但在地图绘制方面还有一些不稳定。追踪小球上根据偏离中心距离调整速度，效果好了不少。</p><p>最后来一张Rosmin的笑脸：</p><p><img src="/images/eb075a854a9d6b082b6debca11f4bfcb.jpg" alt></p><p>哈哈，还有牺牲了一个手机壳有时还不得不举着舵机讲电话的T同学。。。</p><p><img src="/images/5084405ab64001d9edb1a2a3e91b192b.jpg" alt></p><p>一切还只是刚刚开始</p><p style="color: #fff;">The Next is Rossum.</p>]]></content>
    
    <summary type="html">
    
      &lt;div class=&quot;video-container&quot;&gt;
&lt;iframe height=&quot;270&quot; width=&quot;480&quot; src=&quot;http://player.youku.com/embed/XNDg2OTMzNDEy&quot; frameborder=&quot;0&quot; allowfullscreen&gt;&lt;/iframe&gt;
&lt;/div&gt;

&lt;p&gt;2012年8月，W、T、F三人陆续回到学校。&lt;/p&gt;
&lt;p&gt;因为共同的机器人之梦，这个团队在今年5月份组建。&lt;/p&gt;
&lt;p&gt;首先W同学有了一个想法，觉得可以把ARM11放在小车上，做一些图像处理的工作，然后再连上Arduino控制器控制小车运动，另外用一台Android手机来操控。&lt;/p&gt;
&lt;p&gt;开始考虑用纯Linux加上Qt作为图形界面，用上OpenCV来做。事实上W同学之前因为做过类似的东西对这个已经比较熟悉了。只是由于摄像头驱动以及USB接口只支持1.1的原因，采集摄像头图像的速度非常慢，慢到无法忍受。&lt;/p&gt;
&lt;p&gt; 但是经过多次尝试，发现一款USB摄像头在ARM板厂商的测试程序当中速度很快，效果很理想，问题是厂商并没有开源这个摄像头测试程序的代码，如果要自己做驱动的话就不是一时半会能搞定的了。于是W同学又尝试了把板子刷上Android操作系统，由于有API可以调用，尽管这个程序闭源仍然可以使用。&lt;/p&gt;
&lt;p&gt;于是W同学又从C/C++版本的OpenCV转到Android版本的OpenCV，在Android测试了一下自带的示例程序，发现会花屏。尝试了很多方法都未能解决。后来ARM板的损坏也导致不得不思考新的方案。&lt;/p&gt;
&lt;p&gt;于是就到了8月份。&lt;/p&gt;
&lt;p&gt;F同学由于要做Android客户端程序学习了Android编程。于是想到直接用Android手机代替ARM11开发板，这样会省去很多麻烦。而在这时，Android手机之间的单向socket通信已经基本完成，在解决了一些小问题以后工作很稳定，速度也很快。&lt;/p&gt;
&lt;p&gt;很快，由于F同学曾经有做小车的经验，以及Arduino编程的经验，由Arduino控制的小车耗不费力地就跑了起来。&lt;br&gt;接下来遇到的第一个难题是Arduino与Android的通信。开始买Arduino的时候没有考虑这个问题，但现在需要与Android手机通信，主要有两个办法，蓝牙和USB，我们觉得蓝牙这个东西开关比较麻烦，也可能不够稳定，于是决定直接用USB Accessory，该特性由Android 2.3.4（平板是3.1）以上支持。开始看到很多论坛的帖子说华为中兴的手机不支持，真心捏了一把汗，还好后来证明三个人的手机都是可用的。&lt;/p&gt;
&lt;p&gt;要解决这个问题，F同学查找了很多资料，最终终于完成了Android手机（客户端）传递信息到另一台Android手机（服务器），再由这台服务器传递信息到Arduino控制小车运动。反应很灵敏，效果很不错，非常好的一个玩具遥控车。&lt;/p&gt;
&lt;p&gt;这个时候，bug只是偶尔出现，解决了以后基本就很完美了，工作都非常稳定。&lt;/p&gt;
&lt;p&gt;可是一切才刚刚开始。&lt;/p&gt;
&lt;p&gt;9月份，W研究了众多可用于Android平台上的计算机视觉库，包括OpenCV，SimpleCV，JavaCV以后，最终发现还是OpenCV比较适合，但是由于JNI接口使用觉得过于复杂，没有深入研究下去。于是利用Android上的OpenCV实现了追踪有明显颜色特征的物体（ColorBlob Track）并且绘制出其中心坐标。&lt;/p&gt;
&lt;p&gt;在T同学完成数模一段时间之后，小车的Arduino部分主要转给他负责。买好了舵机，却发现转起来吱吱地响。让舵机云台根据前面所说的图像处理得到的点的位置跟踪目标，经过一个下午调整终于调好了，可舵机已经坏得差不多了，声音很吓人。后来拆开发现里面的齿轮是塑料的！顿时觉得被坑了，180多买来的二自由度舵机云台居然如此劣质！淘宝立刻给差评！后来买了两个20多块的MG995,质量都很好一直用到现在。&lt;/p&gt;
&lt;p&gt;当然这还远远不是结束。接下来我们陆续实现了：&lt;/p&gt;
&lt;ol&gt;
&lt;li&gt;&lt;p&gt;TTS&lt;/p&gt;
&lt;/li&gt;
&lt;li&gt;&lt;p&gt;小范围英文离线语音识别&lt;/p&gt;
&lt;/li&gt;
&lt;li&gt;&lt;p&gt;Socket双向通信&lt;/p&gt;
&lt;/li&gt;
&lt;li&gt;&lt;p&gt;各种代码的分离和整合&lt;/p&gt;
&lt;/li&gt;
&lt;/ol&gt;
&lt;p&gt;F同学开始研究利用Android服务器上的陀螺仪计算角度和客户端的地图绘制。&lt;/p&gt;
&lt;p&gt;借了一个平板过来。。。&lt;/p&gt;
&lt;p&gt;&lt;img src=&quot;/images/ed79edf141de1d98a5f212396be5c3a8.jpg&quot; alt&gt;&lt;/p&gt;
    
    </summary>
    
    
      <category term="Android" scheme="https://www.sun11.me/tags/Android/"/>
    
      <category term="Robot" scheme="https://www.sun11.me/tags/Robot/"/>
    
  </entry>
  
  <entry>
    <title>Tiny6410的OpenCV2.4.2移植笔记</title>
    <link href="https://www.sun11.me/blog/2012/opencv-242-porting-to-tiny6410/"/>
    <id>https://www.sun11.me/blog/2012/opencv-242-porting-to-tiny6410/</id>
    <published>2012-07-25T09:16:00.000Z</published>
    <updated>2019-07-20T02:59:45.728Z</updated>
    
    <content type="html"><![CDATA[<p>关于OpenCV在ARM上的移植最经典的应该就是这篇：<br><a href="http://blog.csdn.net/noodies/article/details/5798434" target="_blank" rel="noopener">编译OpenCV for arm-linux</a></p><p>去年在什么都不懂的情况下移植的时候也主要是靠这篇文章，写得很详细，如果你觉得还不够详细的话，推荐个带图的:<br><a href="http://blog.csdn.net/yr119111/article/details/7732336" target="_blank" rel="noopener">opencv2.3.1在arm端的移植</a></p><p>这篇写得也不错:<br><a href="http://www.cnblogs.com/s_agapo/archive/2011/11/24/2262346.html" target="_blank" rel="noopener">Linux下移植OpenCV+Qt到ARM(Tiny6410)总结</a></p><p>我的环境是Ubuntu12.04,板子是友善之臂的tiny6410。</p><p>首先当然是装好arm-linux-gcc,配置环境变量，输入arm-linux-gcc -v有输出，这步就完成了。<br>然后是cmake,比较方便的是用带界面的cmake-gui,要注意的地方是<strong>CMAKE_INSTALL_PREFIX</strong>和<strong>WITH_TIFF</strong>还有<strong>CMAKE_EXE_LINKER_FLAGS</strong>。</p><p>第一个参数需要注意是因为我们编译的库是适用于ARM的，不应该直接放在/usr/local里，否则如果装了x86的OpenCV会有冲突，比如改成/usr/local/opencv-arm。第二个参数一般情况下需要去掉勾，因为似乎默认情况下ubuntu是没有这个支持的，要选上得自己装些什么东西。第三个参数是因为OpenCV需要这两个库的支持？我现在也还不太明白，总之加上-lrt和-lpthread就不会报错了。其它参数保持原状基本都不会报错。</p><p>cmake好后下一步是make,对于双核的机器加上-j4参数速度会快很多，但是也发烫，在系统监视器里看到四个线程的CPU都是接近100%,风扇一直呼呼地响。</p><p>然后是配置编译环境了，好像在2.3以后OpenCV的x86版安装好后都会有pkgconfig的.pc文件。//2.3以前的版本不清楚</p><p>所以比较方便的就是用pkgconfig来配置了，它的.pc文件是在/usr/local/lib/pkgconfig下面。这是适用于PC版本的OpenCV的（因为之前已经安装好了x86的OpenCV）。但是只要把那第一行的prefix路径改成ARM版OpenCV的安装路径（也就是上面CMAKE_INSTALL_PREFIX参数的值）就可以直接用了。<a href="http://blog.csdn.net/yr119111/article/details/7732336" target="_blank" rel="noopener">opencv2.3.1在arm端的移植</a>这篇帖子说再Libs里要加上-lrt -lpthread参数，我的环境下似乎不需要，但是加上也没什么问题。</p><p>这样配置好后，arm-linux-gcc编译的时候加上参数`pkg-config —cflags —libs opencv-arm`就行了,比如arm-linux-gcc `pkg-config —cflags —libs opencv-arm` test.c -o test。//在这个情况下.pc文件名是opencv-arm，注意是两个反引号。<br>我用的主要是Qt，所以在.pro文件里加上：</p><pre><code>    unix {        CONFIG += link_pkgconfig        PKGCONFIG += /usr/local/lib/pkgconfig/opencv-arm.pc    }</code></pre><p>但是编译成功后可能会显示一些警告，比如：</p><pre><code>    ../../lib/libopencv_core.so, needed by /usr/local/opencv-arm/lib/libopencv_highgui.so, not found (try using -rpath or -rpath-link)</code></pre><a id="more"></a><p>这个警告在我的情况下只要把opencv-arm/lib里的.so文件全部放到/opt/FriendlyARM/toolschain/4.5.1/arm-none-linux-gnueabi/sys-root/lib下面就可以解决，但事实上不管这条警告也不会出什么问题，不会影响到程序的运行。//去年移植的时候就一直没管</p><p>但是耗费我四天的根本就不是这些问题有木有啊！我要开始吐槽了有木有啊！</p><p>首先要吐槽一下u盘，有个以前编译好的程序放在u盘上一直不能运行，报错</p><pre><code>    ../../lib/libopencv_core.so, needed by /usr/local/opencv-arm/lib/libopencv_highgui.so, not found (try using -rpath or -rpath-link)</code></pre><p>和编译时那个警告一样，害得我以为是那个警告必须解决掉。后来折腾了好久发现只要把程序拷到板子的存储介质上就直接能运行了！尼玛啊是文件系统还是权限的神马问题啊！于是我就换成用nfs挂载了。</p><p>现在去年编译的那个程序是能运行了，可是新编译的程序都不能和OpenCV库连上，也是报相同的错，好吧，我试过把.so文件放在/lib下，放在/usr/local/opencv-arm/lib下，两个都放，甚至还试过新建好多个文件夹，放在/opt/FriendlyARM/toolschain/4.5.1/arm-none-linux-gnueabi/sys-root/lib下，结果都一样！只有老的程序能运行，新编译的都不行。后来脑袋终于开窍了，既然老程序可以运行，说明我移植的OpenCV库没有问题。于是我尝试直接用armm-linux-gcc编译了一个简单的程序，发现运行正常？！然后不知什么想法让我把新编译的程序拷贝到/mnt下，也就是nfs挂载的那个目录，神奇的事情发生了，它正常运行了！！！</p><p>那么，这究竟是什么原理呢？我到现在还没搞明白。nfs挂载以后，所有挂载的文件都相当于自己原本文件系统里的文件么？还是有权限什么的问题呢？</p>]]></content>
    
    <summary type="html">
    
      &lt;p&gt;关于OpenCV在ARM上的移植最经典的应该就是这篇：&lt;br&gt;&lt;a href=&quot;http://blog.csdn.net/noodies/article/details/5798434&quot; target=&quot;_blank&quot; rel=&quot;noopener&quot;&gt;编译OpenCV for arm-linux&lt;/a&gt;&lt;/p&gt;
&lt;p&gt;去年在什么都不懂的情况下移植的时候也主要是靠这篇文章，写得很详细，如果你觉得还不够详细的话，推荐个带图的:&lt;br&gt;&lt;a href=&quot;http://blog.csdn.net/yr119111/article/details/7732336&quot; target=&quot;_blank&quot; rel=&quot;noopener&quot;&gt;opencv2.3.1在arm端的移植&lt;/a&gt;&lt;/p&gt;
&lt;p&gt;这篇写得也不错:&lt;br&gt;&lt;a href=&quot;http://www.cnblogs.com/s_agapo/archive/2011/11/24/2262346.html&quot; target=&quot;_blank&quot; rel=&quot;noopener&quot;&gt;Linux下移植OpenCV+Qt到ARM(Tiny6410)总结&lt;/a&gt;&lt;/p&gt;
&lt;p&gt;我的环境是Ubuntu12.04,板子是友善之臂的tiny6410。&lt;/p&gt;
&lt;p&gt;首先当然是装好arm-linux-gcc,配置环境变量，输入arm-linux-gcc -v有输出，这步就完成了。&lt;br&gt;然后是cmake,比较方便的是用带界面的cmake-gui,要注意的地方是&lt;strong&gt;CMAKE_INSTALL_PREFIX&lt;/strong&gt;和&lt;strong&gt;WITH_TIFF&lt;/strong&gt;还有&lt;strong&gt;CMAKE_EXE_LINKER_FLAGS&lt;/strong&gt;。&lt;/p&gt;
&lt;p&gt;第一个参数需要注意是因为我们编译的库是适用于ARM的，不应该直接放在/usr/local里，否则如果装了x86的OpenCV会有冲突，比如改成/usr/local/opencv-arm。第二个参数一般情况下需要去掉勾，因为似乎默认情况下ubuntu是没有这个支持的，要选上得自己装些什么东西。第三个参数是因为OpenCV需要这两个库的支持？我现在也还不太明白，总之加上-lrt和-lpthread就不会报错了。其它参数保持原状基本都不会报错。&lt;/p&gt;
&lt;p&gt;cmake好后下一步是make,对于双核的机器加上-j4参数速度会快很多，但是也发烫，在系统监视器里看到四个线程的CPU都是接近100%,风扇一直呼呼地响。&lt;/p&gt;
&lt;p&gt;然后是配置编译环境了，好像在2.3以后OpenCV的x86版安装好后都会有pkgconfig的.pc文件。//2.3以前的版本不清楚&lt;/p&gt;
&lt;p&gt;所以比较方便的就是用pkgconfig来配置了，它的.pc文件是在/usr/local/lib/pkgconfig下面。这是适用于PC版本的OpenCV的（因为之前已经安装好了x86的OpenCV）。但是只要把那第一行的prefix路径改成ARM版OpenCV的安装路径（也就是上面CMAKE_INSTALL_PREFIX参数的值）就可以直接用了。&lt;a href=&quot;http://blog.csdn.net/yr119111/article/details/7732336&quot; target=&quot;_blank&quot; rel=&quot;noopener&quot;&gt;opencv2.3.1在arm端的移植&lt;/a&gt;这篇帖子说再Libs里要加上-lrt -lpthread参数，我的环境下似乎不需要，但是加上也没什么问题。&lt;/p&gt;
&lt;p&gt;这样配置好后，arm-linux-gcc编译的时候加上参数`pkg-config —cflags —libs opencv-arm`就行了,比如arm-linux-gcc `pkg-config —cflags —libs opencv-arm` test.c -o test。//在这个情况下.pc文件名是opencv-arm，注意是两个反引号。&lt;br&gt;我用的主要是Qt，所以在.pro文件里加上：&lt;/p&gt;
&lt;pre&gt;&lt;code&gt;    unix {
        CONFIG += link_pkgconfig
        PKGCONFIG += /usr/local/lib/pkgconfig/opencv-arm.pc
    }
&lt;/code&gt;&lt;/pre&gt;&lt;p&gt;但是编译成功后可能会显示一些警告，比如：&lt;/p&gt;
&lt;pre&gt;&lt;code&gt;    ../../lib/libopencv_core.so, needed by /usr/local/opencv-arm/lib/libopencv_highgui.so, not found (try using -rpath or -rpath-link)
&lt;/code&gt;&lt;/pre&gt;
    
    </summary>
    
    
      <category term="OpenCV" scheme="https://www.sun11.me/tags/OpenCV/"/>
    
      <category term="Embedded Linux" scheme="https://www.sun11.me/tags/Embedded-Linux/"/>
    
  </entry>
  
  <entry>
    <title>西电技物论坛</title>
    <link href="https://www.sun11.me/blog/2012/xdjw-forum/"/>
    <id>https://www.sun11.me/blog/2012/xdjw-forum/</id>
    <published>2012-02-20T16:00:00.000Z</published>
    <updated>2019-07-20T02:59:45.728Z</updated>
    
    <content type="html"><![CDATA[<p>经过路由器和网关的两层端口映射和两个防火墙端口的开启，CentOS 6.2 + Apache + vsftpd 的小型论坛总算基本建好了。</p><p><del>地址是<a href="http://210.27.10.208/" target="_blank" rel="noopener">http://210.27.10.208/</a>,仅供西电校内访问。</del></p><p>现在校内外均可访问<a href="http://f120.tk/" target="_blank" rel="noopener">http://f120.tk/</a>，ftp服务只有校内可以访问。</p><p>这可折腾了好久时间。我想我把路由器，网关之类的概念算是理解透了。</p><p>碰到各种各样的问题，linux的用户权限，防火墙，端口映射，配置文件…</p><p>还好最后都一一解决了。</p><p>采用wordpress做模板，用了v2press主题，于是它就变身论坛。</p>]]></content>
    
    <summary type="html">


        &lt;p&gt;经过路由器和网关的两层端口映射和两个防火墙端口的开启，CentOS 6.2 + Apache + vsftpd 的小型论坛总算基本建好了。&lt;/p&gt;
&lt;p&gt;&lt;del&gt;地址是&lt;a href=&quot;http://210.27.10.208/&quot; target=&quot;_blank&quot; rel=
      
    
    </summary>
    
    
      <category term="Web" scheme="https://www.sun11.me/tags/Web/"/>
    
  </entry>
  
  <entry>
    <title>TL-WR703n挂载USB摄像头</title>
    <link href="https://www.sun11.me/blog/2012/tl-wr703n-usb-camera/"/>
    <id>https://www.sun11.me/blog/2012/tl-wr703n-usb-camera/</id>
    <published>2012-01-06T16:00:00.000Z</published>
    <updated>2019-07-20T02:59:45.727Z</updated>
    
    <content type="html"><![CDATA[<p>首先刷OpenWrt,我用的是<a href="http://www.right.com.cn/forum/thread-71042-1-2.html" target="_blank" rel="noopener">这个帖子</a>里的<a href="http://ishare.iask.sina.com.cn/f/22200677.html&quot; href=&quot;http://ishare.iask.sina.com.cn/f/22200677.html" target="_blank" rel="noopener">这个版本</a>，由于路由器容量较小，一定要先搞定U盘挂载，把安装ipk软件装在u盘上，否则没装几个软件路由器就空间不足了。</p><p>我是按<a href="http://www.unxmail.com/read.php?187&quot; href=&quot;http://www.unxmail.com/read.php?187" target="_blank" rel="noopener">这个帖子</a>来操作的，把u盘分成两个区，一个ext3格式（据说比较稳定？），一个ext4格式。按照帖子成功挂载以后点开luci的System里的Software，发现空间已经是u盘那个指定分区的空间了，啊哈，想装啥就装啥。</p><p>接下来就是摄像头了。由于路由器只有一个usb口，所以得用hub。（废话）</p><p>我看到了<a href="http://www.openwrt.org.cn/bbs/forum.php?mod=viewthread&amp;tid=6105&amp;extra=&amp;page=1" target="_blank" rel="noopener">这个帖子</a>,软件源是不用改的，所以直接：</p><pre><code>opkg updateopkg install usbutils</code></pre><p>由于我的摄像头是杂牌的，芯片貌似不是301的，所以这跟多数人用的301方案不同。</p><p>首先在win7的设备管理器查到了我的摄像头的设备信息，搜到了型号。发现和帖子里的芯片型号一样，大喜呀。</p><p>然后我装了kmod-video-gspca-zc3xx（可能不用装的）和kmod-video-uvc。</p><p>结果竟然很快成功了。</p><a id="more"></a><p>接下来是：</p><pre><code>opkg install mjpg-streamer</code></pre><p>是’-‘不是’_’，和帖子里的不一样，因为跟那个帖子的软件源不同。</p><p>然后仍然按那个帖子把网页文件上传上去，输入命令：</p><pre><code>mjpg_streamer -i &quot;input_uvc.so -y -d /dev/video0&quot; -o &quot;output_http.so -p 8080 -w /www/camwww&quot;</code></pre><p>就可以在 <code>http://192.168.0.1:8080/?action=stream</code> 看到视频了。</p><p>我把画质调到了30,显示速度还可以。</p><p><img src="/images/54539106a4e5c87797caf47aa5676976.png" alt></p><p>关于输入配置参数：</p><pre><code>-y 是关键，默认启动是mjpeg格式，这个就报错。改成YUV格式-d 指定设备-f 制定帧数，默认30帧-r 指定视频大小，如320×240-q 指定画质，默认80</code></pre><p>关于输出参数：</p><pre><code>-p 指定端口，这里是8080-w 指定网页目录，这里我们设置的是/www/camwww目录-c 设置通过密码访问</code></pre><p>（注：眼下正值考试之际，无力详细写此教程，关于建立两个wifi，一个连接可以上网的wifi热点，一个作为接入点的部分没写，就忽略了吧。）</p>]]></content>
    
    <summary type="html">
    
      &lt;p&gt;首先刷OpenWrt,我用的是&lt;a href=&quot;http://www.right.com.cn/forum/thread-71042-1-2.html&quot; target=&quot;_blank&quot; rel=&quot;noopener&quot;&gt;这个帖子&lt;/a&gt;里的&lt;a href=&quot;http://ishare.iask.sina.com.cn/f/22200677.html&amp;quot; href=&amp;quot;http://ishare.iask.sina.com.cn/f/22200677.html&quot; target=&quot;_blank&quot; rel=&quot;noopener&quot;&gt;这个版本&lt;/a&gt;，由于路由器容量较小，一定要先搞定U盘挂载，把安装ipk软件装在u盘上，否则没装几个软件路由器就空间不足了。&lt;/p&gt;
&lt;p&gt;我是按&lt;a href=&quot;http://www.unxmail.com/read.php?187&amp;quot; href=&amp;quot;http://www.unxmail.com/read.php?187&quot; target=&quot;_blank&quot; rel=&quot;noopener&quot;&gt;这个帖子&lt;/a&gt;来操作的，把u盘分成两个区，一个ext3格式（据说比较稳定？），一个ext4格式。按照帖子成功挂载以后点开luci的System里的Software，发现空间已经是u盘那个指定分区的空间了，啊哈，想装啥就装啥。&lt;/p&gt;
&lt;p&gt;接下来就是摄像头了。由于路由器只有一个usb口，所以得用hub。（废话）&lt;/p&gt;
&lt;p&gt;我看到了&lt;a href=&quot;http://www.openwrt.org.cn/bbs/forum.php?mod=viewthread&amp;amp;tid=6105&amp;amp;extra=&amp;amp;page=1&quot; target=&quot;_blank&quot; rel=&quot;noopener&quot;&gt;这个帖子&lt;/a&gt;,软件源是不用改的，所以直接：&lt;/p&gt;
&lt;pre&gt;&lt;code&gt;opkg update

opkg install usbutils
&lt;/code&gt;&lt;/pre&gt;&lt;p&gt;由于我的摄像头是杂牌的，芯片貌似不是301的，所以这跟多数人用的301方案不同。&lt;/p&gt;
&lt;p&gt;首先在win7的设备管理器查到了我的摄像头的设备信息，搜到了型号。发现和帖子里的芯片型号一样，大喜呀。&lt;/p&gt;
&lt;p&gt;然后我装了kmod-video-gspca-zc3xx（可能不用装的）和kmod-video-uvc。&lt;/p&gt;
&lt;p&gt;结果竟然很快成功了。&lt;/p&gt;
    
    </summary>
    
    
      <category term="Linux" scheme="https://www.sun11.me/tags/Linux/"/>
    
      <category term="OpenWrt" scheme="https://www.sun11.me/tags/OpenWrt/"/>
    
  </entry>
  
  <entry>
    <title>一个Quick and Dirty的记事本程序</title>
    <link href="https://www.sun11.me/blog/2011/quick-dirty-text-writer/"/>
    <id>https://www.sun11.me/blog/2011/quick-dirty-text-writer/</id>
    <published>2011-08-20T16:00:00.000Z</published>
    <updated>2019-07-20T02:59:45.728Z</updated>
    
    <content type="html"><![CDATA[<p>最近在学QT编程，总算是能做出一个图形界面程序了。</p><p>我用的书是《C++ GUI Qt 4 编程（第二版）》(C++ GUI Programming with Qt4,Second Edition)。书上给我的第一个有主窗口的完整应用程序的例子是一个电子表格程序，那叫一个复杂啊…虽然说基本把QT库的基本内容展现出来了，可是我实在消化不了那么多东西，而且涉及到表格，太过具体，这些比较细节的东西以后未必用的上。</p><p>所以我不打算完整的学下来，转而做一个简单的记事本程序。</p><p>这个程序有基本的标题栏，菜单栏，状态栏…</p><p>只是工具栏被我删掉了，感觉跟菜单栏比较类似，也懒得去做图标…</p><p>我找了一下网上的教程，有直接用Qt Designer图形界面操作的，但太傻瓜化，有些功能还实现不了。还有就是书上的例子，纯代码…而我是要做一个有基本界面还可以打开和保存文件，有剪切复制粘贴功能的记事本，用Qt Designer设计UI，然后再写一些代码。</p><p>所以参考了一个QT官网上的一个教程和书里的制作电子表格的示例程序，做了一个Quick and Dirty的记事本程序。</p><p>之所以Dirty，是因为它甚至还不支持中文！（勿喷，勿喷，写入文件是用一个叫做QTextStream的类弄的，我什么都不知道…）</p><p>同是C++初学者的我，压根搞不清状况。那么多乱七八糟的类和对象。问题是Qt Designer设计的ui对象我搞不懂怎么用代码操作，书上它是纯代码的也没讲。</p><p>后来还是QtCreator这个给力的IDE好使啊，打出ui，再按点号，自动将点号转成”-&gt;”，然后用特殊方式显示“ui”，这是说，它找到了这个对象，原来这个对象就叫ui…查了一下前面的定义，大体上看懂了。。。</p><p>把窗体初始化以后，然后就是各种信号和槽的连接…各种QT的类，揣摩各种语法规则(本人比较懒，不想查书…)，Google各种error…在这个过程中，总算是了解了基本的QT编程。</p><p>最开心的事情：setShortcut(QKeySequence::XXX)是在各种操作系统上的万能钥匙啊，什么快捷键，系统给你，不用写，哈哈～</p><p>代码在<a href="https://github.com/sun11/QTGUI_Writer" target="_blank" rel="noopener">https://github.com/sun11/QTGUI_Writer</a></p>]]></content>
    
    <summary type="html">


        &lt;p&gt;最近在学QT编程，总算是能做出一个图形界面程序了。&lt;/p&gt;
&lt;p&gt;我用的书是《C++ GUI Qt 4 编程（第二版）》(C++ GUI Programming with Qt4,Second Edition)。书上给我的第一个有主窗口的完整应用程序的例子是一个电子表格程序
      
    
    </summary>
    
    
      <category term="Qt" scheme="https://www.sun11.me/tags/Qt/"/>
    
  </entry>
  
  <entry>
    <title>Hello World</title>
    <link href="https://www.sun11.me/blog/2011/hello-world/"/>
    <id>https://www.sun11.me/blog/2011/hello-world/</id>
    <published>2011-06-25T16:00:00.000Z</published>
    <updated>2019-07-20T02:59:45.726Z</updated>
    
    <content type="html"><![CDATA[<p><strong>Hello World!</strong></p>]]></content>
    
    <summary type="html">


        &lt;p&gt;&lt;strong&gt;Hello World!&lt;/strong&gt;&lt;/p&gt;


    </summary>
    
    
  </entry>
  
</feed>